Table of Contents
Advertisement
Quick Links
Advertisement
Table of Contents

Related Manuals for Voltask SS-20A


Summary of Contents for Voltask SS-20A
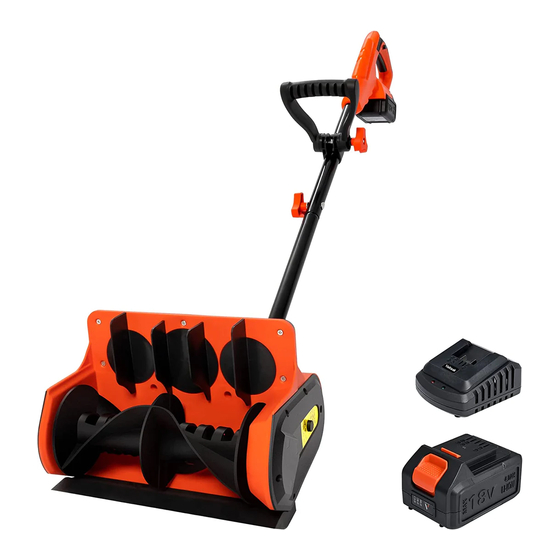
- Page 1 18V/11-INCH Cordless Snow Shovel SS-20A...
- Page 2 Thank you for purchasing our Voltask 18V Cordless Snow Shovel. This snow shovel has been engineered and manufactured to meet Voltask's high standards in product reliability, ease of use and safety. When properly used, it will give you years of powerful trouble-free performance.
-
Page 3: Table Of Contents
CONTENTS INTRODUCTION PACKAGE CONTENTS SYMBOLS GENERAL SAFETY INSTRUCTIONS KNOW YOUR CORDLESS SNOW SHOVEL PRODUCT OVERVIEW TECHNICAL SPECIFICATIONS BATTERY PACK OPERATION BATTERY CHARGE LEVEL INDICATOR ASSEMBLY OPERATION ADJUSTMENT ANGLE OPERATING TIPS MAINTENANCE AND STORAGE TROUBLESHOOTING WARRANTY... -
Page 4: Introduction
INTRODUCTION -This power tool may only be used with the accessory parts listed under accessories. -This product is not intended for commercial use, Generally acknowledged accident prevention regulations and endorsed safety instructions must be observed. -Only perform work described in these instructions for use. Any other use is improper. -The manufacturer will not assume responsibility for damage resulting from such use. -
Page 5: Symbols
SYMBOLS DANGER! Direct danger to life and risk of injury! Directly dangerous situation that may lead to death or severe injuries. WARNING! Probable danger to life and risk of injury! Generally dangerous situation that may lead to death or severe injuries. CAUTIONI Possible risk of injury! Dangerous situation that may lead to injuries. -
Page 6: General Safety Instructions
GENERAL SAFETY INSTRUCTIONS IMPORTANT! All Operators Must Read These Instructions Before Use Read all instructions before using this cordless snow shovel. Basic safety precautions should always be followed to reduce the risk of fire, electric shock and personal injury. General Safety WARNINGS! ●... - Page 7 This is the safety alert symbol. It is used to alert you to potential personal injury hazards. Obey all safety messages that follow this symbol to avoid possible injury or death. Improperly using or maintaining this cordless snow shovel could result in injury or death. To reduce this potential, comply with the following safety instructions.
- Page 8 ● Never direct the discharge toward people or areas where property damage can occur. Keep children, pets and other bystanders away from the work area. ● Do not overload the machine capacity by attempting to clear snow at too fast a rate. ●...
- Page 9 Keep foot way from the moving parts of the snow thrower. The rotating parts will hurt you. To reduce the risk of electric shock, disconnect from supply mains and replace damaged cord immediately. Do not use hands to unclog the chute. Wear safety goggles and ear protectors.
-
Page 10: Know Your Cordless Snow Shovel
KNOW YOUR CORDLESS SNOW SHOVEL Read the owner’s manual and safety rules carefully before operating your cordless snow shovel. Compare the illustration below to the actual unit in order to familiarize yourself with the location of the various controls and adjustments. -
Page 11: Technical Specifications
TECHNICAL SPECIFICATIONS Rated Voltage 18V / 20V Max Battery Capacity 4.0 Ah Rotation Speed 2500 rpm Battery Charge Time Max 2 Hours 20 mins Battery Run Time Max 35 mins Clearing width 11 in (280 mm) Motor 20V 775 Motor Maximum clearing depth 6 in (150 mm) Max throwing Distance... -
Page 12: Battery Pack Operation
BATTERY PACK OPERATION The equipment is powered by a lithium-ion battery. The battery pack is completely sealed and maintenance-free WARNING! Before first use, the battery requires at least 2 hrs 20 mins charge time to be fully charged. When the battery is at low capacity, recharge for 2 hrs 20 mins again before resuming operation. BATTERY CHARGE LEVEL INDICATOR The battery pack is equipped with a push-button for checking the charge level. -
Page 13: Assembly
ASSEMBLY Connecting the tube 1. Slide the upper tube into the lower upper assembly. Align the screw holes (Fig. 2). 2. Line up holes on each tube, and make sure that the internal cable (A) does not pass the mounting holes. 3. - Page 14 Charging the Battery 1. Press the push lock buttons on the battery to pull the battery pack out of the equipment(Fig.4) Fig. 4 Checking the Chain Brake 2. Check that the mains voltage is the same as that marked on the rating plate of the battery charger. Then, insert the charger's plug into the electrical wall outlet.
- Page 15 5. If the light indicators do not come on at all, check that the battery pack is fully seated into the bay. Remove the battery pack and reinsert. If the problem persists, please contact Voltask for support and service. 6. When charging is complete, remove the battery from the charger by pressing the push lock button and sliding the battery backward to unlock it from the charger.
-
Page 16: Operation
OPERATION WARNING! Keep the area to be cleared free of stones, toys or other foreign objects that the rotor blades might pick up and throw. Such items could be covered by snow and are easy to overlook, so be sure to conduct a thorough inspection of the area before beginning work. - Page 17 Handle Adjustment To adjust the angle of the auxiliary handle, follow the instructions below: 1. Stop the machine and remove the battery. Wait until the blade comes to a completely stop. 2. Loosen the auxiliary handle by turning the handle knob counterclockwise. Rotate the auxiliary handle to a comfortable position.
-
Page 18: Adjustment Angle
ADJUSTMENT ANGLE WARNING! Don’t adjust the angle when the machine is running. If you want to adjust the angle. Please stop the machine. When you adjust the angle, please check the picture below. Fig. 12 If you adjust the knob directly to the right, the snow guider plate will turn left. If you want to adjust the snow guilder plate to the other direction, please adjust the knob to the left. -
Page 19: Operating Tips
OPERATING TIPS 1. Start the cordless snow shovel. Push the shovel forward at a comfortable rate, yet slow enough to clear the path completely. The clearing width of the snow shovel and the depth of snowfall should dictate your forward speed. - Page 20 Scraper Replacement IMPORTANT! Always remove the battery from the tool before performing any maintenance on it. 1. Place the snow shovel on the ground or on a workbench. Position the snow shovel so that the impeller is facing up. 2. Remove the screws that are located beneath the impeller that secures the scraper to the housing using a screwdriver.
-
Page 21: Troubleshooting
• Battery may require service or • Contact customer service: replacement. support@voltask.com, or replace battery. • The motor is on but the • The belt is damaged. • Replace the belt. rotor does not turn. -
Page 22: Warranty
3-year limited warranty on Voltask equipment. Voltask warrants to the original owner that each new product and service part is free from defects in materials and workmanship. Voltask agrees to repair or replace any defective product or part for the warranty period as stated above from the original date of purchase, except for the conditions and circumstances listed below: 1. - Page 23 Webside: www.voltask.com Email: support@voltask.com FB: @voltasktools IG: @voltasktools...
Need help?
Do you have a question about the SS-20A and is the answer not in the manual?
Questions and answers