Table of Contents
Advertisement
Quick Links
Advertisement
Table of Contents

Subscribe to Our Youtube Channel
Related Manuals for Line Magnetic LM-210IA


Summary of Contents for Line Magnetic LM-210IA
- Page 1 INTEGRATED VACUUM TUBE AMPLIFIER LM-210IA...
-
Page 2: Table Of Contents
Table of Contents Thanks for choosing our Line Magnetic LM-210IA Integrated Amplifier as an important part of your music system and please read the manual carefully before installation and operation. In order to prevent damage during transportation the amplifier is packed with protective foams surrounding the tubes. -
Page 3: Package Contents
Package Contents Please carefully check the package first and then open the package. Package contents include: 1. Line Magnetic LM-210IA 2. Main Fuses 3. Power cord 4. Remote control 5. 1.5V Batteries(AAA) 6. User’s Manual Note:All other parts except above are not included. -
Page 4: Specification
Storage Condition: Temperature: -20℃~70℃ Moisture: 20%~90% Note : Line Magnetic Audio reserves the right to change specifications at any time without further notice in advance if products are upgraded. Specifications on the manual only show the specifications of the amplifier you bought. -
Page 5: Connection
Too low or too high voltage may cause problem or reduce its life. Connection Audio Connection Here is the standard way of connection for LM-210IA with other audio equipments. Please take pictures below for your reference: Suggestions: 1.During installation please always refer to other products’... - Page 6 Connection Speaker Connection Check the impedance of your speakers. Attach the positive from your speaker to the 4, 8 or 16 ohm terminals and the negative to the 0 ohm terminals separately. 4 ohm, 8 ohm or 16 ohm impedance speakers are preferential and if your speakers are 6 ohm it would not cause damage to the amplifier and experience using 4, 8, or 16 ohm positive terminal to find what the best is for your speakers.
-
Page 7: Functions Description
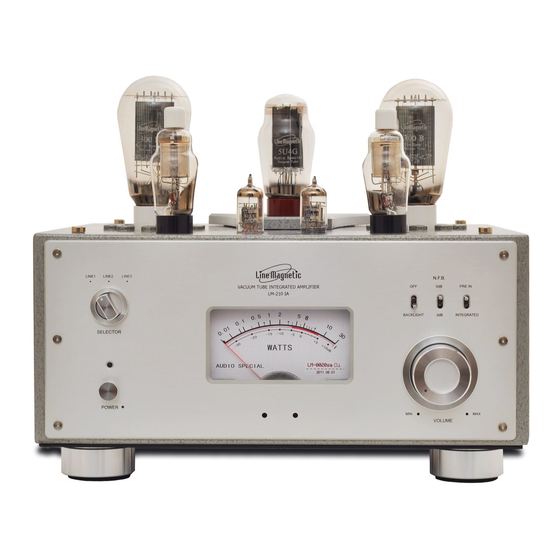
Functions Description Overview from the top: Hum Adjustment V1 Hum Adjustment V2 V1, V2: 300B Power Tube V3, V4: 310A Driver Tube V5, V6: 12AX7 Input Tube V7, V8: 5U4G Rectifier Tube Note: 1. Be careful of the high temperature of the tubes during operation. 2. - Page 8 Functions Description Front Panel: Function Switches Input Selector Output Level Meter Remote Receiver Volume Knob LM-0020sa 2011.08.01 Mute Indicator Power Switch Power LED Holes for restoring the Meter pointer to Zero. Function Switches: Backlight Switch: Integrated/PRE-IN Switch ON/OFF NFB Switch: MAX/MIN Rear Panel: Power Socket with main fuse:...
-
Page 9: Turning On
Turning ON Precautions: Connection of the power cord: Connect the speaker cables and signal cables first and then plug the power cord into the power socket. Before turning on the amplifier please make sure all connections are right and power supply is stable. Connect to AC ~120V/230V/240V 5% (50Hz/60Hz)... -
Page 10: Remote Control
Remote Control Description Volume Mute VOLUME UP/VOLUME DOWN MUTE REMOTE CONTROL UNIT LM-02 Installation and replacement of the batteries: Installation: 1. Remove the screws of the remotes backcover. 2. Insert two AAA batteries , please check the indicators giving for the correct positioning. 3. -
Page 11: Tube Replacement
Zhuhai Line Magnetic Audio Co., LTD or an authorized Line Magnetic Audio Representative. -
Page 12: Troubleshooting
NO reaction to the remote Obstacle is located between the Remove the obstacle remote and the amplifier Line Magnetic logo is registered trademark of Zhuhai Line Magnetic Audio Co., LTD. Copyright of Zhuhai Line Magnetic Audio Co., LTD. All Rights Reserved.
Need help?
Do you have a question about the LM-210IA and is the answer not in the manual?
Questions and answers