Table of Contents
Advertisement
Advertisement
Table of Contents

Related Manuals for C-lock GreenFeed

Summary of Contents for C-lock GreenFeed
-
Page 2: Table Of Contents
Protecting GreenFeed Powering On GreenFeed Powering Off GreenFeed Control Feed Mobile App Scanning for Systems Controlling GreenFeed Connecting GreenFeed to a Different WiFi Network Calibrating GreenFeed Standard Calibrations Recovery Maintenance Cleaning the Head Position Sensor Replacing and Cleaning the Air Filter... - Page 3 Storing GreenFeed Secondary Sample Filter Controlling GreenFeed Data Flow GreenFeed GUI Control InterfaceTM Instrument Specifications...
-
Page 4: Introduction
), and water-vapor. GreenFeed is an important tool for research scientists as well as for those responsible for the husbandry of animals, especially ruminants, because it provides new data that allows scientists and producers to monitor trace gas emissions with a high time-resolution in near-real time, remotely from a large number of individual animals in a cost-effective and non-intrusive way. - Page 5 The aerodynamics of the feeder have also been designed to capture as much of the emitted gas from the animal as possible under a wide range of environmental conditions. C-Lock has found that even in 55 km/hour head-on winds, it is possible to capture approximately 70% of the animal’s breath into the sample...
- Page 6 CO Data Obtained from the GreenFeed System As GreenFeed is used in the field, and data is collected, new potential uses of the data are even still being discovered. For example, as highlighted in Figure 2, an animal enters the feeder and does not immediately eructate.
- Page 7 Figure 2) Example Data from GreenFeed System, Methane Production, by Source The GreenFeed system has also been designed so that each animal can be fed a specific amount of food supplement in a specific time period. In addition, with multiple feeders, specific animals could be allowed to eat at one feeder and others at a different feeder with different feed types.
-
Page 8: Greenfeed Component Layout
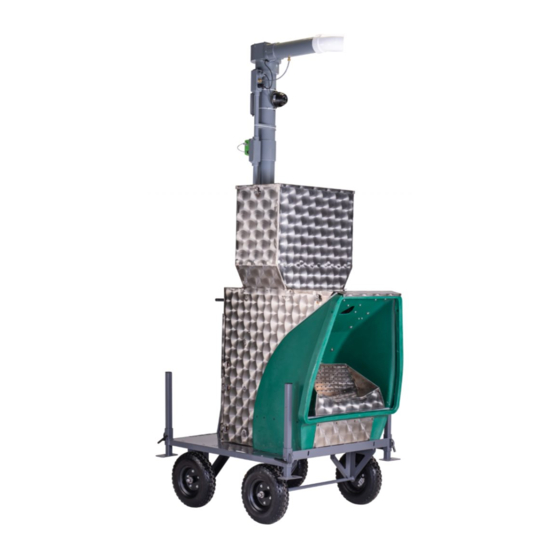
1.2. GreenFeed Component Layout Figure 3 shows the layout of GreenFeed, including the essential components. Note the path of the animal’s emissions: 1) From the animal muzzle, the air is collected through the feeding dish up through the primary air filter - where debris and large particles are removed... -
Page 9: Assembling Greenfeed
2) Preventing animals from gathering around the system, which will also increase the background concentrations. 3) Allowing only one animal to visit GreenFeed at a time. This requires the use of alleyways to prevent multiple animals from fitting into the feed area at once. -
Page 10: Anchoring Greenfeed
1) Using rebar or lead-anchors to secure it firmly to the ground. 2) Using alleyways, fencing, or walls in conjunction with chains or cables to secure the system. In a Pasture Trailer, the weight of the trailer will be enough to secure GreenFeed. -
Page 11: Setting Up Alleyways
Figure 5) Free-Stall Cart Holes for Securing GreenFeed 2.3. Setting Up Alleyways Alleyways are crucial for GreenFeed to ensure that only one animal can access the system at a time. If multiple animals are present, the system cannot separate the emissions and attribute them to each animal. -
Page 12: Protecting Greenfeed
2.4. Protecting GreenFeed Although GreenFeed is built to withstand animal use, this only applies to the front of the system. Animal access to the back of the system must be prevented. In most free-stall scenarios, this requires a sturdy barrier around the back of the system, preventing the... -
Page 13: Powering On Greenfeed
To power off the system, please follow the steps in Section 3.2 part 6b (turn the system off). Once the system is commanded to shut off, please wait 30 seconds before unplugging the power. This will allow enough time for GreenFeed to save its data and full power down. -
Page 14: Control Feed Mobile App
Control Feed in your respective app store, or scan the QR code below. Apple App Store Google Play Store https://apps.apple.com/us/app/control-feed/id1524038899 https://play.google.com/store/apps/details?id=com.controlfeed Please note, the Control Feed app will only work within 20 meters of a GreenFeed system. It is not guaranteed that feeders farther than 20 meters will respond correctly. -
Page 15: Scanning For Systems
Figure 8) Scanning and Connecting to a System using Control Feed 3.2. Controlling GreenFeed Once connected to a GreenFeed system, you will be able to perform the following tasks: 1) View real-time sensor values of the machine 2) Turn on and off the fan and sample pump... -
Page 16: Connecting Greenfeed To A Different Wifi Network
To change the WiFi network that GreenFeed connects to: 1. Tap “WiFi Settings” 2. Tap the button with the WiFi network you wish GreenFeed to use 3. In the box that appears, select WPA2 ● If the network is an open network (no password), select None 4. - Page 17 Figure 10) Control Feed WiFi Configuration...
-
Page 18: Calibrating Greenfeed
) Balanced - which means the rest of the gas consists of nitrogen The second gas is commonly referred to as the “Span” gas. This gas must consist of a known concentration of all gases intended to measure with GreenFeed. This will typically consist of the following constituent concentrations: 1) Oxygen (O ): ~20.5% (205,000ppm) - Note that this must be a different... -
Page 19: Co Recovery
The process involves releasing a measured amount of CO into the system, then comparing that known amount to GreenFeed’s calculated value. For an in-depth demonstration of performing a CO recovery, please refer to our Maintenance playlist - Performing a CO Recovery video (https://videos.c-lockinc.com) -
Page 20: Maintenance
5. Maintenance 5.1. Cleaning the Head Position Sensor The head position sensor is located directly above the edge of the feed dish. From time to time, this sensor will become dirty due to animals and debris. It is important to keep the lenses clean on this sensor. -
Page 21: Replacing And Cleaning The Air Filter
When the time comes to swap the air filter, please perform the following steps: Turn the fan off. You can do this by either putting the GreenFeed to sleep, or by issuing the “Fan Off” command (Section 3.2). Wait for the fan to fully stop. -
Page 22: Filling The Hopper Bin
7mm will likely not dispense properly. Powered feed, large pellets, and straw type feed should not be used in GreenFeed. Using “dusty” feed will result in more frequent air filter changes. If you are unsure if your feed will work in GreenFeed, please contact... - Page 23 5.4. Storing GreenFeed When GreenFeed is to be stored for an extended duration, maintenance operations must be performed to ensure it will be ready for the next use: Remove the feed dish and plug the feed spout and the air intake spout with a temporary rodent barrier.
- Page 24 Use a vacuum cleaner to remove all feed out of the hopper. Clean the feed dish, removing any debris from the intake manifold holes. Vacuum all feed out of the back of the GreenFeed, underneath the air filter box. Pasture Trailer Only: Turn off both a) the red battery switch and b) the main power switch.
- Page 25 This mode will allow the user to immediately power-up the system if it will be used in the near future. Once sleep mode is activated, the GreenFeed unit will do the following: 1) Stop collecting data and upload any unsaved data to the central C-Lock server, which...
- Page 26 3. Wait 30 seconds, then unplug the power. 4. If GreenFeed is powered by a solar trailer, turn the power switch to OFF in the main electrical box. If GreenFeed is powered by the provided AC power supply, unplug the...
- Page 27 1) A computer located inside GreenFeed stores the real-time data then uploads it to the C-Lock server once per hour (this time can be changed). 2) Once the data is entirely uploaded on the central C-Lock server, the data is archived in the onboard computer (where it is removed after 4 months).
- Page 28 8. GreenFeed GUI Control Interface The GreenFeed unit is configured through the Internet. To access, view, and configure your GreenFeed unit(s), go to https://greenfeed.c-lockinc.com and log in using your assigned username and password. By default, your password is “greenfeed”. It is very important that you change your...
- Page 29 9. Instrument Specifications Power Requirements Power Input: 100 ~ 240VAC / 2.8A 10.5 ~ 15VDC / 10A Maximum Power Rating: 300 W Flow Meter (Velocity) Accuracy at 20 C, 45%RH, 1013 hPa: 0.2 m/s + 3% of m.v. Range: 0.2-10 m/s Concentration Measurement Linearity error: <...
- Page 30 Appendix A - Solar Charging System If your GreenFeed unit is ordered with a pasture trailer, it will include solar charging capability to assure it can run autonomously for long periods of time without a need for replacing batteries or running extension cords. Please read these instructions to learn how to properly use the solar charging system.
- Page 31 To turn your unit on or off, simply toggle the unit power switch to ON or OFF: To turn the charge controller on and off, rotate the battery charge switch to ON or OFF: When to turn your unit or battery charge switch on and off: CAUTION: Failure to follow these instructions will result in degraded battery performance and decreased battery life which will void the warranty of the unit and batteries...
- Page 32 You may also plug in the unit to an AC power source while it is being stored. If this is done, the battery charge switch may be left ON. When GreenFeed is in use, the battery charge switch should always be ON. The table below shows the different switch positions depending on how the system is stored...
Need help?
Do you have a question about the GreenFeed and is the answer not in the manual?
Questions and answers