Table of Contents
Advertisement
Quick Links
Advertisement
Table of Contents

Subscribe to Our Youtube Channel
Related Manuals for snug SnugStat


Summary of Contents for snug SnugStat
- Page 1 SnugStat Instruction Manual...
- Page 2 WELCOME SnugStat makes smart, high performance heating, easier than ever. This guide tells you everything you need to know.
-
Page 3: Table Of Contents
CONTENTS Standby Screen Screen Lock Temperature Format Temperature Limit Pairing with SnugStat App Away LCD Display Defrost Sensor Selection Operation of Main Display Icons Floor Temperature Limit Schedule Humidity Sensor Calibration Programming Timer Mode Schedule Open Window Function Copy To... - Page 4 INTRODUCTION...
- Page 5 INTRODUCTION What is a Programmable Thermostat? A programmable room thermostat is a device that combines the functions All types of thermostats need a free flow of air to sense the best of both a room thermostat and timed heating controller into a single unit. temperature, so they must not be placed in a cupboard or covered by The programmable thermostat is used to switch the heating system in curtains or blocked by furniture.
- Page 6 Choose to set ‘distance based heating’ rules, or come back to this Pairing the SnugStat Thermostat with the later (page XXX). SnugStat App Download the free SnugStat App from the Apple Store or the Google Play Press ‘save’ to create property. Store by searching SnugStat. Press the icon to add first room.
- Page 7 Your thermostat is now connected – it may display ‘fault’ for a few seconds before connection is fully established. On the SnugStat app, select ‘Smart Config’ and then ‘Add Device Location’. The app will display ‘Is Connected to the Wi-Fi’ and the thermostat will read ‘App Matching Successful’.
- Page 8 Manual Entry On the thermostat press the to enter Feature Settings. On the SnugStat app, select ‘Manual Entry’ – a box should appear for you to enter your thermostats MAC address. Use the to scroll to Network Setting and select.
-
Page 9: Lcd Display
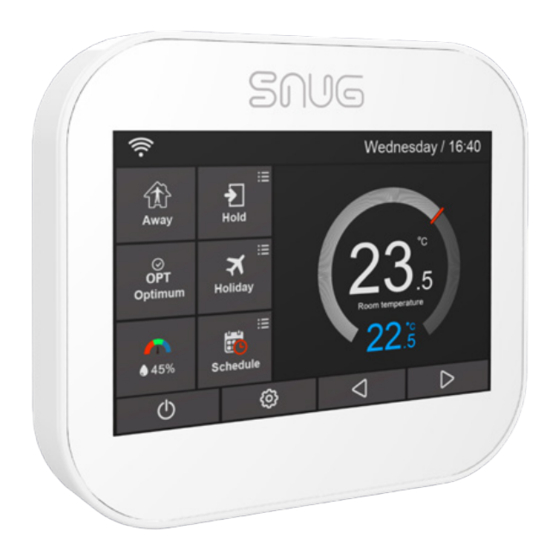
Setup button. Adjusting the optional settings. Adjusting the temperature setting. Day indicator and clock. or turning a page. ‘Away’: Means the SnugStat is Target temperature. maintaining a lower temperature Actual temperature display. to improve efficiency whilst away. Temperature reading is in 0C (Turn ON Status). -
Page 10: Operation Of Main Display Icons
OPERATION OF MAIN DISPLAY ICONS... -
Page 11: Schedule
09 Press the third column of ‘Temperature’, use the scroll function or the icons to set desired temperature. The SnugStat arrives preset to the weekday/weekend (5/2 day) setting. This is the default mode. If you would like to change this, turn to page 28. -
Page 12: Programming Timer Mode Schedule
Programming Timer Mode Schedule Copy To 01 Press the schedule icon on the main screen. The ‘Copy To’ feature allows you to copy times and schedules across multiple days, without inputting the data again. 02 Press the ‘Timer’ option. 01 To use this, simply select your time and press ‘Copy To’. Then select 03 On the schedule page, select the days you wish to edit. - Page 13 Hold Boost The temperature hold function allows you to manually override the current The boost function allows you to override the timer function of the operating program and set a different temperature for a desired period. This thermostat outside of the programmed times. is useful for when you want the temperature to remain for a longer period This can be to override on or override off.
-
Page 14: Humidity Sensor
Holiday Humidity Sensor The SnugStat Wi-Fi Thermostat will maintain the defrost preset Selecting the Humidity Sensor option on the main screen will show temperature for the duration of the holiday and will then automatically return you a detailed gauge of your room’s exact temperature and humidity. -
Page 15: Feature Settings Explained
Weekday / Weekend (5 + 2) Programming - Allows you to edit the 4 time so the SnugStat Wi-Fi Thermostat does not light up the room. periods for the weekday and 4 time periods for the weekend. This is the preset setting. - Page 16 Output Delay: This setting is to stop rapid switching, if set to 15min, once Floor Temp Limit: The function is available when the floor sensor is the thermostat stops calling for heat it will not switch on for 15 minutes. enabled.
-
Page 17: Operation Of Feature Settings
OPERATION OF FEATURE SETTINGS... -
Page 18: Clock Setting
OPERATION OF Clock Setting FEATURE SETTINGS To set the clock, follow these steps. 01 Press the icon to enter Feature Settings. Language 02 Press ‘Clock’ Setting. 01 Press the icon to enter Feature Settings. 03 Press the column of Day/Month/Year, use the icons to set the Day/Month/Year values. -
Page 19: Standby Screen
Screen Lock When Ambient Light Dimming is in mode, you can manually adjust the backlight brightness. 01 Touch the icon to enter Feature Settings. 05 Use the icons to adjust to the desired brightness.. 02 Press ‘Screen Lock’ to enter setting interface. 06 Press the icon twice to save and return to the main screen. -
Page 20: Temperature Limit
04 Press the icon to the left of 0C or 0F. 01 Press the icon to enter Feature Settings. 02 Find ‘Away’ option and press it. 05 Press the icon twice to save and return to the main screen. 03 Use the scroll function icons to adjust the temperature. -
Page 21: Sensor Selection
Sensor Selection Press the icon twice to save and return to the main screen. 01 Press the icon to enter Feature Settings. Humidity Sensor Calibration 02 Find ‘Sensor Selection’, and press it. This feature is to recalibrate your humidity sensor, if you have one at home and the readings are mismatched, simply: 03 Press the name of the sensor that you require. -
Page 22: Optimum Start
02 Press ‘System Information’ and enter system interface. Note: The rate of change is impossible to change on the thermostat, as the SnugStat is self-learning it will adjust to your home the more it is used. The 03 Press the icon twice to exit. -
Page 23: Reset To Factory Settings
03 Press ‘Reset’. Once the back plate is secure, re-fit the thermostat front panel to the back 04 The SnugStat will now restart, this may take a few moments. Once this plate and gently tighten the bottom retaining screw. is complete the SnugStat has reset to factory settings. -
Page 24: Technical Specification
TECHNICAL SPECIFICATION Power supply: 230V, 50/60Hz Screw hole CC: 60mm Setting temp range: 5-350C Grade of protection: IP 20 Working temp range: -100C to +450C Sensor type: NTC10k Power consumption: Installation type: Flush Floor Temperature Limit: 20-450C Dimension: 96 * 86 * 42.5 (W*H*D) mm Max Switch Current: Heating Mode: 13A –... -
Page 25: Wiring Diagrams
WIRING DIAGRAM Electric Radiator and Electric Underfloor Heating Electric Radiator and Wet Underfloor Heating 230v MAINS 230v BOILER SUPPLY MAINS SUPPLY SL PL Electric Towel Radiator Electric Towel Radiator REMOTE FLOOR PROBE REMOTE FLOOR PROBE UFH 2 port valve or RAD 2 port valve Electric UFH... - Page 26 Electric Underfloor Heating and Hot Water Wet Underfloor Heating and Hot Water Towel Radiator Towel Radiator 230v 230v MAINS BOILER MAINS SUPPLY BOILER SUPPLY SL PL SL PL UFH 2 port valve or RAD 2 port valve REMOTE FLOOR PROBE HW Towel Rad 2 port valve Electric UFH...
-
Page 27: Recalibration
Recalibration Wet Underfloor Heating and Radiators Your thermostat has been fully calibrated and tested. Should this need changing. 01 Press the icon to enter the Feature Settings. 02 Press the icons to turn to page 4 and press ‘Sensor Selection’ 03 Press on the name of the sensor you wish to recalibrate. - Page 28 Notes...
- Page 29 CAN WE HELP? Your SnugStat comes with a 2 year warranty from date of purchase. If you have any problems installing or programming your SnugStat, call our dedicated technical support team on 01772 761333, who will be more than happy to help.
- Page 30 Can We Help? Your SnugStat comes with a 2 year warranty from date of purchase. If you have any problems installing or programming your SnugStat, call our dedicated technical support team on 01772 761333, who will be more than happy to help.
Need help?
Do you have a question about the SnugStat and is the answer not in the manual?
Questions and answers