Table of Contents
Advertisement
Advertisement
Table of Contents

Related Manuals for Bush NE-8765


Summary of Contents for Bush NE-8765
- Page 1 NE-8765 763/0497...
- Page 2 We’re here to help you get the most from your DAB/FM Radio. Should you require any guidance, a simple solution can often be found online at: www.bush-support.com If you still require further assistance, call one of our experts on 0345 604 0105.
-
Page 3: Table Of Contents
USB operation Auxiliary Input Using Earphones Maintenance Other information Specifications Product support Help and assistance Disposal Guarantee section of these instructions, or online at www.bush-support.com If you still require further assistance, call one of our experts on 0345 604 0105... - Page 5 Safety information...
-
Page 6: Safety Information
Safety information Important - Please read these instructions fully before installing or operating SAFETY PRECAUTIONS - Read all the instructions carefully before using the unit and keep them for future reference. - Check that the voltage marked on the rating label matches your mains voltage. - The unit must be placed on a flat stable surface and should not be subjected to vibrations. - Page 7 Safety information Important - Please read these instructions fully before installing or operating LASER SAFETY This unit employs an optical laser beam system in the CD mechanism, dedigned with built-in safeguards. Do not attempt to disassemble, refer to qualified service personnel. Exposure to this invisible laser light beam may be harmful to the human eye.
- Page 8 Safety information Important - Please read these instructions fully before installing or operating WARNING Keep new and used batteries away from children. If the battery compartment does not close securely, stop using the product and keep it away from children. If you think batteries might have been swallowed or placed inside any part of the body, seek immediate medical attention.
-
Page 11: Getting To Know Your Dab/Fm Radio
Getting to know your DAB/FM Radio... -
Page 12: Ready? Let's Begin
Getting to know your DAB/FM Radio You’ll be up and running in no time Ready? Let’s begin... Please read these instructions carefully. They contain important information which will help you get the best from your product and ensure safe and correct installation and operation. If you require any further assistance, our technical experts are happy to help. -
Page 13: Product Overview
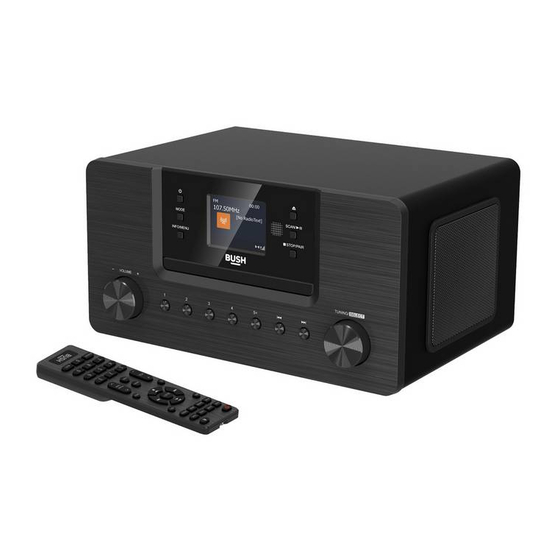
Getting to know your DAB/FM Radio You’ll be up and running in no time Product Overview Front View 8. SCAN/ 12 Button CD tray 2. MODE Button 9. 3 STOP/PAIR Button 3. q STANDBY Button 10. Speakers 4. INFO/MENU Button 11. - Page 14 Getting to know your DAB/FM Radio You’ll be up and running in no time Rear view 15. Aerial 18. USB 5V 1A Charging Port 16. AUX IN Socket 19. DC IN Socket 17. Earphone Socket...
- Page 15 Getting to know your DAB/FM Radio You’ll be up and running in no time Remote Control q STANDBY Button 2. SLEEP Button 3. CLOCK Button 4. INTRO Button 5. RANDOM Button 6. MODE Button 12 / w Button 8. 7 Button 9.
-
Page 17: Using Your Dab/Fm Radio
Using your DAB/FM Radio... -
Page 18: Battery Replacement For The Remote Control
Using your DAB/FM Radio Let’s get started Battery Replacement for the Remote Control Press down the battery cover at “OPEN” and push the battery cover outwards in the direction of the arrow. 2. Insert 2 x AAA 1.5V alkaline batteries (included). Make sure to match the (+) and ( - ) ends of the battery with the (+) and ( - ) ends indicated in the battery compartment. -
Page 19: Power Source
Using your DAB/FM Radio Let’s get started POWER SOURCE Mains Power Unwind the mains adapter cable to its full length. Connect the end of the cable to the DC IN Socket at the rear of the unit and then connect the mains adapter to the mains socket. Make sure the mains adapter is firmly inserted into the mains socket. -
Page 20: System Settings
Using your DAB/FM Radio Let’s get started Navigating the Menu Press the MENU button on the remote control or press and hold the INFO/MENU button on the unit to access the menu. Press the 12/w / 3/s buttons on the remote control or turn the TUNING/SELECT dial on the unit to select your choice. - Page 21 Using your DAB/FM Radio Let’s get started Time/Date Press the CLOCK button on the remote to access the Time/Date menu. Alternatively: During System settings mode, press 12/w / 3/s buttons to select Time/Date and then press the SELECT button to confirm. Press 12/w / 3/s buttons on the remote control to select the option below: Set Time/Date Press 12/w / 3/s buttons on the remote control to adjust the time and date, then press SELECT to...
-
Page 22: Timer
Using your DAB/FM Radio Let’s get started Factory Reset There may be times when you need to reset your unit back to the factory settings especially when you have moved house. If you experience reception problems you may want to reset and try again. If you move to another part of the country and pick up the local and national DAB stations in that area, your previously tuned channels may no longer be available. -
Page 23: Sleep
Using your DAB/FM Radio Let’s get started Source Press SELECT button and then press 12/w / 3/s buttons to select Buzzer, Digital Radio , FM, or CD, then press SELECT to confirm. If DAB or FM is chosen as the audio source you will also be prompted to select the Last Listened or preset station (if set). -
Page 24: Dab Operation
Using your DAB/FM Radio Let’s get started DAB operation If the unit is connected to the mains power and then switched on from standby for the first time, the unit will automatically enter into the DAB mode and perform auto scan function. During the scan the display will show “Scanning…”... - Page 25 Using your DAB/FM Radio Let’s get started Preset Stations You can store up to 30 stations to the memory, allowing access to your favourite stations quickly and easily. To store a preset, you must first be listening to the station that you would like to save. 2.
-
Page 26: Fm Operation
Using your DAB/FM Radio Let’s get started Ensemble This displays the name of the multiplex that contains the station you are listening to. A multiplex is a collection of radio stations that are bundled and transmitted on one frequency. There are national and local multiplexes. - Page 27 Using your DAB/FM Radio Let’s get started Manual Scan To search for FM stations manually, turn the TUNING/SELECT dial on unit or press 12/w / 3/s buttons on the remote control repeatedly until your desired frequency is reached. With FM radio it may be necessary to fine tune each station by turning TUNING/SELECT dial on unit or press 12/w / 3/s buttons on remote control repeatedly.
- Page 28 Using your DAB/FM Radio Let’s get started Recalling a Stored Station To listen the preset stations 1-4, press 1/2/3/4 preset button on unit and the unit will switch to desired corresponding preset location. If the preset has not been allocated, “Preset Empty” will be shown in the display.
-
Page 29: Cd Operation
Using your DAB/FM Radio Let’s get started CD Operation Press the MODE button on unit or remote control repeatedly to select CD mode. Playback Press the ' open/close button on unit or remote control to open the disc tray. 2. Place the CD with the label side up into the CD compartment, and then press the ' open/close button on unit or remote control to close the disc tray. -
Page 30: Bluetooth ® Operation
3. Activate your Bluetooth device and select the search mode. 4. “BUSH NE-8765” will appear on your Bluetooth device list. 5. Select “BUSH NE-8765” and enter “0000” for the password if necessary. 6. To disconnect the Bluetooth device, press the MODE button on unit or remote control to switch to another mode or disconnect the function from your Bluetooth device. -
Page 31: Usb Operation
Using your DAB/FM Radio Let’s get started Playing Music via Bluetooth You may need to adjust the volume on your radio and Bluetooth device. ∞ Press the SCAN/ 12 button on unit or 12/w button on remote control to play/pause music. ∞... -
Page 32: Auxiliary Input
Using your DAB/FM Radio Let’s get started Auxiliary Input There is an AUX IN socket located at the back of the unit. Analogue audio sound signals from other audio sources can be input to the unit through this socket. 2. Connect the input to another audio device via an AUX cable (not included) with AUX IN socket. 3. -
Page 33: Maintenance
Using your DAB/FM Radio Let’s get started Maintenance Handling Discs ∞ Do not touch the playback side of the disc. ∞ Do not attach paper or tape to the disc. Cleaning Discs ∞ Fingerprints and dust on the disc cause picture and sound deterioration. -
Page 35: Other Information
Other information... -
Page 36: Specifications
291 (W) x 217 (D) x 145 (H) mm Radio Frequency FM 87.50 – 108.00 MHz DAB+ 174.928 - 239.200 MHz Bluetooth information Bluetooth pairing ID : BUSH NE-8765 Bluetooth Profile: A2DP and AVRCP Bluetooth Range: Max. 8M Bluetooth Version:... - Page 37 Other information Helpful technical information Note: ∞ If DAB radio, CD, USB or Bluetooth audio mode has no audio playback the unit will automatically go into Standby mode after 15 minutes. Press Standby button to resume. ∞ In Auxiliary Input mode, the unit will automatically go to Standby mode after 4hours. Press Standby button to resume.
-
Page 39: Product Support
Product support... -
Page 40: Help And Assistance
If you require any technical guidance or find that your DAB/FM Radio is not operating as intended, a simple solution can often be found in the Troubleshooting section of these instructions or online at www.bush-support.com If you still require further assistance, call one of our experts on 0345 604 0105*. To help... -
Page 41: Disposal
Declaration of Conformance Hereby, Argos Ltd, declares that this Band II LPD device is in compliance with the essential requirements and other relevant provisions of Radio Equipment Directive 2014/53/EU. The complete declaration of conformity can be obtained by contacting http://www.bush-support.com/... -
Page 42: Guarantee
Call us now and activate your 12 month guarantee Thank you for choosing Bush. Your new product is guaranteed against faults and breakdowns for 12 months. Don’t forget to register it with us today so we can provide you with our best possible after-sales service and useful updates. - Page 44 Contact: www.bush-support.com Helpline: 0345 604 0105...
Need help?
Do you have a question about the NE-8765 and is the answer not in the manual?
Questions and answers