Table of Contents
Advertisement
Quick Links
DYNertia3 Quick Start (Inertia- Chassis type)
'Quick Start' Guide for
Inertia Dyno- 'Chassis' Type
(see www.DTEC.net.au for 'Quick Start' guides on other dyno types)
'Quick Start' Guide: Version IC 8.2 (≥ V3.3.0)
DISCLAIMER: This software and hardware is provided "as is" without warranty of any kind, either express or implied, including, without limitation, any warranty of merchantability and fitness for a
particular purpose. In no event shall the creators of this software be liable for any direct, special, incidental or consequential damages arising out of the use or inability to use the software. The creators
and distributors of this software shall not be liable for any loss, damages or costs, arising out of, but not limited to, lost profits or revenue, loss of use of the software, loss of data or equipment, the costs
of recovering software, data or equipment or claims by third parties, damage to equipment, or other similar costs.
For continuous product improvement and due to ongoing development, we reserve the right to alter specifications without notice.
WARNING: This hardware and software is protected by law and international treaties. Unauthorized reproduction or distribution of Dynertia, or any portion of it, may result in severe civil and criminal
penalties and will be prosecuted to the maximum extent possible under law.
Dynertia software, hardware & firmware is copyright- Darren Todd 2022
www.dtec.net.au
1
Advertisement
Table of Contents

Related Manuals for dtec DYNertia3


Summary of Contents for dtec DYNertia3
- Page 1 ‘Quick Start’ Guide for Inertia Dyno- ‘Chassis’ Type (see www.DTEC.net.au for ‘Quick Start’ guides on other dyno types) ‘Quick Start’ Guide: Version IC 8.2 (≥ V3.3.0) DISCLAIMER: This software and hardware is provided "as is" without warranty of any kind, either express or implied, including, without limitation, any warranty of merchantability and fitness for a particular purpose.
- Page 2 DYNertia3 manual. Tip- There are sample test Runs installed along with DYNertia3 software so you can learn to use many of the features without needing to perform actual ‘Runs’. www.dtec.net.au...
-
Page 3: Table Of Contents
DYNertia3 Control Unit Mounting ..........................5 Basic wiring ................................. 6 ‘Linking’ Hardware to PC ..............................7 Two Main DYNertia3 Windows (DYNO / GRAPH) ......................8 Basic Hardware Settings..............................9 First time use, Hardware setup ..........................9 Basic Software settings (default) ..........................10 Quick Test of Dyno Speed Sensor .......................... -
Page 4: Concept
PC for analysis and storage. The included 'DYNertia3' software package handles all the functions required for dyno control, setting up, saving runs, correcting for atmospheric conditions, filtering, displaying data, printing, overlaying and analyzing multiple runs. -
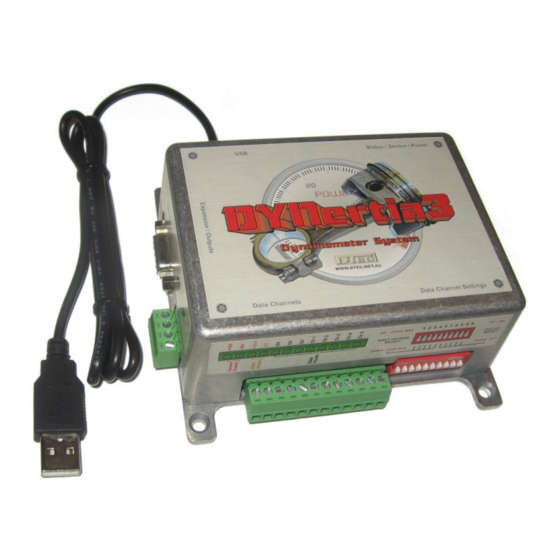
Page 5: Dynertia3 Control Unit Mounting
Secure at the DYNertia control unit to prevent movement of the cables. DYNertia3 software can even be operated by remote control if required (wireless keyboard or a PC ‘page turner’ as one option), tests can be started and stopped and new files even created (names incremented). -
Page 6: Basic Wiring
Do not connect anything to the “RPM Adapter” input, including the ‘RPM adapter’ (if you have one) Please refer to the main DYNertia3 Manual (found under ‘Help’ menu) chapter called ‘Inputs- Using’ for full wiring details on connection of optional data acquisition devices or ‘RPM Adapter’. -
Page 7: Linking' Hardware To Pc
‘Linked’. Once ‘Linked’ DYNertia3 will automatically find the hardware in future when it is connected, powered and the software is started. If you plug DYNertia hardware into another USB port you may need to re-link. -
Page 8: Two Main Dynertia3 Windows (Dyno / Graph)
When test Runs are visible on the graph we refer to them as ’traces’. Note: The DYNertia3 Window does not size itself to the PC screen, if you wish you can adjust your PC screen resolution to best suit (Program Window size is1024 x 768) www.dtec.net.au... -
Page 9: Basic Hardware Settings
DYNertia3 Quick Start (Inertia- Chassis type) Basic Hardware Settings As an example of a basic test ‘Run’ we will test a motorbike, we will do the test in 4 gear and save the results for future reference. This example Dyno has roller of 1000mm circumference and an inertia factor of 4.7 kg/m² (your dyno’s inertia value can be calculated by pressing the ‘MOI”... -
Page 10: Basic Software Settings (Default)
Basic Software settings (default) Shown below are the software settings (menu choice ‘Setup/Software’), see the main DYNertia3 manual for any details. Leave the settings at default (except multiple monitor if possible), but take the time to see what options are available–... -
Page 11: Displaying Engine Rpm (One Method)
Press Enter and your setting will be transferred to the ‘Record Settings’ panel for “Current Ratio” (in the ‘DYNO’ Window). That’s it! DYNertia3 now knows the engine RPM for any speed driven in the gear just used. You can ‘teach’ other gears also if you want to do testing in multiple gears. -
Page 12: Performing A Basic Inertia Test 'Run
DYNertia3 Quick Start (Inertia- Chassis type) Performing a Basic Inertia Test ‘Run’ All dyno run setup is done in this main ‘DYNO’ Window: Enter the current Temperature, Barometric pressure and Humidity into the ‘Correction Factors’ box. If you have no weather data then go to menu option “Setup/Software”... -
Page 13: Observing The Engine Data During A Test
DYNertia3 Quick Start (Inertia- Chassis type) Observing the engine data during a test The available windows to view data in depend on the fitment of a second monitor. In inertia dyno mode the ‘Torque’ and ‘Power’ displays do not show data during a test, these are for analysing Note: data after a test. -
Page 14: Viewing/Loading Of Runs ('Graph' Window)
Shift and Delete keys (or menu option “View/Clear Graphs”). Note: Files are not deleted or modified; they are just not selected for viewing. Tip- DYNertia3 already has some test runs in a Folder called ‘Samples’, use these to learn the software operation. www.dtec.net.au... -
Page 15: Finding Folders To View Or To Save Tests Into
DYNertia3 Quick Start (Inertia- Chassis type) Finding Folders to view or to save tests into As mentioned on the previous page, ‘DYNertia File Explorer’ is used to select a storage Folder of choice and when each Run file within it is selected (one ‘Left Click’) its data table, general notes, key data and preview graph are shown. -
Page 16: Basic Analysis Of Saved Data
DYNertia3 Quick Start (Inertia- Chassis type) Basic Analysis of Saved Data Basic analysis using the main GRAPH Window; refer to the full DYNertia3 manual for details. The main Graph Window can be used for overlaying and analysing data from test Runs. -
Page 17: Windows For Further Analysis Of Saved Data
DYNertia3 Quick Start (Inertia- Chassis type) Windows for Further Analysis of Saved Data A brief over view of more complex analysis, read the main DYNertia3 manual for many more options and details. Most Windows used for analysing saved data are in the menu option ’View’... -
Page 18: Shortcuts
DYNertia3 Quick Start (Inertia- Chassis type) Shortcuts In the menu ‘Setup/Software/General’ is the ability to allocate some functions to the ‘page up’ and ‘page down’ keys. This allows the opportunity to use wireless ‘presenters’ to control some dyno functions. Of course there are always wireless keyboards available that can be used. -
Page 19: Troubleshooting
DYNertia3 Quick Start (Inertia- Chassis type) Troubleshooting Assessing test results- Poor settings Most poor results are either due to electrical interference (via PC, accessories or DYNertia hardware) or from poor selection of start and end points for the test. OK- It has a good start point and decisive end OK- It has a good start point and decisive end. -
Page 20: Assessing Test Results- Signal Issues
DYNertia3 Quick Start (Inertia- Chassis type) Assessing test results- Signal issues OK- Traces go back and forth. This can be from ignition interference etc. but the image above is lacking any large ‘spikes’ that this usually creates. Likely the engine RPM differs to roller RPM in the data so this implies an issue i.e.
Need help?
Do you have a question about the DYNertia3 and is the answer not in the manual?
Questions and answers