Table of Contents
Advertisement
Available languages
Available languages
Quick Links
Advertisement
Chapters
Table of Contents

Related Manuals for Marathon CL030089-BK-00


Summary of Contents for Marathon CL030089-BK-00
- Page 1 Atomic Clock with Auto Backlight Self-Setting Time, Date & Temperature Horloge atomique avec rétroéclairage automatique Temps d’auto-réglage, date et température Reloj Atómico con Luz de Fondo Automático Tiempo de Autoajuste, Fecha y Temperatura | EN | FR | ES |...
-
Page 2: Table Of Contents
English Table of Contents 1. Exploring the features 2. What’s in the box 3. Getting started 4. Clock set up 5. Thermometer 6. Backlight / Auto backlight... -
Page 3: Exploring The Features
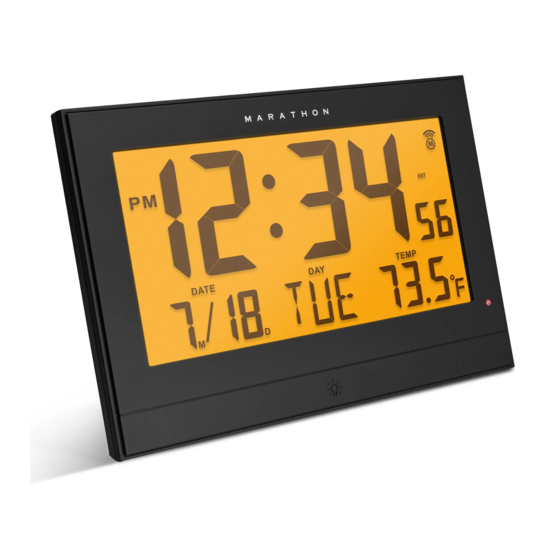
Exploring the features Time Temperature Radio Controlled Time (RC-WWVB) Indoor measurable range: -9.9°C ~ +50°C • • Eight time zones Measures °C / °F user selectable • • 12/24 hour time display selectable • Perpetual Calendar Up to Year 2099 •... -
Page 4: What's In The Box
What’s in the box Front Back A1: Time button button / °C/°F RESET A2: Date button slide switch A3: Radio control icon button B10: slide switch CLOCK SET UP TIME ZONE A4: Temperature button B11: slide switch – A5: Day of week button B12: Battery compartment / WAVE... -
Page 5: Getting Started
Getting started Clock set up Automatic Clock Set up: RCC WWVB Reception Place your clock face down on a soft, flat surface. • Connect the electrical cord to the wall outlet, or remove the battery cover • NOTE: Slide the switch to ON or OFF to turn RCC on or off. - Page 6 Manual Clock Set Up: RCC function is set to OFF Press 7x = SET MONTH To change the Clock time or Calendar, hold the button CLOCK SET UP • The month digits will flash. Press to set a month. – for 3 seconds to enter Clock Set Up Mode.
-
Page 7: Thermometer
Thermometer Backlight / Auto backlight Press button to select the temperature to display in Celsius or / °C/°F Press the button on the front of the clock, to turn the backlight on for • Fahrenheit. 10 seconds. To turn on the auto backlight feature, slide the switch to ON. - Page 8 Français Table des matières 1. Caractéristiques 2. Apparence de l’unité principale 3. Commencer 4. Réglage de l’horloge 5. Thermomètre 6. Rétroéclairage / rétroéclairage automatique...
-
Page 9: Caractéristiques
Caractéristiques Heure Température Heure radiocommandée (RC-WWVB) Plage de mesure intérieure : -9.9°C ~ +50°C • • Huit fuseaux horaires Mesures °C / °F sélectionnable par l’utilisateur • • Affichage 12/24 heures sélectionnable • Calendrier perpétuel jusqu’à l’année 2099 •... -
Page 10: Apparence De L'unité Principale
Apparence de l’unité principale Face de l’horloge Retour de l’horloge A1 : Heure B1 : Bouton B8 : Bouton / °C/°F RESET A2 : Date B2 : Bouton B9 : Interrupteur à glissière A3 : Icône de radiocommande B3 : Bouton B10 : Interrupteur à... -
Page 11: Commencer
Commencer Réglage de l’horloge Réglage automatique de l’horloge : Réception RCC WWVB Placez votre horloge face vers le bas sur une surface douce et plate. • Connectez le cordon électrique à la prise mural, ou retirez le couvercle du • REMARQUE : Faites glisser l’interrupteur sur ON ou OFF pour activer ou compartiment à... - Page 12 Réglage manuel de l’horloge : La fonction RCC est réglée sur OFF Appuyez 5 fois = RÉGLAGE DE L ’ANNÉE Pour modifier l’heure de l’horloge et le calendrier, maintenez le bouton • « 2021 » clignotera. Appuyez sur pour régler l’année. –...
-
Page 13: Thermomètre
Thermomètre Rétroéclairage / rétroéclairage automatique Appuyez sur le bouton pour sélectionner la température à afficher / °C/°F Appuyez sur le bouton situé à l’avant de l’horloge, pour activer le • en degrés Celsius ou Fahrenheit. rétroéclairage pendant 10 secondes. Pour activer la fonction de rétroéclairage automatique, faites glisser •... - Page 14 Español Tabla de contenido 1. Características 2. Qué hay en la caja 3. Primeros pasos 4. Configuración del reloj 5. Termómetro 6. Retroiluminación/Auto retroiluminación...
-
Page 15: Características
Características Hora Temperatura Tiempo controlado por radio (RC-WWVB) Rango calculable interior: -9.9°C ~ +50°C • • Ocho usos horarios Temperaturas para seleccionar por el usuario • • Opción de seleccionar la pantalla en 12/24 horas °C / °F • Calendario perpetuo hasta el año 2099 •... -
Page 16: Qué Hay En La Caja
Qué hay en la caja Frente del reloj Respaldo del reloj A1: Hora B1: Botón B8: Botón / °C/°F RESET A2: Fecha B2: Botón B9: Interruptor deslizante A3: Ícono del control del radio B3: Botón B10: Interruptor deslizante CLOCK SET UP TIME ZONE A4: Temperatura B4: Botón... -
Page 17: Primeros Pasos
Primeros pasos Configuración del reloj Configurar de reloj automático: Recepción RCC WWVB Coloca tu reloj boca abajo sobre una superficie suave y plana. • Conecta el cable eléctrico a la toma de corriente de pared, o retire la • NOTA: Deslice el interruptor a ON o OFF para encender o apagar el RCC. - Page 18 Configurar de reloj manual: La función RCC está configurada en Presionar 6x = CONFIGURAR FORMATO DE FECHA APAGADO “M” “D” se mostrarán. Pulse para seleccionar la visualización del – Para cambiar la hora del reloj o calendario, mantén presionado el botón •...
-
Page 19: Termómetro
Termómetro Retroiluminación/Auto retroiluminación Pulsa el botón para seleccionar la temperatura que desees mostrar / °C/°F Presiona el botón en la parte frontal del reloj, para encender la • en Celsius o Fahrenheit. retroiluminación durante 10 segundos. Para activar la función de retroiluminación automática, desliza el •... - Page 21 Marathon Watch Company Ltd. Customer Service: / Service Clients: / Servicio al cliente: www.MarathonWatch.com Designed in Canada / Conçu au Canada / Diseñado en Canadá Made in China / Fabriqué en Chine / Hencho en China 2 year Garantie 2 años...
Need help?
Do you have a question about the CL030089-BK-00 and is the answer not in the manual?
Questions and answers