
Related Manuals for WESTHILL BIKES VENTURE


Summary of Contents for WESTHILL BIKES VENTURE
- Page 1 Electric Bike User Manual VENTURE HAVE A QUESTION? NEED HELP? Contact us on Facebook for a quick reply. westhillbikes.com VENTURE...
-
Page 2: Warranty
WARRANTY Westhill bikes are covered by a limited 3-year warranty. Aside from general cycle maintenance, any work to the motor should be carried out by a Westhill technician or authorised dealer. 1. Warranty periods Spokes The statutory warranty valid at the time of... - Page 3 TABLE OF CONTENTS INCLUDED IN THE BOX..................SPECIFICATIONS ....................ASSEMBLY....................... SAFE RIDING ....................... CHARGING THE BATTERY..................HOW TO USE THE BIKE CONTROLS..............CARE AND MAINTENANCE.................. SAFETY WARNINGS....................MODIFICATIONS....................ADDITIONAL OPERATION CAUTIONS............... DEFAULT PASSWORD: 0314 THIS MANUAL SHOULD BE CONSIDERED A PERMANENT PART OF THE ELECTRIC BICYCLE AND SHOULD REMAIN IF IT IS RESOLD.
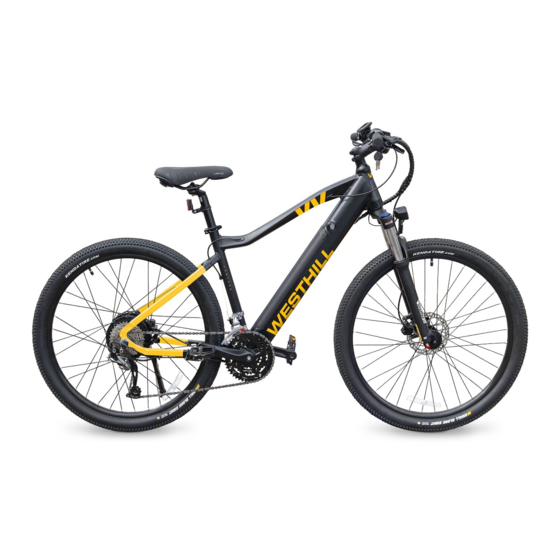
- Page 4 Display Seat Rear Wheel Rear Brake Motor fb.com/westhillbikes | westhillbikes.com...
-
Page 5: Specifications
SPECIFICATIONS MODEL VENTURE RANGER CLASSIC LINK Bike Wheel Size 27.5” 700c 26” 20” Frame Size 18” / 46 cm 19” / 48 cm 16.5” / 42 cm 13” / 33 cm Max Rider Weight 120kg 120kg 120kg 120kg Max Speed 25km/h 15.5mph... -
Page 6: Assembling The Handlebar
caliper , the pedals and insert the seat post. 6-11 whilst your bike. bike, call our team bike but assembly will still be the same. ASSEMBLING THE HANDLEBAR fb.com/westhillbikes | westhillbikes.com... - Page 7 Place the handlebar into the handlebar stem and screw the 4 bolts in using an allen key. Torque to 6Nm. to colour. fb.com/westhillbikes | westhillbikes.com...
- Page 8 FRONT DISC BRAKE CALIPER Please check that the bolts are tightened correctly on the brake calliper shown below. Be careful not to overtighten the bolts (torque to 8Nm). Loosen the pin through the middle of the wheel to allow you to place the fork onto it.
- Page 9 Tighten the nut and hold the lever in an upright position as shown in the photo below. Once tight push the lever in to secure the wheel. TO CHECK Make sure the quick release clamping lever is secure. Make sure the brake is hooked onto the disc and working properly. Check your tyre pressure –...
- Page 10 There are 2 pedals. Please look inside of each pedal to identify which is labeled R (right) and L (left). To connect the pedals to the bike, place L pedal into the left crank arm and R pedal into the right crank arm (left and right directions are as though you are sitting on the bike).
-
Page 11: Attaching The Seat
ATTACHING THE SEAT • Slide the saddle post into the seat tube. • Align the seat with the frame to make sure it is straight. • The height of the seat should not be pulled higher than the safety line marks on the seat post. •... -
Page 12: Safe Riding
SAFE RIDING suffient charge Do not ride the bike through deep water. removable -ion the battery. The charging port is located on the side of the battery shown in the photo on p.13. battery charged and remove once completed. fb.com/westhillbikes | westhillbikes.com... -
Page 13: Charging Port
CHARGING PORT Do not turn on the bike while it is charging. charging port. In the unlikely event , step away from the battery and contact Westhill Bikes for further assistance. fb.com/westhillbikes | westhillbikes.com... -
Page 14: Product Name And Model
KD986 E-BIKE DISPLAY USER MANUAL PRODUCT NAME AND MODEL Name: Intelligent TFT display for E-bike Model: KD986 SPECIFICATIONS - 36V/48V Power Supply - Rated working current: 10mA - The maximum working current: 30mA - Off-state leakage current: <1μA - Operating temperature: -20˚C~ 60˚C - Storage temperature: -30˚C~ 70˚C APPEARANCE AND SIZE - Display appearance and dimensional drawing (unit: mm) -
Page 15: Function Summary
REMOTE CONTROL APPEARANCE FUNCTION SUMMARY KD986 can provide a lot of functions to fit the users needs. - Battery SOC percentage indication - Motor power indication - Assist-level indication - Speed indication (incl. running speed, max. speed and ave. speed) - Odometer and trip distance - Push-assistance function - Trip time indication... -
Page 16: General Operation
GENERAL OPERATION Switching the E-bike System On/Off Press the power button to switch on the E-bike system. To turn off the E-bike system, hold the power button down for 2 seconds. When switched off, the E-bike system no longer uses battery power. When switching off the E-bike system, the leakage current is less than 1 μA. - Page 17 Switching the Headlight On/Off To switch on the headlight, hold the button. The backlight brightness is automatically reduced. Hold the button again to switch the headlight off. The front light additionally has a light sensor function. This means if the bike is in a dark place, the light will automatically turn on, and if the light is on in a bright location, the headlight will automatically be switched off.
- Page 18 Error Code Indication The components of the E-bike system are continuously and automati- cally monitored. When an error is detected, the respective error code is indicated in text indication area. Have the display repaired when error code appears. Otherwise, you will not be able to ride the bike normally.
- Page 19 Unit km/mile Conversion DisPlay Setting DisPlay Setting Toggle Unit represents unit settings. To toggle the unit, press the “+” button or the “-” button to choose the desired unit and press the “i” button to confirm. The default unit is “Metric (km)”.
-
Page 20: Advanced Settings
DisPlay Setting Backlight Brightness Settings DisPlay Setting LCD Luminance represents backlight brightness. 100% is the highest brightness. The less the percentage, the lower the backlight brightness. To change the backlight brightness, press the “+” button or the “-” button to choose the desired percentage. - Page 21 Advanced Settings Advanced Settings Controller Over-current Cut Settings Current Limit represents controller over-current cut settings. The current value can be changed from 7.0A to 25.0A. The default value is 15A. To change basic settings, press the “+” or the “-” button to increase or decrease the value of the current.
- Page 22 Sensitivity Advanced Settings Advanced Settings Sensitivity represents the sensitivity of the power assist sensor. It means the motor assist should start after a certain number of magnets are passing on the power assist sensor. To change the value, press the “+” or the “-” button to choose the sensitivity value.
- Page 23 Power-on Password Disable/Enable To enable or disable Start PassWord settings, press the “+” or the “-” button to select ON or OFF. ON means enabling a power-on password while OFF means disabling a power-on password. The default value is OFF. To enable a power-on password, choose ON and press “i” button to confirm and input the current password or default password ’0314’.
-
Page 24: Connection Layout
CONNECTION LAYOUT Wire sequence table Socket type male connector (display is cable free) Wire no. Colour Function Red (VCC) Blue (K) Lock Black (GND) Green (RX) Yellow (TX) Display-side Matching connector from Some displays have wire connection with socket controller side water-proof connectors, users can not see the color of lead wires in the harness. -
Page 25: Battery Range
WARNINGS - Use the display with caution. Don’t attempt to release or link the connector when battery is on. - Try to avoid hitting the display. - Don’t modify system parameters to avoid parameter disorder. - Repair the display when error code appears. *This manual instruction is a universal version for DISPLAY KD986. -
Page 26: Cleaning The Bike
CLEANING THE BIKE Do not use excessive water to clean the bike as this could damage the components, resulting in personal injury or malfunction of the bicycle. Lubricate the chain after every wash if you can to keep it smooth and rust free. Suitable products are available via westhillbikes.com. - Page 27 Be aware of your surroundings. any electrical parts without contacting the Customer Service (+44 (0)1823 672 970). the bike. fb.com/westhillbikes | westhillbikes.com...
- Page 28 Westhill Bikes Warranty Register Now Through Our Website westhillbikes.com/warranty-registration Simply visit and fill in your information. Register Now Through Facebook The other way to register your new bike is through Facebook. Simply visit our page www.fb.com/westhillbikes or scan the QR code below with your mobile...
Need help?
Do you have a question about the VENTURE and is the answer not in the manual?
Questions and answers