Table of Contents
Advertisement
Available languages
Available languages
Quick Links
Advertisement
Table of Contents

Related Manuals for Bresser TR-688V

Summary of Contents for Bresser TR-688V
- Page 1 Tripod · Stativ · TR-688V Instruction manual Bedienungsanleitung...
- Page 2 Desidera ricevere informazioni esaustive su questo prodotto in una lingua specifica? Venga a visitare il nostro sito Web al seguente link (codice QR Code) per conoscere le versioni disponibili. www.bresser.de/PF002036 GARANTIE · WARRANTY · GARANTÍA · GARANZIA www.bresser.de/warranty_terms...
- Page 3 English ........................Deutsch ........................
-
Page 4: Intended Use
We ask for your understanding that unsolicited returns cannot be pro- cessed. Errors and technical changes excepted. © 2022 Bresser GmbH All rights reserved. The reproduction of this documentation - even in extracts - in any form (e.g. photocopy, print, etc.) as well as the use and distribution by means of electronic systems (e.g. -
Page 5: General Safety Instructions
5 General safety instructions DANGER Danger of suffocation! Improper use of this product may result in suffocation, especially for children. It is therefore imperative that you observe the following safety information. • Keep packaging materials (plastic bags, rubber bands, etc.) away from children! There is a danger of choking! •... -
Page 6: Parts Overview And Scope Of Delivery
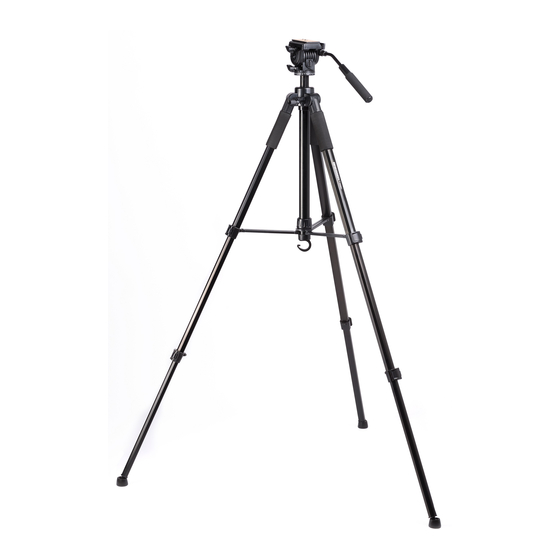
6 Parts overview and scope of delivery Illustration 1: All parts of the tripod 1 Tripod head 2 Tripod head plate with ¼" DIN photo thread 3 Locking lever (tripod head plate) 4 Fixing screw (tripod head tilt 90°) 5 Guiding handle and fixation (vertical 6 Height-adjustable tripod centre rod (can be ex- movement) tended/retracted via (9)) -
Page 7: Setting Up The Tripod
Scope of delivery: Tripod (A), quick-release plate (B), carrying bag (C) 7 Setting up the tripod 1. Loosen the locking ring for the tripod bridge. 2. Pull out the tripod legs slowly until the tripod bridge is opend completely. 3. Tighten the locking ring for the tripod bridge by hand. 4. -
Page 8: Warranty
You can consult the full guarantee terms as well as information on extending the guarantee period and details of our services at www.bresser.de/warranty_terms. 8 / 16... -
Page 9: Zu Dieser Anleitung
„Garantie“ und „Service“ in dieser Dokumentation. Wir bitten um Verständnis, dass unaufgeforderte Rücksendungen nicht bearbeitet werden können. Irrtümer und technische Änderungen vorbehalten. © 2022 Bresser GmbH Alle Rechte vorbehalten. Die Reproduktion dieser Dokumentation – auch auszugsweise – in irgendeiner Form (z.B. Fotokopie, Druck, etc.) sowie die Verwendung und Verbreitung mittels elektronischer Systeme (z.B. -
Page 10: Allgemeine Sicherheitshinweise
5 Allgemeine Sicherheitshinweise GEFAHR Erstickungsgefahr! Bei unsachgemäßer Verwendung dieses Produkts besteht Erstickungsgefahr, insbesondere für Kin- der. Beachten Sie deshalb unbedingt die nachfolgenden Sicherheitsinformationen. • Verpackungsmaterialien (Plastiktüten, Gummibänder, etc.) von Kindern fernhalten! Es besteht Er- stickungsgefahr! • Dieses Produkt beinhaltet Kleinteile, die von Kindern verschluckt werden können! Es besteht Ersti- ckungsgefahr! VORSICHT Verletzungsgefahr! -
Page 11: Teileübersicht Und Lieferumfang
6 Teileübersicht und Lieferumfang Abb. 1: Alle Teile des Stativs 1 Stativkopf 2 Stativkopfplatte mit ¼“ DIN-Fotogewinde 3 Arretierungshebel (Stativkopfplatte) 4 Fixierschraube (Stativkopfneigung 90°) 5 Führungsgriff und Fixierung (vertikale 6 Höhenverstellbare Stativmittelstange (über (9) Bewegung) aus-/einfahrbar) 7 Fixierschraube (horizontale Bewegung) 8 Wasserwaage 9 Kurbel (Höhenverstellung) 10 Arretierungsring (Höhenverstellung) 11 Dosenlibelle... -
Page 12: Stativ Aufstellen
Lieferumfang: Stativ (A), Schnellwechselplatte (B), Transporttasche (C) 7 Stativ aufstellen 1. Arretierungsring für die Stativspinne lösen. 2. Stativbeine langsam nach außen ziehen bis Stativspinne vollständig geöffnet ist. 3. Arretierungsring für die Stativspinne handfest anziehen. 4. Klemmhebel für die Stativbeine öffnen. 5. -
Page 13: Garantie
Die reguläre Garantiezeit beträgt 2 Jahre und beginnt am Tag des Kaufs. Um von einer verlängerten, freiwilligen Garantiezeit wie auf dem Geschenkkarton angegeben zu profitieren, ist eine Registrierung auf unserer Website erforderlich. Die vollständigen Garantiebedingungen sowie Informationen zu Garantiezeitverlängerung und Ser- viceleistungen können Sie unter www.bresser.de/garantiebedingungen einsehen. 13 / 16... - Page 15 (de preferencia por Telephone*: +44 1342 837 098 e-mail). BRESSER UK Ltd e-mail: servicio.iberia@bresser-iberia.es Customer Support Teléfono*: +34 91 67972 69 Suite 3G, Eden House BRESSER Iberia SLU...
- Page 16 Bresser GmbH Gutenbergstraße 2 46414 Rhede · Germany www.bresser.de @BresserEurope...
Need help?
Do you have a question about the TR-688V and is the answer not in the manual?
Questions and answers