Advertisement
Advertisement
Table of Contents

Related Manuals for VELOWAVE RANGER

Summary of Contents for VELOWAVE RANGER
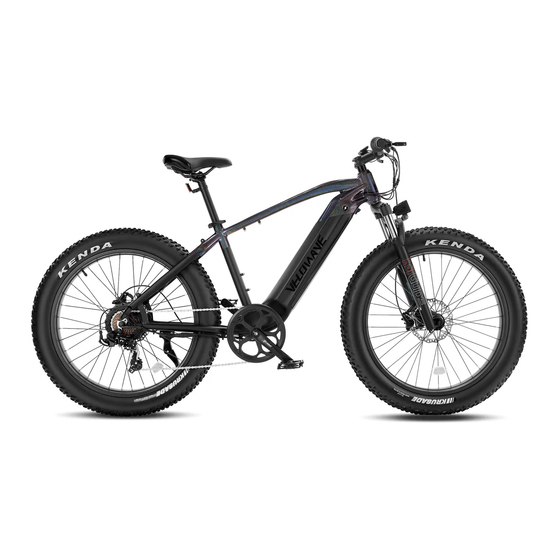
- Page 1 Instructions to Set Up Your VELOWAVE RANGER/GHOST Diagram 1 / 16...
- Page 2 We know you are excited about getting going but please: ✓ Reseat and charge the battery before the first ride ✓ Make sure the pedals are tight ✓ Make sure the front wheel is installed properly and tight ✓ Inflate the tires properly ✓...
-
Page 3: Assembling Your E-Bike
Assembling Your E-Bike 1) Read all of the instructions carefully. Be familiar with the proper operation of all items. 2) This quick guide is intended to list the steps needed to assemble your bike with some mechanical skills. It is not a complete manual or training. If you do not feel comfortable or lack some of the skills to assemble it yourself, reach out to a cyclist friend, a local bike mechanic or one of our support technicians for guidance. - Page 4 Installing Your Handlebars 1) Point the headset towards the front of the bike. 2) Place the handlebar in the handlebar mount being careful with the wires. 3) Face the mounting brackets on the front end of the mount with the round edges facing outward. Insert the screws into the screw holes and tighten alternating sides until secure (4mm allen wrench with 6N strength).
- Page 5 Installing Your Front Wheel 1) Insert the front wheel in between the front fork on the bike. Be sure the fork is resting on the outside of the axle. 2) Align the disk between the brake caliper as shown in Figure 2. 3) Insert the skewer into the wheel axle as seen shown.
- Page 6 Installing Your Headlight 1) Place the headlight with its bracket in front of the fork gantry. Push the screw provided on the headlight through the installing hole on the fork gantry. Tighten the fixing nut onto the screw. (You might need to secure the fixing nut tightly so the screw doesn’t turn). Connect the headlight cable with the wire coming from the downtube.
- Page 7 Installing Your Pedals 1) Warning: Incorrect installation will cause damage. Please read the instructions and watch our videos if needed. 2) Identify the Left and Right markings on the pedals. They can only be installed in their respective side. a. L is for the Left Pedal and it goes on the Left Crank Arm. b.
-
Page 8: Installing And Removing The Battery
Installing and Removing the Battery To Install the Battery 1) Turn the key counterclockwise to release the lock. 2) Seat the bottom of the battery into the receptacle first and push the upper side of the battery into the frame tightly until it gets locked with a clatter sound. Seat your battery securely, turn the key clockwise to lock the battery. -
Page 9: Preparations Before Riding
To Remove the Battery 1) Turn off the LCD display. 2) The battery is secured with a double-lock mechanism. Use the key to release the first lock. Push slide the plastic tab under the tube to release the second lock. Note: Please hold the battery tight with one hand at least as it will drop off when the lock is released. -
Page 10: How To Use The Display
How to Use the Display 1) Power on/off button to turn on the display. Your bike will be ON. Press again to turn it off. The Press the display will automatically shut down when there is no operation or riding for 5 minutes. 2) Adjust the assist level Short press “+”... - Page 11 How to Charge Your Bike There are two ways to charge your battery. 1. Charge the battery ON the bike 1) Find the Charge Port at the bottom of the downtube. 2) Pull out the cover to show the charge port and insert the charger output plug into the port. Connect the input plug to the power supply.
- Page 12 Do not leave a charging battery unattended. Never charge a battery for more than 12 hours at a time. Failure to follow battery charging best practices could result in unnecessary wear to the charging components, battery, and or charger, and could lead to an under-performing or non-functional battery and replacement will not be covered under warranty.
-
Page 13: Error Code
Error Code Error Error Notes Code Throttle has not returned to the start position on start-up. Open Throttle Fault Check to see if the throttle can return to the start position or if there is something blocking the throttle unit. Throttle may be damaged. -
Page 14: Basic Troubleshooting
Basic Trouble Shooting SYMPTOMS CAUSES SOLUTIONS Battery off Turn on battery Battery installation Reseat battery LCD display not on Turn on LCD display Throttle and pedal assist not working Discharged battery Charge battery ... - Page 15 Label of Your RANGER 15 / 16...
- Page 16 To find out more, please visit our website at www.velowavebikes.com 16 / 16...