Table of Contents
Advertisement
Quick Links
Advertisement
Table of Contents

Related Manuals for IC Realtime PWR-POE-8-V3

Summary of Contents for IC Realtime PWR-POE-8-V3
- Page 1 PWR-POE-8-V3 8-port Unmanaged Desktop Switch Quick Start Guide V1.0.0...
-
Page 2: Foreword
Foreword General This manual explains the hardware, installation, and wiring steps of the PWR-POE-8-V3 8- port unmanaged desktop switch (hereinafter referred to as "the device"). Safety Instructions Below are terminology and icons that may appear in the manual and its definition. - Page 3 ● If there is any uncertainty or controversy, please refer to our final explanation.
-
Page 4: Important Safeguards And Warnings
Important Safeguards and Warnings The manual will guide you on how to use the product properly. To avoid danger and property damage, read the manual carefully before using the product, and we highly recommend you to store for future reference. Operating Requirements ●... -
Page 5: Table Of Contents
Table of Contents Foreword ........................................I Important Safeguards and Warnings ............................III 1 Overview ........................................1 1.1 Introduction ....................................1 1.2 Features and Applications..............................1 2 Port and Indicator ....................................2 2.1 Front Panel ....................................2 2.2 Rear Panel ...................................... 3 3 Installation ....................................... -
Page 6: Overview
1 Overview 1.1 Introduction The PWR-POE-8-V3 is a high-performance layer-2 commercial switch utilizing a large buffer memory to ensure smooth video stream transmission. This switch is equipped with a full-metal and fanless design, features excellent heat dissipation capability, and can work in the environment from –14°F to +131 °F 9–10°C to +55 °C.). -
Page 7: Port And Indicator
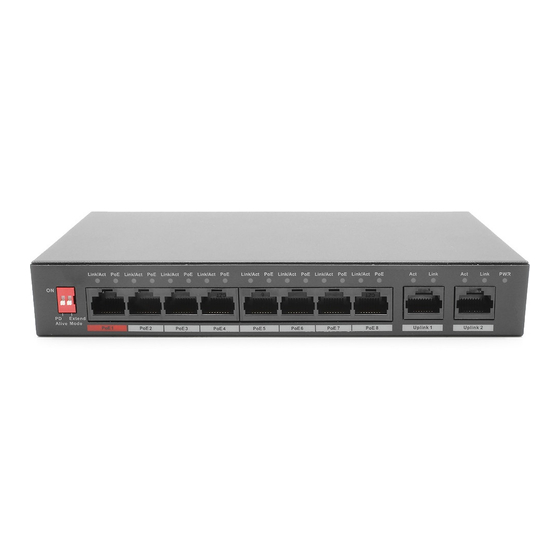
2 Port and Indicator 2.1 Front Panel The figure below is for reference only, and may differ from the actual product. Figure 2-1 Front panel The following are all the ports and indicators on the front panel of the 8-port unmanaged desktop switch. -
Page 8: Rear Panel
Description DIP switch ● PD Alive: When a connected device becomes unresponsive, the switch will power down and restart the device. ● Extend Mode: Extends the maximum transmission distance to 250 m, but reduces average transmission speed to 10 Mbps. Another DIP switch Select Default or Extend Mode by toggling the DIP switch. -
Page 9: Installation
3 Installation 3.1 Preparation ● Select an appropriate installation method as needed. ● Install the device on solid and flat surface. ● Leave about 4 inches for heat dissipation space around the switch to ensure good ventilation. 3.2 Desktop Mount The device supports desktop mount. -
Page 10: Wiring
4 Wiring 4.1 Connecting GND (Ground) A Devices GND connection is important for device lightning protection and anti-interference. The steps for connecting the GND are as follows: Step 1 Remove the ground screw on the device. Pass the ground screw through the round hole of the OT terminal of the ground cable. -
Page 11: Connecting Poe Ethernet Port
Figure 4-2 Ethernet port pin number Figure 4-3 Pin description The cable connection of RJ-45 connector conforms to the standard 568B (1-orange white, 2-orange, 3-green white, 4-blue, 5-blue white, 6-green, 7-brown white, 8-brown). 4.4 Connecting PoE Ethernet Port You can directly connect the device PoE Ethernet port to the switch PoE Ethernet port using a network cable to achieve synchronized network connection and power supply. -
Page 12: Appendix 1 Cybersecurity Recommendations
Appendix 1 Cybersecurity Recommendations Cybersecurity is something that pertains to every device that is connected to the internet (IoT). IP video surveillance are not immune to cyber risks, but taking basic steps toward protecting and strengthening networks and networked devices will make them less susceptible to attacks. Below are some tips and recommendations on how to create a more secured security system. - Page 13 6. Enable HTTPS We suggest you to enable HTTPS, so that you visit Web service through a secure communication channel. 7. MAC Address Binding We recommend you to bind the IP and MAC address of the gateway to the device, thus reducing the risk of ARP spoofing.