Table of Contents
Advertisement
Available languages
Available languages
Quick Links
Advertisement
Chapters
Table of Contents

Related Manuals for Intenso 7 PHOTOMODEL


Summary of Contents for Intenso 7 PHOTOMODEL
- Page 1 Intenso PHOTOMODEL V 1.0...
- Page 2 Bedienungsanleitung Intenso PHOTOMODEL...
-
Page 3: Table Of Contents
Inhaltsverzeichnis EINFÜHRUNG ..........................................1 ALLGEMEINE PRODUKT MERKMALE ..................................2 ÜBERSICHT ..........................................3 FERNBEDIENUNG ........................................4 EINSETZEN DER BATTERIE IN DIE FERNBEDIENUNG ............................5 ERSTE SCHRITTE ........................................6 NUTZUNG VON SPEICHERKARTEN ..................................7 BETRACHTEN EINER DIASHOW ..................................... 8 HAUPTMENÜ ..........................................9 BETRACHTEN VON FOTOS .................................... - Page 4 Datum und Uhrzeit einstellen ....................................18 Aktivieren des automatischen Ein- und Ausschaltens ............................19 Anzeige des Kalenders ......................................20 HÄUFIG GESTELLTE FRAGEN ....................................21 PRODUKT SPEZIFIKATIONEN ....................................24 PFLEGE UND WARTUNG ......................................25...
-
Page 5: Einführung
EINFÜHRUNG Danke, dass Sie sich für den DIGITALEN FOTORAHMEN ( DF ) von Intenso entschieden haben. Bevor Sie dieses Gerät nutzen, lesen Sie bitte diese Bedienungsanleitung gründlich durch und beachten Sie alle Warnhinweise. Wir empfehlen eine sichere Aufbewahrung dieser Anleitung, um etwaig auftretende Fragen selbstständig beantworten zu können . -
Page 6: Allgemeine Produkt Merkmale
ALLGEMEINE PRODUKT MERKMALE Dekorative Erscheinung, gute Qualität Anzeige von Fotos (JPEG) ohne einen Computer Automatische Diashow mit Übergangseffekten und individueller Anzeigedauer Kalender Funktion Timer Funktion Kompatibel mit SD / SDHC / MMC / MS Karten USB Steckplatz für den Anschluss von USB Massenspeichern 2 Wege der Steuerung: 7 Tasten auf der Rückseite des , Infrarot Fernbedienung DE - 2... -
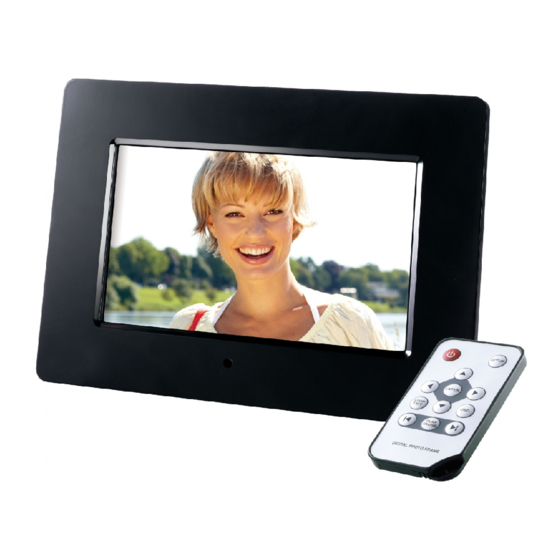
Page 7: Übersicht
ÜBERSICHT 1 Infrarot Sensor 8 Zurück [ ] Taste 2 Menü Taste, öffnet das OSD Menü 9 Power An/Aus 3 Links [ ] Taste 10 SD/MMC/MS Karten Slot 4 Aufwärts [ ] Taste 11 USB Host 5 Play/Pause [ ] Taste 12 DC 5V 1A Eingang 6 Rechts [ ] Taste 13 Standfuß... -
Page 8: Fernbedienung
FERNBEDIENUNG Power On/ Off Bewegt den Cursor aufwärts im Auswahlmenü Kippt das Bild im Uhrzeigersinn um 90 Grad im Diashow Modus. Bewegt den Cursor nach links im Auswahlmenü oder zurück zum vorherigen Bild im Diashow-Modus MENU Aufrufen des Hauptmenüs Bewegt den Cursor abwärts im Auswahlmenü Kippt das Bild im Diashow Modus um 90 Grad gegen den Uhrzeigersinn. -
Page 9: Einsetzen Der Batterie In Die Fernbedienung
EINSETZEN DER BATTERIE IN DIE FERNBEDIENUNG Platzieren Sie die Fernbedienung mit den Tasten nach unten. Drücken Sie die Feder links neben dem Batteriefach nach rechts und ziehen Sie gleichzeitig das Batteriefach heraus. Setzen Sie eine CR2025 Lithium Batterie mit dem Plus Symbol nach oben in das Batteriefach ein. Schieben Sie das Batteriefach wieder vollständig in das Gehäuse der Fernbedienung. -
Page 10: Erste Schritte
ERSTE SCHRITTE Befestigen Sie den Standfuß am DIGITALEN FOTORAHMEN ( DF ). Verbinden Sie das mitgelieferte Netzteil mit dem DF. Stecken Sie das andere Ende des mitgelieferten Netzteils in die Steckdose. Schieben Sie den Regler des DF Für die erste Inbetriebnahme wählen Sie bitte nach dem ersten Einschalten die Sprache in dem erscheinenden Fenster mittels der Tasten auf der Rückseite oder der Fernbedienung aus. -
Page 11: Nutzung Von Speicherkarten
NUTZUNG VON SPEICHERKARTEN Setzen Sie SD / SDHC / MMC / MS Karten mit den Kontakten in Richtung des Display schauend in den 3-in-1 Karten Slot ein. Verbinden Sie USB Speichermedien mit dem DIGITALEN FOTORAHMEN durch Einsetzen der Medien in den USB Steckplatz (USB Host). Hinweis: Bitte setzen Sie Speicherkarten nicht mit Gewalt ein. -
Page 12: Betrachten Einer Diashow
BETRACHTEN EINER DIASHOW Nach dem Einschalten gelangen Sie direkt in das Hauptmenü. Wenn Sie eine Speicherkarte oder einen USB Stick mit dem DF verbunden haben, startet die Diashow direkt nach dem Einschalten. Drücken Sie die Taste MENU anschließend die [ ],[ ] Tasten auf der Rückseite des DF oder die Tasten auf der Fernbedienung, um das verbundene Speichermedium, das Setup oder den Kalender aufzurufen. -
Page 13: Hauptmenü
HAUPTMENÜ Im Hauptmenü haben Sie die Auswahl zwischen den verbundenen Speichermedien, dem Kalender und dem Setup. 1. Drücken Sie die MENU -Taste auf der Rückseite des DF oder auf der Fernbedienung, um das Hauptmenü aufzurufen. Menü Beschreibung Erscheint, wenn ein USB Medium verbunden ist. SD/MMC/MS Erscheint, wenn eine SD, SDHC, MS oder MMC Karte verbunden ist. -
Page 14: Betrachten Von Fotos
BETRACHTEN VON FOTOS Abspielen einer Diashow Sie können in jedem Menü die [ ] Taste auf der Fernbedienung zum Starten der Diashow nutzen, Sie beginnt jeweils mit dem ersten Foto. Zum Anhalten der Diashow und zum Anzeigen eines einzelnen Fotos drücken Sie die [ ] Taste auf dem DF oder die OK-Taste auf der Fernbedienung. - Page 15 Bilder-Vorschaumenü Die Bilder auf dem ausgewählten Speichermedium werden als Miniaturbilder dargestellt. Es können bis zu 15 Bilder gleichzeitig angezeigt werden. Wählen Sie im Hauptmenü ein Speichermedium (USB, SD/MMC/MS) aus und drücken Sie auf dem DF oder der Fernbedienung die OK-Taste. Zum Navigieren zwischen den Miniaturbildern nutzen Sie die [ ],[ ],[ ],[ ] Tasten auf dem DF oder die Tasten auf der Fernbedienung.
-
Page 16: Anzeige Eines Einzelnen Bildes
Anzeige eines einzelnen Bildes Sie können ein einzelnes Bild auswählen. Wählen Sie im Bilder-Vorschaumenü ein Bild aus und drücken Sie die [ ] Taste auf dem DF oder die OK-Taste auf der Fernbedienung. Das Bild wird nun im Vollbildmodus angezeigt. Betätigen Sie jetzt innerhalb der gewählten Anzeigedauer nochmals die [ ] Taste auf dem DF oder die OK-Taste auf der Fernbedienung. -
Page 17: Ändern Des Anzeigemodus
Ändern des Anzeigemodus Während des Betrachtens eines Bildes oder während der Diashow können Sie durch mehrmaliges Drücken der [4:3/16:9] Taste auf der Fernbedienung den Anzeigemodus wechseln. 4:3: Bei dieser Auswahl wird ein Bild, welches im 16:9 oder einem größeren Format gespeichert ist, gestreckt und als Vollbild angezeigt. -
Page 18: Nutzung Des Osd Menüs
Nutzung des OSD Menüs Sie können das OSD Menü nutzen, um die nachfolgenden Aktionen auszuführen. Drücken Sie die [OSD] Taste auf der Fernbedienung während des Betrachtens eines Bildes oder einer Diashow. Das OSD Menü erscheint auf dem Display und die Diashow wird gestoppt. Drücken Sie die [ ], [ ] Tasten auf dem DF oder die Tasten auf der Fernbedienung, um zwischen den Funktionen zu navigieren. - Page 19 Um das Foto um 90 Grad im Uhrzeigersinn zu drehen, wählen Sie bitte das Symbol und drücken Sie [ ] auf dem DF oder OK auf der Fernbedienung. Um das Foto um 90 Grad gegen den Uhrzeigersinn zu drehen, wählen Sie bitte das Symbol und drücken Sie [ ] auf dem DF oder OK auf der Fernbedienung.
-
Page 20: Setup Menü
SETUP MENÜ Sie können die Systemeinstellungen des DIGITALEN FOTORAHMENS ( DF ) individuell einstellen. Wählen Sie im Hauptmenü den Menüpunkt SETUP aus und bestätigen Sie Ihre Auswahl mit der [ ] Taste auf dem DF oder der OK-Taste auf der Fernbedienung. Sie gelangen außerdem durch Drücken der [SETUP] Taste auf der Fernbedienung direkt in dieses Menü. - Page 21 Einstellmöglichkeiten Beschreibung Wählen Sie aus, wie lange ein Bild während einer Diashow angezeigt werden soll. Anzeigedauer Einstellmöglichkeiten: 3 Sek., 5 Sek., 15 Sek., 1 Min., 15 Min. Bildübergänge Wählen Sie zwischen zufälligen und einem kontinuierlichen Bildübergang Wählen Sie die die Anzeigeform für Ihren Kalender / Uhr aus. Einstellmöglichkeiten: Monatskalender, Uhrmodus Digitaluhr, Analoguhr Einstellen der Uhrzeit.
-
Page 22: Datum Und Uhrzeit Einstellen
Datum und Uhrzeit einstellen Stellen Sie die Uhrzeit auf dem Intenso DF ein: Wählen Sie im Hauptmenü den Menüpunkt SETUP aus. Drücken Sie die [ ], [ ] Tasten auf dem DF oder die Tasten auf der Fernbedienung, um den Eintrag Zeiteinstellung auszuwählen. -
Page 23: Aktivieren Des Automatischen Ein- Und Ausschaltens
Aktivieren des automatischen Ein- und Ausschaltens Sie können den DIGITALEN FOTORAHMEN von Intenso zu einer von Ihnen gewünschten Uhrzeit automatisch ein- und ausschalten lassen. Hinweis: Für diese Funktion muss im Vorfeld die korrekte Uhrzeit eingegeben werden. Wählen Sie im Hauptmenü den Menüpunkt SETUP aus. -
Page 24: Anzeige Des Kalenders
Anzeige des Kalenders Im Kalendermodus wird das aktuelle Datum, die aktuelle Uhrzeit und im Hintergrund eine Diashow mit den verfügbaren Bildern angezeigt. Wählen Sie im Hauptmenü den Menüpunkt Uhr aus. Um den Kalendermodus zu verlassen, drücken Sie die [ ] Taste. Hinweis: Datum und Zeit können nur im Menü... -
Page 25: Häufig Gestellte Fragen
Es ist eine Speicherkarte eingesteckt. Der DF kann jedoch nicht von dieser lesen. Was kann ich machen? Als erstes überprüfen Sie bitte, ob diese Karte kompatibel zum DIGITALEN FOTORAHMEN von Intenso ist. Überprüfen Sie danach, ob die Karte in der richtigen Art und Weise in den Kar tenslot eingesteckt wurde. Denken Sie bitte auch Bitte beachten Sie: Einige Digitalkameras speichern die Bilder nicht in dem Standardformat JPEG ab. - Page 26 Warum werden einige Bilder schneller geladen als andere? Bilder mit einer höheren Auflösung benötigen länger bis sie angezeigt werden können. Um die Anzeigegeschwindigkeit zu erhöhen, nutzen Sie bitte Bilder mit einer niedrigeren Auflösung. Hinweis: Der Photo Frame unterstützt eine Auflösung bis 8000*8000 Pixel. Warum startet die Software nicht, obwohl die Stromversorgung gegeben ist und Power auf O Wahrscheinlich liegt ein Systemfehler vor.
- Page 27 In welcher Auflösung sollten Bilder sein, um optimal auf dem Display dargestellt werden zu können? Die beste Auflösung für diesen DF ist 800*600 Pixel. Warum funktionieren die Funktionen: Automatisches Einschalten / Ausschalten nicht, obwohl ich sie aktiviert habe? Stellen Sie sicher, dass Sie die korrekte Uhrzeit eingestellt haben. Wenn die eingestellte Uhrzeit in der Vergangenheit liegt, wird die Funktion zum ersten Mal am nächsten Kalendertag aktiviert.
-
Page 28: Produkt Spezifikationen
PRODUKT SPEZIFIKATIONEN Digitales TFT LCD Display Größe: 7 (17,78cm sichtbare Bilddiagonale) Anzeige Anzeigemodus: 4:3 Auflösung: 800*600 Pixel Input: 100~240V AC, 50/60Hz Netzteil Output: 5V 1A DC USB Host 2.0 USB port Unterstützt USB Speichermedien Unterstützte SD/SDHC (Secure Digital Card), MMC (MultiMedia Card), MS (Memory Stick) Speicherkarten... -
Page 29: Pflege Und Wartung
PFLEGE UND WARTUNG Pflege Um die Gefahr von elektrischen Stromstößen zu vermeiden, entfernen Sie bitte weder die Schrauben noch das Gehäuse. Benutzen Sie dieses Gerät nicht in der Nähe von Wasser. Setzen Sie dieses Gerät weder Regen noch Feuchtigkeit aus. Stellen Sie keine Gegenstände in der Nähe des Gerätes ab, die Wasser oder andere Flüssigkeiten speichern . - Page 30 Wartung des Gerätes Das Gerät muss ausgeschaltet sein. Sprühen oder tragen Sie niemals eine Flüssigkeit direkt auf das Display oder Gehäuse auf. Säuberung des Displays / Gehäuses / Rahmens Wischen Sie Gehäuse, Rahmen und LCD Display vorsichtig mit einem weichen, fussel - und chemikalienfreien Tuch ab. Verwenden Sie nur Reinigungsmittel, die speziell für LCD-Displays bestimmt sind.
- Page 31 Operating Instructions Intenso PHOTOMODEL...
- Page 32 Table of Contents INTRODUCTION ......................................... 1 GENERAL PRODUCT CHARACTERISTICS ................................2 OVERVIEW ..........................................3 REMOTE CONTROL ........................................4 INSERTING BATTERIES INTO REMOTE CONTROL .............................. 5 FIRST STEPS..........................................6 USING MEMORY CARDS ......................................7 WATCHING A SLIDE SHOW ...................................... 8 MAIN MENU ..........................................9 WATCHING PHOTOS .......................................
- Page 33 Adjusting Date and Time ....................................... 18 Activating Automatic Power On/Off ..................................19 CALENDAR DISPLAY ......................................20 FAQs............................................21 PRODUCT SPECIFICATIONS....................................24 SERVICE AND MAINTENANCE ....................................25...
-
Page 34: Introduction
INTRODUCTION Before using this device please carefully read these operating instructions a nd observe all safety notes. Please store these instructions at a safe place to have an answer at hand whenever you have questions. These instructions have been compiled with great care to enable you to safely use all functions of the DF. -
Page 35: General Product Characteristics
GENERAL PRODUCT CHARACTERISTICS Decorative appearance, excellent quality Shows pictures (JPEG) without requiring a computer Automatic slide show with transition effects and individual display duration Calendar function Timer function Compatible with SD / SDHC / MMC / MS cards USB slot to connect USB flash drives 2-way control: 7 buttons on the rear side of the DF, infrared remote control GB - 2... -
Page 36: Overview
OVERVIEW 1 Infrared sensor 8 Exit [ ] button 2 Menu button, opening the OSD menu 9 Power On/Off 3 Left [ ] button 10 SD/SDHC/MMC/MS card slot 4 Up [ ] button 11 USB host slot 5 Play/Pause [ ] button 12 DC 5V 1A input 6 Right [ ] button 13 Frame base... -
Page 37: Remote Control
REMOTE CONTROL Power On/ Off -{}- Moves the cursor upwards in the selection menu Tilts the picture in clockwise direction by 90 degree in the slide show mode. Moves the cursor to the left in the selection menu or back to the previous picture in the slide show mode MENU Starts the main menu Moves the cursor downwards in the selection menu... -
Page 38: Inserting Batteries Into Remote Control
INSERTING BATTERIES INTO REMOTE CONTROL Turn your remote control upside down with the buttons facing down. There is a spring on the left side of the battery compartment. Hold it to the right and simultaneously pull out the battery compartment. Insert a CR2025 Lithium battery to the battery compartment with the Plus symbol facing upwards. -
Page 39: First Steps
FIRST STEPS Connect the frame base to the DIGITAL PHOOTE FRAME ( DF ). Connect the mains adapter provided with the Plug the other end of the provided mains adapter into the power outlet. Using the device for the first time please select the Language in the appearing window by use of the keys on the rear side or the remote control. -
Page 40: Using Memory Cards
USING MEMORY CARDS Insert SD / SDHC / MMC / MS cards into the 3-in-1 card slot with the contacts facing the display. USB storage mediums can be connected with the DIGITAL PHOTE FRAME by inserting these mediums into the USB port (USB host). Please note: Please do not insert memory cards by use of force. -
Page 41: Watching A Slide Show
WATCHING A SLIDE SHOW After power-on you will be guided directly to the main menu. If a memory card or a USB memory stick is connected to the DF, the slide show will start directly after power on. Press the button on the rear side of the DF or on the remote control and then the MENU [ ],[... -
Page 42: Main Menu
MAIN MENU In the main menu you can select the storage mediums connected, the setup menu and the calendar. 1. 1. Press the MENU -button on the rear side of the DF or on the remote control to access the main menu. Menu Description Displayed if a USB medium is connected. -
Page 43: Watching Photos
WATCHING PHOTOS Starting a Slide Show In each menu you can use the [ ] button on the remote control to start the slide show, starting with the first photo. To stop the slide show and to display individual photos please press the [ ] button on the DF or the OK-button on the remote control. By repeatedly pressing the [ ] button on the DF or the OK-button on the remote control you can proceed with the slide show. - Page 44 Picture Preview Menu Picture Preview Menu The pictures on the storage medium selected are depicted as thumbnails. It is possible to display up to 15 pictures at a time. In the main menu please select a storage medium (USB, SD/MMC/MS) and press the OK-button on the DF or on the remote control.
-
Page 45: Displaying Individual Pictures
Displaying Individual Pictures You can select individual pictures without starting a slide show. In the picture preview menu please select a picture and press the [ ] button on the DF or the OK-button on the remote control. The picture is now displayed in full screen mode. Now please press the [ ] button on the DF or the OK-button on the remote control within the selected display time. -
Page 46: Changing The Display Mode
Changing the Display Mode While watching a picture or during the slide show you can change the display mode by repeatedly pressing the [4:3/16:9] button on the remote control. 4:3: With this selection a picture which is saved in the 16:9 or a larger format is stretched and displayed as full screen picture. 16:9: With this selection a picture which is saved in the 16:9 or a larger format is displayed in its original format with a black bar at the upper and lower margin. -
Page 47: Using The Osd Menu
Using the OSD Menu You can use the OSD menu carry out the following functions. Press the [OSD] button on the remote control when watching a picture or a slide show. The OSD menu will appear on the display and the slide show will be stopped. - Page 48 To rotate the picture by 90 degrees in clockwise direction please select the symbol and press the [ ] button on the DF or OK on the remote control. To rotate the picture by 90 degrees in anti-clockwise direction please select the symbol and press the [ ] button on the DF or OK on the remote control.
-
Page 49: Setup Menu
SETUP MENU You can individually adjust the configuration of the DIGITAL PHOTFRAME ( DF ). In the main menu please select the menu item SETUP and confirm your selection with the [ ] button on the DF or the OK-button on the remote control. You can also access this menu by pressing the [SETUP] button on the remote control. - Page 50 Settings Description Select long picture displayed during slide show. Display duration Settings: 3 sec., 5 sec., 15 sec., 1 min., 15 min. Picture transitions Select from random and continuous transition modes Select the display mode of your calendar / clock. Options: Monthly calendar, digital clock, analogue clock Clock settings Time settings Adjusting the time.
-
Page 51: Adjusting Date And Time
Adjusting Date and Time How to adjust date and time on the Intenso DF: In the main menu select the menu item SETUP. Press the [ ], [ ] buttons on the DF or the buttons on the remote control to select the menu item Time. -
Page 52: Activating Automatic Power On/Off
Activating Automatic Power On/Off tomatically at a preset time. Please note: This function requires setting the correct time in advance. In the main menu select the menu item SETUP. Press the [ ], [ ] buttons on the DF or the buttons on the remote control to select the menu item autom. -
Page 53: Calendar Display
CALENDAR DISPLAY The calendar mode displays the current date, the current time and a slide show with thumbnails in the background. In the main menu select the menu item CLOCK. To leave the calendar mode please press the [ ] button. Please note: Date and time can only be set in the Setup menu. -
Page 54: Faqs
Some not so widespread storage mediums are not compatible with the DF. Please use a compatible card. Please bear in mind A memory card is inserted but the DF cannot read this card. What can I do? At first please check if this card is actually compatible with Intenso's DIGITAL PHOTOFRAME. supported. - Page 55 Why are some pictures loaded faster than others? Pictures with a high resolution need longer times to be displayed. To increase the loading speed ple ase use pictures with a lower resolution. Please note: The photo frame supports a resolution of up to 8000*8000 pixels. This might be a system error.
- Page 56 What is the ideal resolution to display pictures on the DF? The ideal resolution for this DF is 800*600 pixels. Why do the functions: Automatic power-on / off not work although I have enabled them? Please make sure your time settings are correct. If the set time is in the past, the function will be enabled on the next cal endar day for the first time.
-
Page 57: Product Specifications
PRODUCT SPECIFICATIONS Digital TFT LCD (17,78cm diagonal viewable image) Display Display modus: 4:3 Resolution: 800*600 pixels Input: 100~240V AC, 50/60Hz Mains adapter Output: 5V 1A DC USB Host 2.0 USB port Supports USB storage mediums SD/SDHC Memory cards supported JPEG, max. resolution:8000*8000 pixels Picture size supported 0°C ~ +45°C Operating temperature... -
Page 58: Service And Maintenance
SERVICE AND MAINTENANCE Service To avoid risks of electric shocks please do not remove screws or the housing. Do not use the device in the vicinity of water. Do not expose the device to rain or moist ure. Do not place any objects in the vicinity of the device that store water or any other liquids. - Page 59 Device Maintenance The Device must be switched off. Never spray or apply liquid substances directly onto the display or the housing. Cleaning the display / housing / frame Clean the housing, frame and LCD display carefully with a soft cloth which is free of lint and chemicals. Only use cleaning agents which are suitable for cleaning LCD displays.
- Page 60 Intenso PHOTOMODEL...
- Page 61 Indice INTRODUZIONE ......................................... 1 CARATTERISTICHE GENERALI DEL PRODOTTO ..............................2 RIEPILOGO ..........................................3 TELECOMANDO ........................................4 INSERIMENTO DELLA BATTERIA NEL TELECOMANDO ............................5 I PRIMI PASSI ..........................................6 USO DI SCHEDE DI MEMORIA ....................................7 GUARDARE UN DIASHOW ....................................... 8 MENU PRINCIPALE ........................................
- Page 62 Impostare data e orario ......................................18 Attivare accensione e spegnimento automatici ..............................19 VISUALIZZAZIONE DEL CALENDARIO ................................20 DOMANDE FREQUENTI ......................................21 SPECIFICAZIONI DEL PRODOTTO ..................................24 CURA E MANUTENZIONE ....................................... 25...
-
Page 63: Introduzione
INTRODUZIONE Grazie di aver deciso di acquistare una CORNICE DI FOTO DIGITALE ( CF ) di Intenso. enze. Raccomandiamo di conservare in un luogo sicuro queste istruzioni al fine di poter rispondere in modo indipendente a eventuali domande. Il contenuto di queste istruzioni è strutturato in modo tale che Lei possa utilizzare in modo sicuro tutte le funzio ni della La CF Le permette di guardare le foto digitali direttamente dalla scheda di memoria della Sua videocamera. -
Page 64: Caratteristiche Generali Del Prodotto
CARATTERISTICHE GENERALI DEL PRODOTTO Aspetto decorativo, alto livello qualitativo Visualizzazione di foto (JPEG) senza computer Diashow automatico con effetti di passaggio e durata di visualizzazione personalizzata Funzione calendario Funzione timer Compatibile con schede SD / SDHC / MMC / MS Porta USB per il collegamento di memorie di massa USB 2 percorsi di comando: 7 tasti sul retro della CF, telecomando infrarosso IT- 2... -
Page 65: Riepilogo
RIEPILOGO 1 Sensore infrarosso 8 Tasto interruzione [ ] 2 Tasto menu, apre il menu OSD 9 Power Accesso/Spento 3 Tasto sinistra [ ] 10 Schede Slot SD / SDHC / MMC / MS 4 Tasto su [ 11 Host Slot USB 5 Tasto Play/Pause [ 12 Entrata DC 5V 1A 6 Tasto diritto [ ]... -
Page 66: Telecomando
TELECOMANDO Power acceso/ spento Muove il cursore ver . nel modo diashow MENU Richiamare il menu principale Muove il cursore verso il basso nel menu di selezione Ritorno alla foto precedente nel diashow o indietro alla pagina precedente nel modo anteprima immagine Zoom In 4:3/ 16:9 Selezione della visualizzazione immagine: 4:3 , 16:9... -
Page 67: Inserimento Della Batteria Nel Telecomando
INSERIMENTO DELLA BATTERIA NEL TELECOMANDO Posizioni il telecomando con i tasti verso il basso. Prema la molla a sinistra del comparto delle batterie verso destra, estraendo allo stesso tempo il comparto delle batterie. Inserisca una batteria di litio CR2025 Inserisca nuo La preghiamo di attenersi a quanto segue: La preghiamo di assicurare uno smaltimento delle batterie corrispondente alle prescrizioni legali. -
Page 68: I Primi Passi
I PRIMI PASSI Fissi il piedino sulla CORNICE DI FOTO DIGITALE ( CF ). Posizioni il regolatore della CF nella posizione ON . Per la prima messa in funzione, La p idioma dopo la prima accensione nella finestra che appare mediante i tasti sul retro o con il telecomando. -
Page 69: Uso Di Schede Di Memoria
USO DI SCHEDE DI MEMORIA Inserisca le schede SD / SDHC / MMC / MS con i contatti in direzione dello schermo nello slot di 3 carte in 1. Colleghi le chiavi USB con la CORNICE DI FOTO DIGITALE, inserendo le chiavi nella porta USB (host USB). Avviso: La preghiamo di non inserire le schede di memoria con forza. -
Page 70: Guardare Un Diashow
GUARDARE UN DIASHOW Prema il tasto sul retro della CF o sul telecomando e in seguito i tasti [ ],[ ] sul retro MENU della CF oppure i tasti sul telecomando per richiamare il mezzo di memoria collegato, il set up o il calendario. Avviso: Se un mezzo di memoria è... -
Page 71: Menu Principale
MENU PRINCIPALE Nel menu principale Lei può scegliere tra i mezzi di memoria collegati, il calendario e il set up. 1. Prema il tasto MENU sul retro della CF o sul telecomando per richiamare il menu principale. Menu Descrizione Appare quando è collegata una chiave USB. SD/MMC/MS Appare, quando è... -
Page 72: Guardare Foto
GUARDARE FOTO Visualizzare un diashow In ogni menu Lei può utilizzare il tasto [ ] del telecomando per avviare il diashow che inizia rispettivamente con la prima foto. Per interrompere il diashow e per visualizzare una singola foto, prema il tasto [ ] sulla CF oppure il tasto OK sul telecomando. Premendo nuovamente il tasto [ ] sulla CF oppure il tasto OK del telecomando, il diashow continua. - Page 73 Menu anteprima immagini Menu anteprima immagini Le immagini del mezzo di memoria selezionato vengono rappresentate quali immagini miniatura. Si possono visualizzare fino a 15 immagini in contemporanea. Nel menu principale selezioni un mezzo di memoria (USB, SD/MMC/MS), premendo dunque il tasto OK sulla CF o sul telecomando. Per navigare tra le immagini miniatura, utilizzi i tasti [ ],[ ],[ ],[ ] sulla CF oppure i tasti del telecomando.
-
Page 74: Visualizzazione Di Una Singola Immagine
Visualizzazione di una singola immagine [ ] sulla CF oppure il tasto OK sul telecomando. di immagine completa. Riattivi dunque, entro la durata di visualizzazione selezionata, il tasto [ ] sulla CF oppure il tasto OK del telecomando. Vede ora il simbolo feriore sinistro dello schermo. -
Page 75: Modificare Il Modo Di Visualizzazione
Modificare il modo di visualizzazione può cambiare il modo di visualizzazione, premendo ripetutamente il tasto [4:3/16:9] del telecomando. 4:3: in modo esteso oppure quale immagine completa. 16:9: in formato originale con una fascia nera sul bordo superiore ed inferiore. Avviso: Una foto salvata nel formato 4:3 può... -
Page 76: Uso Di Menu Osd
Uso di menu OSD Lei può utilizzare il menu OSD per eseguire le azioni riportate qui a seguito. Prema il tasto [OSD] sul telecomando mentre gua OSD appare sullo schermo e il diashow viene interrotto. Prema i tasti [ ], [ ] sulla CF o i tasti del telecomando per navigare tra le funzioni. - Page 77 Per ruotare la foto di 90 gradi in senso antiorario La preghiamo di selezionare il simbolo e di premere [ ] sulla CF oppure OK sul telecomando. Mediante il simbolo si seleziona il passaggio tra 4:3 / 16:9. Premendo [ ] sulla CF oppure OK sul telecomando si esegue Modificare il modo di visualizzazione (pagina13)"...
-
Page 78: Menu Setup
MENU SETUP Lei può impostare in modo personalizzato le impostazioni di sistema della CORNICE DI FOTO DIGITALE (CF). Selezioni il punto del menu SETUP nel menu principale e confermi la Sua selezione con il tasto [ ] sulla CF oppure con il tasto OK del telecomando. Inoltre, premendo il tasto [SETUP] del telecomando, Lei giunge direttamente in questo menu. - Page 79 Possibili impostazione Descrizione Durata di visualizzazione Possibili impostazioni: 3 sec., 5 sec., 15 sec., 1 min., 15 min. Selezioni la forma di visualizzazione per il Suo calendario/orologio. Possibili impostazioni: calendario Impostazione orologio mensile, orologio digitale, orologio analogico Impostazione orario Impostare il calendario Impostazione data Idioma Impostazione della luminosità...
-
Page 80: Impostare Data E Orario
Per confermare i Suoi inserimenti prema il tasto [ ] sul retro della CF oppure il tasto OK del telecomando. Imposti la data sulla CF di Intenso: Prema i tasti [ ], [ ] sulla CF oppure i tasti data. -
Page 81: Attivare Accensione E Spegnimento Automatici
Attivare accensione e spegnimento automatici Lei può far accendere o spegnere la CORNICE DI FOTO DIGITALE di Intenso in modo automatico ad un orario da Lei desiderato. Avviso: rio corretto. Selezioni il punto del menu SETUP nel menu principale. Prema i tasti [ ], [ ] sulla CF o i tasti del telecomando per selezionare il punto del menu accendere o spegnere. -
Page 82: Visualizzazione Del Calendario
VISUALIZZAZIONE DEL CALENDARIO ario attuale e sullo sfondo un diashow con le immagini disponibili. Selezioni il punto del menu orologio nel menu principale. Per abbandonare il modo del calendario prema il tasto [ ]. Avviso: Data e orario possono essere impostati esclusivamente nel menu Setup. Attivando il tasto [ ] sul retro della CF o il tasto OK sul telecomando si può... -
Page 83: Domande Frequenti
F però non riesce a leggerla. Che cosa posso fare? Innanzitutto La preghiamo di controllare se questa scheda è compatibile con la CORNICE DI FOTO DIGITALE di Intenso. Verifichi dunque se la scheda è stata inserita in modo corretto nello slot della scheda. La preghiamo di voler anche considerare il La preghiamo di voler considerare quanto segue: Alcune videocamere digitali non salvano le immagini nel formato standard JPEG. - Page 84 Per quale motivo alcune immagini si caricano più rapidamente rispetto ad altre ? Immagini con una risoluzione superiore necessitano più tempo per essere visualizzate. Per aumentare la velocità di visualizzazione, La preghiamo di utilizzare immagini con una risoluzione ridotta. Avviso: La cornice di foto supporta una risoluzione fino a 8000*8000 Pixel. Per quale motivo il software no alcuni secondi.
- Page 85 Posso adeguare i colori delle immagini? No. Tutte le impostazioni cromatiche vengono eseguite durante la ripresa delle foto. Lei può però adeguare la luminosità e il contrasto dello schermo. In che risoluzione devono essere le immagini per poter essere riprodotte in modo ottimale sullo schermo ? La miglior risoluzione per questa CF è...
-
Page 86: Specificazioni Del Prodotto
SPECIFICAZIONI DEL PRODOTTO TFT LCD digitale Dimensioni dello schermo: 7 pollici (17,78cm di diagonole immagine visibile) Visualizzazione Modo di visualizzazione: 4:3 Risoluzione: 800*600 Pixel Input: 100~240V AC, 50/60Hz Adattatore Output: 5V 1A DC USB Host 2.0 Porta USB Supporta le chiavi di memoria USB Schede di memoria SD/SDHC (Secure Digital Card), MMC... -
Page 87: Cura E Manutenzione
CURA E MANUTENZIONE Cura Per evitare il pericolo di scosse elettriche La preghiamo di non levare viti e/o involucro. Non depositi oggetti che conservano acqua o altri liquidi Non installi questa cornice di foto vicino a termosifoni, fori o altre apparecchiature che producono calore . Lasci questo lavoro al personale specializzato. - Page 88 Non spruzzi o non applichi in nessun caso un liquido direttamente sullo schermo o sull´involucro. Pulizia di schermo / involucro / cornice nice e lo schermo LCD con cautela, utilizzando una pezza morbida, senza pellucci e sostanze chimic he. Utilizzi esclusivamente detergenti appositamente destinati agli schermi LCD. Smaltimento di apparecchiature elettroniche usate Le apparecchiature caratterizzate con questo simbolo sottostanno alla direttiva CEE/2002/96.
- Page 89 Intenso PHOTOMODEL...
- Page 90 Sommaire INTRODUCTION ......................................... 1 CARACTERISTIQUES GENERALES DU PRODUIT ..............................2 APERÇU ............................................3 TELECOMMANDE ........................................4 METTRE LES PILES DANS LA TELECOMMANDE ..............................5 PREMIERS PAS .......................................... 6 UTILISATION DE CARTES DE MEMOIRE ................................7 REGARDER UN DIAPORAMA ....................................8 MENU PRINCIPAL ........................................
- Page 91 ......................................18 Activer la mise en marche et hors marche automatique ............................19 INDICATION DU CALENDRIER ................................... 20 QUESTIONS FREQUEMMENT POSEES ................................21 SPECIFICATIONS DU PRODUIT ..................................... 23 SOIN ET ENTRETIEN ....................................... 24...
-
Page 92: Introduction
INTRODUCTION Nous vou umérique (CPN) Intenso. Nous vous ellement plus tard. Le contenu de cette instruction vous permet de profiter de toutes les fonctions du CPN. Le CPN vous permet de regarder des photos numériques directement de la carte de mémoire de votre appareil photo. Vous avez la possibilité... -
Page 93: Caracteristiques Generales Du Produit
CARACTERISTIQUES GENERALES DU PRODUIT Apparence décorative, bonne qualité Visualisation de photos (JPEG) sans ordinateur Diaporama automatique avec des effets de transiti individuelle Fonction Calendrier Fonction Réveil Compatible avec cartes SD / SDHC / MMC / MS Fente USB pour la connexion de mémoires de masse USB 2 possibilités de navigation FR - 2... -
Page 94: Aperçu
APERÇU 1 Senseur infrarouge 8 Touche Stop/Fin [ ] 2 Touche Menu , ouvre le menu OSD 9 Power On/Off 3 Touche Gauche [ ] 10 Fente de cartes SD / MMC / MS 4 Touche En amont [ ] 11 Fente USB Host 5 Touche Play/Pause [ ] 12 Entrée DC 5V 1A... -
Page 95: Telecommande
TELECOMMANDE Power On/ Off Bouge le curseur en amont dans le menu de choix Tourne rama MENU Appeler le menu principal Bouge le curseur en aval dans le menu de choix Tourne Affiche la photo précédente dans le images Zoom In 4:3/ 16:9 : 4:3, 16:9 SETUP... -
Page 96: Mettre Les Piles Dans La Telecommande
METTRE LES PILES DANS LA TELECOMMANDE Placez la télécommande à tel point que les touches montrent vers le bas. Pousser le ressort à la côté gauche du compartiment à piles à droite et dégagez le compartiment en même temps. Mettez une pile de lithium CR2025 dans le compartiment, le symbole « + » montre vers le haut. Poussez le compartiment à... -
Page 97: Premiers Pas
PREMIERS PAS Fixer le support au cadre photo numérique (CPN). Connecter le Pousser le régulateur du CPN vers la position « On ». Après la première mise en marche, vous pouvez choisir la langue de la télécommande. Valieder le choix avec la touche [ ] OK de la télécommande. -
Page 98: Utilisation De Cartes De Memoire
UTILISATION DE CARTES DE MEMOIRE Mettez les cartes SD / SDHC / MMC / MS dans la fente trois en un. Connectez le module de mémoire au CPN en mettant les modules dans la fente USB Host. Remarques : Ne mettez pas les cartes SDHC / MMC ou MS Pour déconnecter des cartes du CPN, dégagez-les prudemment de la fente de carte. -
Page 99: Regarder Un Diaporama
REGARDER UN DIAPORAMA Après la mise en marche, le menu principal sera affiché. Si vous avez connecté une carte de mémoire ou une clé USB au CPN, le diaporama sera lancé automatiquement après la mise en marche. Appuyez sur la touche et ensuite sur les MENU touches [ ],[ ]... -
Page 100: Menu Principal
MENU PRINCIPAL Dans le menu principal, vous avez le choix entre les modules de mémoire connectés, le calendrier et le setup. 1. Appuyez sur la touche MENU Menu Description Apparaît quand un module USB est connecté. SD/MMC/MS Apparaît quand une carte SD, MS ou MMC Est connectée. -
Page 101: Regarder Des Photos
REGARDER DES PHOTOS Passer un diaporama Dans tous les menu, vous pouvez appuyez sur la touche [ ] de la télécommande pour lancer le diaporama. Celui-ci commence respectivement avec la première photo. Pour stopper le diaporama et afficher une seule photo, appuyez sur la touche [ ] du CPN ou sur la touche OK de la télécommande. - Page 102 Menu Les images du module de mémoire choisi sont affichées comme des miniatures. 15 images peuvent être affichées en même temps. Choisissez un module de mémoire (USB, SD/SDHC/MMC/MS) dans le menu principal et appuyez sur la touche OK du CPN ou de la télécommande. Pour naviger entre les miniatures, appuyez sur les touches [ ],[ ],[ ],[ ] du CPN ou sur les touches de la télécommande.
- Page 103 Visualisation Vous pouvez choisir une image. [ ] du CPN ou sur la touche OK de la télécommande. . Maintenant, appuyez encore une fois sur la touche [ ] du CPN ou sur la touche OK de choisie. Ensuite, vous voyez le symbole dans le coin gauche en bas de Pour afficher les photos précédentes ou les prochaines photos, appuyez sur les touches [ ], [ ] du CPN ou sur les touches de la télécommande.
- Page 104 [4:3/16:9] de la télécommande afin de 4:3: Quand vous choisissez ce mode, une image qui est mémorisée au format 16:9 sera tendue et affichée comme plein écran. 16:9: Quand vous choissisez ce mode, une image qui est mémorisée au format 16 :9 sera affichée au format original avec des Remarques : Une photo qui a été...
-
Page 105: Utilisation Du Menu Osd
Utilisation du menu OSD Vous pouvez le menu OSD pour effectuer les actions suivantes. Appuyez sur la touche [OSD] de la télécommande OSD apparaîtra sur Appuyez sur les touches [ ], [ ] du CPN ou sur les touches de la télécommande pour naviger entre les fonctions. Pour stopper ou continuer le diaporama, choisissez le symbole et appuyez sur la touche [ ] du CPN ou sur la touche OK de la télécommande... - Page 106 Pour tourner la photo dans le sens horaire de 90°, choisissez le symbole et appuyez sur la touche [ ] du CPN ou sur la touche OK de la télécommande. Pour tourner la photo en sens antihoraire de 90°, choisissez le symbole et appuyez sur la touche [ ] du CPN ou sur la touche OK de la télécommande.
-
Page 107: Menu Setup
MENU SETUP Vous pouvez choisir les paramètres du CPN. SETUP dans le menu principal et validez votre choix en appuyant sur la touche [ ] du CPN ou sur la touche OK de la télécommande. En appuyant sur la touche [SETUP] de la télécommande, vous accédez directement à... - Page 108 Paramètres Description Choisissez une durée Possibilités de choix : 3 sec., 5 sec., 15 sec., 1 min., 15 min. Choisissez entre ge pour votre calendrier/horloge. Possibilités de choix : clendrier par mois, horloge numérique, horloge analogue Réglez le calendrier. Réglage de la date Langue Choisissez la langue souhaitée.
- Page 109 Régler SETUP dans le menu principal. Appuyez sur les touches [ ], [ ] du CPN ou sur les touches Heure. Appuyez sur les touches [ ], [ ] du CPN ou sur les touches de la télécommande afin de choisir l'élément précédent ou le prochain élément (heure, minute).
-
Page 110: Activer La Mise En Marche Et Hors Marche Automatique
Activer la mise en marche et hors marche automatique Remarque : SETUP dans le menu principal. Appuyez sur les touches [ ], [ ] du CPN ou sur les touches Mise en marche ou Mise hors marche. Appuyez sur les touches [ ], [ ] du CPN ou sur les touches prochain élément (heure, minute). -
Page 111: Indication Du Calendrier
INDICATION DU CALENDRIER Choisissez l Horloge dans le menu principal. Pour quitter le mode de calendrier, appuyez sur la touche [ ]. Remarques : Setup. En appuyant sur la touche [ ] En appuyant sur les touches [ ], [ ] du CPN ou sur les touches de la télécommande, le calendrier peut afficher les mois précédents ou les prochains mois. -
Page 112: Questions Frequemment Posees
QUESTIONS FREQUEMMENT POSEES e à la valeur indiquée soumis aux directives du SI (Système International 1024 MB correspondent à 1 GB. Dans le standard SI, 1000 MB correspondent à 1 GB. A cause des ces calculs différents, il y a une différence entre les indications de capacité. - Page 113 Pourquoi le lo Il existe probablement une erreur de système. quelques secondes. Pourquoi Vérifiez si le CPN est connecté correctement à une prise de c ourant et si le régulateur Power est poussé vers la position « On ». Est- Oui.
-
Page 114: Specifications Du Produit
SPECIFICATIONS DU PRODUIT Ecran TFT LCD digital Ecran de 7 pouces Affichage Affichage : 4:3 Résolution : 800*600 pixels Input: 100~240V AC, 50/60Hz Netzteil Output: 5V 1A DC USB Host 2.0 Slot USB Supporte modules de mémoire USB Cartes mémoire SD/SDHC Secure Digital Card), MMC MultiMedia Card), MS... -
Page 115: Soin Et Entretien
SOIN ET ENTRETIEN Pflege Pour éviter des décharges électriques Ne posez pas des objets doit être réparé par des spécialistes. . Ainsi, vous évitez des chargements électrostatiques. Connecter tous les raccordements correctement et sûrement . Le cadre photo numérique ne peut lire que des formats compatibles . Des images peuvent être soumises au copyright. - Page 116 doit être mis hors marche. Ne mettez pas de liquide directement sur l´écran ou sur le boitier. LCD prudemment avec un chiffon tendre, sans peluches et sans produits chimiques. LCD. Mise en rebut de vieux appareils électro Les appareils marqués avec ce symbole sont soumis à la directive européenne 2002/96/EC. Tous les vieux appareils électro doivent être mis en rebut séparément du déchet domestique dans les FR - 25...
- Page 117 Manual de instrucciones Intenso PHOTOMODEL...
- Page 118 Contenido INTRODUCCIÓN ......................................... 1 CARACTERÍSTICAS GENERALES DEL PRODUCTO ............................2 DESCRIPCIÓN GENERAL ......................................3 MANDO A DISTANCIA ....................................... 4 COLOCAR LAS PILAS EN EL MANDO A DISTANCIA ............................5 PRIMEROS PASOS ........................................6 UTILIZACIÓN DE LAS TARJETAS DE MEMORIA ..............................7 PRESENTACIÓN DE DIAPOSITIVAS ..................................
- Page 119 Programar fecha y hora ......................................18 Activar la conexión y desconexión automática ..............................19 MOSTRAR CALENDARIO ....................................20 PREGUNTAS MÁS FRECUENTES ..................................21 ESPECIFICACIONES DEL PRODUCTO ................................. 23 CUIDADO Y MANTENIMIENTO ....................................24 Mantenimiento del aparato ....................................25...
-
Page 120: Introducción
INTRODUCCIÓN Gracias por haber elegido el MARCO DE FOTOS DIGITAL (MD) de Intenso. Antes de utilizar este producto le rogamos que lea con atención el manual de instrucciones y que tenga en cuenta las advertencias de seguridad. Le recomendamos que guarde estas instrucciones para poder responder de manera independiente a eventuales preguntas que se le presenten. -
Page 121: Características Generales Del Producto
CARACTERÍSTICAS GENERALES DEL PRODUCTO Aspecto decorativo, buena calidad Presentación de fotos (JPEG) sin necesidad de ordenador Presentación automática de diapositivas con efecto de transición y definición individual de la duración de la visualización Función de calendario Función timer Compatible con tarjetas SD / SDHC / MMC / MS Enchufe para USB para conectar memorias USB 2 modos de manejo: 7 teclas en la parte posterior del MD, mando a distancia infrarrojo ES - 2... -
Page 122: Descripción General
DESCRIPCIÓN GENERAL 1 Sensor infrarrojo 8 Tecla Stop [ ] 2 Tecla menú, abre el Menú OSD 9 Power encendido/apagado 3 Tecla derecha [ ] 10 Ranura p. tarjetas SD/MMC/MS 4 Tecla arriba [ ] 11 Ranura USB Host Tecla Play/Pause [ ] 12 Entrada DC 5V 1A 6 Tecla izquierda [ ] 13 Soporte... -
Page 123: Mando A Distancia
MANDO A DISTANCIA Power On/ Off (encendido/apagado) Mueve el cursor hacia arriba en el menú de selección Gira la imagen 90 grados en el sentido de las agujas del reloj en el modo presentación de diapositivas. Mueve el cursor hacia la izquierda en el menú de selección o retrocede a la imagen anterior en el modo de presentación de diapositivas MENU Abre el menú... -
Page 124: Colocar Las Pilas En El Mando A Distancia
COLOCAR LAS PILAS EN EL MANDO A DISTANCIA Coloque el mando a distancia con las teclas hacia abajo. Oprima el resorte a la izquierda del compartimento para pilas hacia la derecha y al mismo tiempo tire del compartimento hacia afuera. Coloque una pila de litio CR2025 en el compartimento para pilas con el símbolo + hacia arriba. -
Page 125: Primeros Pasos
PRIMEROS PASOS Fije el soporte al MARCO DE FOTOS DIGITAL ( MD ). Conecte la fuente de alimentación incluida al MD. Conecte el otro extremo de la fuente de alimentación al enchufe de corriente. Deslice el regulador del MD a la posición ON . Para ponerlo en funcionamiento por primera vez seleccione tras la primera conexión el idioma en la ventana que aparece mediante la tecla en la parte posterior o usando el mando a distancia. -
Page 126: Utilización De Las Tarjetas De Memoria
UTILIZACIÓN DE LAS TARJETAS DE MEMORIA Introduzca las tarjetas SD / SDHC / MMC / MS con los contactos mirando hacia la pantalla en la ranura 3 en 1 para tarjetas. Conecte la memoria USB al MARCO DE FOTOS DIGITAL introduciendo la memoria en la ranura para USB (USB Host) Advertencias: No introduzca la tarjeta de memoria por la fuerza. -
Page 127: Presentación De Diapositivas
PRESENTACIÓN DE DIAPOSITIVAS Al encender el aparato se accede directamente al menú principal. Si ha conectado una tarjeta de memoria o una memoria USB al MD la presentación comienza directamente después de encender el aparato. Pulse la tecla en la parte posterior del MD o del mando a distancia y seguidamente MENÚ... -
Page 128: Menú Principal
MENÚ PRINCIPAL En el menú principal es posible seleccionar entre los soportes de memoria conectados, el calendario y la configuración. 1. Pulse la tecla MENÚ en la parte posterior del MD o en el mando a distancia para abrir el menú principal. Menú... -
Page 129: Contemplar Fotos
CONTEMPLAR FOTOS Reproducir presentación de diapositivas Puede utilizar la tecla [ ] del mando a distancia en cada menú para iniciar una presentación, que comienza cada vez con la primera foto. Para detener la presentación y para visualizar una sola foto pulse la tecla [ ] en el MD o la tecla OK en el mando a distancia. Pulsando nuevamente la tecla [ ] en el MD o la tecla OK en el mando a distancia, la presentación prosigue. - Page 130 Menú de visualización previa de imágenes Menú de visualización previa de imágenes Las imágenes del soporte de memoria seleccionado se representan en imágenes en miniatura. Se pueden mostrar hasta 15 imágenes simultáneamente. Seleccione un soporte de memoria en el menú principal (USB, SD/MMC/MS) y pulse la tecla OK en el MD o en la mando a distancia.
-
Page 131: Mostrar Una Imagen
Mostrar una imagen Usted puede seleccionar una única imagen. Seleccione una imagen del menú de visualización previa de imágenes y pulse la tecla [ ] en el MD o la tecla OK en el mando a distancia. La imagen se mostrará entonces a pantalla completa. Pulse nuevamente la tecla [ ] en el MD o la tecla OK en el mando a distancia dentro del tiempo escogido de visualización. -
Page 132: Cambiar El Modo De Visualización
Cambiar el modo de visualización Durante la contemplación de una imagen o durante la presentación es posible cambiar el modo de visualización pulsando varias veces la tecla [4:3/16:9] en el mando a distancia. 4:3: seleccionando esta opción, una imagen grabada en 16:9 o en un formato más grande se extiende y se muestra a pantalla completa. -
Page 133: Empleo Del Menú Osd
Empleo del menú OSD Usted puede usar el menú OSD para llevar a cabo las siguientes acciones. Pulse la tecla [OSD] en el mando a distancia mientras contempla una imagen o una presentación . El menú OSD aparece en el display y la presentación se detiene. - Page 134 Para girar la foto 90 grados en el sentido de las agujas del reloj seleccione el símbolo y pulse la tecla [ ] en el MD o la tecla OK en el mando a distancia. Para girar la foto 90 grados en el sentido contrario de las agujas del reloj seleccione el símbolo y pulse la tecla [ ] en el MD o la tecla OK en el mando a distancia.
-
Page 135: Menú De Configuración
MENÚ DE CONFIGURACIÓN Usted puede ajustar la configuración del sistema del MARCO DE FOTOS DIGITAL (MD) de modo individual. Seleccione en el menú principal el punto SETUP y confirme su elección con la tecla [ ] en el MD o la tecla OK en el mando a distancia. De la misma forma, usted puede acceder directamente a ese menú... - Page 136 Opciones de configuración Descripción Seleccione por cuánto tiempo se ha de mostrar una imagen durante la presentación. Tiempo de visualización Opciones de configuración: 3 seg., 5 seg., 15 seg., 1 min., 15 min. Transición de imágenes Elija entre transición de imágenes aleatoria o continuada. Seleccione la forma en que se mostrará...
-
Page 137: Programar Fecha Y Hora
Programar fecha y hora Ajuste la hora en el MD Intenso: Seleccione en el menú principal el punto SETUP. Pulse las teclas [ ], [ ] en el MD o las teclas en el mando a distancia para seleccionar la entrada hora. -
Page 138: Activar La Conexión Y Desconexión Automática
Activar la conexión y desconexión automática Usted puede hacer que el MARCO DE FOTOS DIGITAL de Intenso se conecte y desconecte automáticamente a una hora determinada. Advertencia: Para esta función es preciso haber intoducido previamente la hora correcta. Seleccione en el menú principal el punto SETUP. -
Page 139: Mostrar Calendario
MOSTRAR CALENDARIO En el modo calendario se muestra la fecha actual, la hora actual y al fondo una presentación con las imágenes disponibles Seleccione en el menú principal el punto reloj. Para abandonar el modo calendario pulse la tecla [ ]. Advertencias: Fecha y hora solo pueden ser configuradas en el menú... -
Page 140: Preguntas Más Frecuentes
He introducido una tarjeta de memoria. No obstante, el MD no puede leerla. ¿Qué puedo hacer? En primer lugar, compruebe que esa tarjeta es compatible con el MARCO DE FOTOS DIGITAL de Intenso . A continuación, asegúrese de que la tarjeta haya sido introducida en la ranura para tarjetas del modo correcto. Tenga también en cuenta que solo se pueden reproducir imágenes en formato de archivo... - Page 141 ¿Por qué no se inicia el software a pesar de que existe suministro de corriente y la potencia está o ? Probablemente se haya producido un error en el sistema. Reinicie el software cortando durante un par de segundos el suministro de energía.
-
Page 142: Especificaciones Del Producto
ESPECIFICACIONES DEL PRODUCTO LCD TFT digital Tamaño display: 7 pulgadas (17,78cm Diagonal de pantalla visible) Visualización Modo de visualización: 4:3 Resolución: 800*600 Pixel Input: 100~240V AC, 50/60Hz Fuente de alimentación Output: 5V 1A DC USB Host 2.0 Puerto USB Soporta memorias USB Tarjetas de memoria SD/SDHC (Secure Digital Card), MMC... -
Page 143: Cuidado Y Mantenimiento
CUIDADO Y MANTENIMIENTO Para evitar el riesgo de descarga eléctrica no retire ni los tornillos ni la carcasa. No utilice este aparato cerca del agua. No ponga en contacto al aparato ni con lluvia ni con humedad. No coloque cerca del aparato ningún objeto que almacene agua o cualquier otro tipo de líquido. -
Page 144: Mantenimiento Del Aparato
Mantenimiento del aparato El aparato debe estar desconectado. Nunca rocie ni ponga en contacto directo con liquidos el display o la carcasa. Limpieza del display / carcasa / marco Limpie cuidadosamente la carcasa, el marco y el display LCD con un paño suave, sin pelusas ni químicos. Emplee solo productos de limpieza especialmente apropiados para displays LCD. - Page 145 Manual de instruções Intenso PHOTOMODEL...
- Page 146 Conteúdo INTRODUÇÃO ..........................................1 CARACTERÍSTICAS GERAIS DO PRODUTO ................................. 2 VISUALIZAÇÃO DO PRODUTO ....................................3 CONTROLE REMOTO........................................ 4 INSERINDO PILHAS NO CONTROLE REMOTO ..............................5 PRIMEIROS PASSOS......................................... 6 UTILIZAÇÃO DE MÍDIAS DE ARMAZENAMENTO ..............................7 VISUALIZAÇÃO DE SLIDESHOW .................................... 8 MENU PRINCIPAL ........................................
- Page 147 Ativar Ligar e Desligar automático ..................................19 VISUALIZAÇÃO DO CALENDÁRIO ..................................20 PERGUNTAS COMUNS ......................................21 ESPECIFICAÇÕES DE PRODUTO ..................................23 CUIDADO E MANUTENÇÃO ....................................24 CUIDADO ..........................................24...
-
Page 148: Introdução
INTRODUÇÃO Agradecemos pela escolha da Moldura Digital (MD) da Intenso. Antes de utilizar o aparelho, leia com atenção este manual de instruções e observe todos as advertências. Recomendamos guardar este manual de instruções com cuidado, assim eventuais perguntas podem ser respondidas por você mesmo. O conteúdo deste manual está... -
Page 149: Características Gerais Do Produto
CARACTERÍSTICAS GERAIS DO PRODUTO Aparência decorativa, alta qualidade. Visualização de fotos (JPEG) sem computador Slideshow automático com efeitos de transições e tempo de visualização individuais. Função calendário Função Timer Compatível com cartões SD / SDHC / MMC / MS Entrada USB para conexão com mídias de armazenamento USB 2 opções de controle: 7 teclas na parte traseira da MD, controle remoto infravermelho. -
Page 150: Visualização Do Produto
VISUALIZAÇÃO DO PRODUTO 1 Sensor Infravermelho 8 Tecla Stop [ ] 2 Tecla Menu , abre o menu OSD 9 Power On/Off 3 Tecla Esquerda [ ] 10 Entrada cartões SD/MMC/MS 4 Teclas para cima [ ] 11 Conexão USB Tecla Play/Pause [ ] 12 Entrada DC 5V 1A 6 Tecla Direita [ ]... -
Page 151: Controle Remoto
CONTROLE REMOTO Power On/ Off Move o cursor para cima no menu seleção Gira a foto 90° em sentido horário no modo Slideshow Move o cursor para a esquerda no menu seleção ou para trás para a foto anterior em modo Slideshow MENU Ir para o Menu Principal Move o cursor para trás no menu seleção... -
Page 152: Inserindo Pilhas No Controle Remoto
INSERINDO PILHAS NO CONTROLE REMOTO Posicione o controle remoto com as teclas para baixo. Pressione a mola à esquerda do compartimento de pilhas e puxe, ao mesmo tempo, o compartimento para fora. Encaixe uma pilha CR2025 Litio com o símbolo Mais para cima no compartimento. Empurre todo o compartimento de pilhas de volta para dentro do controle remoto. -
Page 153: Primeiros Passos
PRIMEIROS PASSOS Fixe o pé de apoio na MOLDURA DIGITAL (MD) Conecte o cabo de força incluído na embalagem à MD. Insira a outra extremidade do cabo em uma tomada. Na primeira vez em que for ligada, selecione com as teclas na parte posterior ou no controle remoto o Idioma na janela que aparecer. Confirme sua seleção com a tecla [ ] na parte posterior ou a tecla OK no controle remoto. -
Page 154: Utilização De Mídias De Armazenamento
UTILIZAÇÃO DE MÍDIAS DE ARMAZENAMENTO Insira cartões SD / SDHC / MMC / MS na entrada de cartões 3em1 com os contatos virados para o display. Conecte a mídia de armazenamento USB com a MD, inserindo-a na entrada USB. (USB Host) Importante: Não utilize violência ao inserir os cartões. -
Page 155: Visualização De Slideshow
VISUALIZAÇÃO DE SLIDESHOW Após ligar, aparece o Menu Principal. Se um cartão ou Pen Drive estiver conectado, o Slideshow inicia diretamente após ligar o aparelho. Pressione a tecla na parte posterior da MD ou no controle e então as teclas [ ],[ ] MENU na parte posterior da M armazenamento, Configurações ou Calendário. -
Page 156: Menu Principal
MENU PRINCIPAL No Menu principal pode-se selecionar entre as Mídias de Armazenamento, o Calendário ou Configurações. 1. Pressione a tecla MENU na parte posterior da MD ou n controle remoto para ir para o Menu Principal Menü Descrição Aparece quando uma mídia USB estiver conectada. SD/MMC/MS Aparece quando um cartão SD, MS ou MMC estiver onectado. -
Page 157: Visualização De Fotos
VISUALIZAÇÃO DE FOTOS Reprodução de um Slideshow Em qualquer dos Menus pode-se utilizar a tecla [ ] no controle remoto para iniciar o Slideshow, que começa sempre com a primeira foto. Para parar o Slideshow e mostrar uma só foto pressione a tecla [ ] na MD ou a tecla OK no controle remoto. Pressionando novamente a tecla [ ] na MD ou a tecla OK no controle remoto, o Slideshow continuará. - Page 158 Menu Pré-Visualização de Fotos Menu Pré-Visualização de fotos As fotos da mídia selecionada serão mostradas em miniatura. Até 15 fotos podem ser mostradas ao mesmo tempo.. No Menu Principal, selecione uma mídia de armazenamento (USB, SD/MMC/MS) e pressione na MD ou no controle remoto a tecla OK. Para navegar entre as miniaturas, utilize as teclas [ ],[ ],[ ],[ ] na MD ou as teclas no controle remoto.
- Page 159 Visualização de uma só foto Você pode selecionar uma única foto. No Modo de Pré-Visualização de Fotos, selecione uma foto e pressione a tecla [ ] na MD ou a tecla OK no controle remoto. A foto será mostrada em Modo Tela Cheia. Durante o tempo de mostragem, pressione a tecla [ ] na MD ou a tecla OK no controle remoto. No canto inferior esquerdo da tela, vê-se o símbolo Para o tempo de visualização de funções (veja página 17).
-
Page 160: Alteração Do Modo De Visualização
Alteração do Modo de Visualização Durante a visualização de uma foto ou o Slideshow, pode-se variar o Modo de Visualização pressionando várias vezes as teclas [4:3/16:9] no controle remoto. 4:3: Esta opção mostra uma foto, registrada em 16:9 ou em um formato maior, em tela cheia. 16:9: Esta opção mostra uma foto, registrada em 16:9 ou em formato maior, no formato original com faixas pretas na parte superior e inferior. -
Page 161: Utilização Do Menu Osd
Utilização do Menu OSD Pode-se utlizar o Menu OSD para as seguintes funções: Pressione a tecla [OSD] no controle remoto durante a visualização de uma foto ou um slideshow. O Menu OSD aparece no display e o slideshow será interrompido. Pressione as teclas [ ], [ ] na MD ou as teclas no controle remoto, para navegar entre as funções. - Page 162 Para girar a foto 90° em sentido horário, selecione o símbolo e pressione [ ] na MD ou OK no controle remoto. Para girar a foto 90° em sentido anti-horário, selecione o símbolo e pressione [ ] na MD ou OK no controle remoto. Pode-se selecionar entre 4:3 / 16:9 através do símbolo .
-
Page 163: Menu Configurações
MENU CONFIGURAÇÕES Pode-se fazer ajustes personalizados na MOLDURA DIGITAL (MD). No Menu Principal, selecione a opção SETUP e confirme sua opção com a tecla [ ] na MD ou a tecla OK no controle remoto. Pode-se ir direto para este Menu pressionando a tecla [SETUP] no controle remoto. - Page 164 Configuração Descrição Selecione quanto tempo uma foto deve ser mostrada durante o Slideshow. Opções: 3 Seg., 5 Seg., 15 Tempo de visualização Seg., 1 Min., 15 Min. Transições Selecione entre transição aleatória ou contínua. Selecione o formato de visualização do seu calendário. Opções: Calendário do Mês, Relógio Digital, Configurações do Relógio Relógio Analógico.
-
Page 165: Configurar Data E Hora
Configurar Data e Hora Ajuste a hora na MD Intenso: Selecione no Menu Principal a opção SETUP. Pressione as teclas [ ], [ ] na MD ou as teclas no controle remoto, para selecionar a opção Uhrzeit. Pressione as teclas [ ], [ ] na MD ou as teclas no controle remoto, para selecionar o próximo ítem ou o ítem anterior ( Hora,... -
Page 166: Ativar Ligar E Desligar Automático
Ativar Ligar e Desligar automático Você pode configurar a MOLDURA DIGITAL para ligar ou desligar automaticamente.. Aviso: Para esta função deve ser ajustada anteriormente a hora correta. Selecione no Menu Principal a opção SETUP. Pressione as teclas [ ], [ ] na MD ou as teclas no controle remoto, para selecionar entre Ligar e Desligar. -
Page 167: Visualização Do Calendário
VISUALIZAÇÃO DO CALENDÁRIO No Modo Calendário será mostrada a Data e a Hora atuais e ao fundo um Slideshow com as fotos disponíveis. No Menu Principal, selecione a opção Hora. Para sair do Modo Calendário, pressione a tecla [ ]. Aviso: Data e hora somente podem ser ajustadas no Menu Configurações. -
Page 168: Perguntas Comuns
Um cartão de memória está inserido. No entanto, a MD não consegue ler a partir dele. O que fazer? Em primeiro lugar, confira se este cartão é compatível com a Moldura Digital Intenso . Confira em seguida, se o cartão foi inserido de maneira correta no compartimento para cartões. - Page 169 Por que o software não inicializa, embora haja energia e o interruptor de força esteja em Provavelmente existe um erro de sistema. Reinicie o software novamente, desligando o aparelho da corrente elétrica por alguns segundos. Por que não aparece o Menu Principal no visor? Certifique- Posso rotar as imagens no visor? Sim, selecione as flechas [ ], [ ] na MD ou as teclas...
-
Page 170: Especificações De Produto
ESPECIFICAÇÕES DE PRODUTO Visor TFT LCD Digital (17,78 cm tamanho do ecrão visível) Visor Visualização: 4:3 Definição: 800*600 Pixel Input: 100~240V AC, 50/60Hz Alimentação Output: 5V 1A DC USB Host 2.0 USB port Suporta mídias de armazenamento USB Cartões de SD/SDHC (Secure Digital Card), MMC (MultiMedia Card), MS... -
Page 171: Cuidado E Manutenção
CUIDADO E MANUTENÇÃO CUIDADO Para evitar o perigo de choques elétricos, não remova parafusos nem a caixa externa. Não utilize o aparelho próximo à água. Não submeta o aparelho à chuva ou umidade. Não coloque outros objetos que armazenem água ou outros líquidos na proximidade deste aparelho. Não instale esta moldura na proximidade de aquecedores, fornos ou outros aparelhos que gerem calor. - Page 172 Manutenção do aparelho O aparelho deve estar desligado. Nunca espirre ou derrame liquidos diretamente sobre o visor ou so bre a parte externa do aparelho. Limpeza do visor / Parte externa / Moldura Limpe a parte externa, moldura e o visor LCD cuidadosamente com pano macio, sem felpas e sem aditivos químicos. Utilize somente produtos de limpeza especiais para Visors de LCD.
- Page 173 Intenso PHOTOMODEL...
- Page 174 WPROWADZENIE ........................................1 OGÓLNE CECHY PRODUKTU ....................................2 ZARYS ............................................3 PILOT ............................................4 UMIESZCZANIE BATERII W PILOCIE ..................................5 PIERWSZE KROKI ........................................6 ..................................7 ................................... 8 ......................................... 9 ........................................ 10 Odtwarzanie pokazu slajdów ....................................10 obrazów ................................12 ....................................
- Page 175 Ustawianie daty i godziny ..................................... 18 ............................. 19 ..................................20 ....................................21 SPECYFIKACJE PRODUKTU ....................................23 ..................................24...
-
Page 176: Wprowadzenie
WPROWADZENIE RAMKI CYFROWEJ (DF) firmy Intenso. Przed skonstruowana w sposób bezpiecznie wykorzystanie wszystkich funkcji ramki cyfrowej. kart:SD (Secure Digital), (Secure Digital High Capacity), MMC (Memory Stick) oraz USB-Stick. wyprzedzeniem. PL - 1... -
Page 177: Ogólne Cechy Produktu
OGÓLNE CECHY PRODUKTU (JPEG) Automatyczny pokaz slajdów Funkcja kalendarza Funkcja minutnika Kompatybilny z kartami SD / SDHC / MMC / MS Slot Su 2 opcje sterowania: 7 klawiszy na drugiej stronie ramki cyfrowej, pilot IR PL - 2... -
Page 178: Zarys
ZARYS 1 Czujnik IR 8 Stop Klawisz [ ] 2 Menu Klawisz, otwiera Menu OSD 3 W prawo Klawisz [ ] 10 Slot kart SD/MMC/MS 4 Do przodu [ ] 11 USB Host Slot 5 Play/Pause Klawisz [ ] DC 5V 1A 6 W lewo Klawisz [ ] 13 Stojak Klawisz [ ]... -
Page 179: Pilot
PILOT Power On/ Off Porusza kursor do góry w menu wyboru. Przechyla obraz o 90 stopni w trybie pokazu slajdów zgodnei z ruchem wskazówek zegara. Porusza kursor w lewo w menu wyboru lub z powrotem do poprzedniego obrazu w trybie pokazu slajdów. MENU Porusza kursor Przechyla obraz o 90 stopni w trybie pokazu slajdów przeciwnie do ruchu wskazówek zegara. -
Page 180: Umieszczanie Baterii W Pilocie
UMIESZCZANIE BATERII W PILOCIE góry do szuflady baterii. Uwaga: Pro baterii. PL - 5... -
Page 181: Pierwsze Kroki
PIERWSZE KROKI Zamocuj stojak przy RAMCE CYFROWEJ. ramki cyfrowej Przestaw regulator ramki cyfrowej lub przyciskiem OK na pilocie. PL - 6... - Page 182 SDHC / Uwaga: Czytnik kart 3-w-1 Prosimy o SD / SDHC / MMC lub MS . poprzek PL - 7...
- Page 183 POKAZU SLAJDÓW do ramki cyfrowej, na drugiej stronie ramki cyfrowej lub na pilocie oraz dodatkowo klawisze [ ],[ ]na MENU drugiej stronie ramki cyfrowej lub klawisze Uwaga: SD / SDHC / MMC lub MS. PL - 8...
- Page 184 MENU na drugiej stronie ramki cyfrowej lub na pilocie. Menu Opis USB jest pod SD/MMC/MS , gdy karta SD, MS lub MMC jest pod Zegar kalendarza i godziny Ustawienia [ ],[ ] na ramce cyfrowej lub klawisze [ ] na ramce cyfrowej lub przycisk OK na pilocie.
-
Page 185: Odtwarzanie Pokazu Slajdów
DANIE Odtwarzanie pokazu slajdów pokaz slajdów, w lawisz [ ] na ramce cyfrowej lub przycisk OK [ ] na ramce cyfrowej lub przycisku OK na pilocie slajdów. W celu zatrzymania przycisk [ ] na pilocie lub klawisz ]na ramce cyfrowej. Uwaga: pierwszego obrazu nowego no SD/SDHC/... - Page 186 ezentowane jako miniatury na ramce cyfrowej lub pilocie. Do sterowania miniatur [ ],[ ],[ ],[ ] na ramce cyfrowej lub przycisków klawiszy pilocie. Uwaga: [ ] na pilocie lub klawisza [ PL - 11...
- Page 187 pojedynczy obraz. [ ] na ramce cyfrowej lub przycisk OK na pilocie. . W trakcie [ ] na ramce cyfrowej lub przycisk OK . Dla wybranego (patrz strona 17). [ ], [ ] na ramce cyfrowej lub przyciski [ ], [ ] na ramce cyfrowej lub przyciski szeniu obrazu, za ], [ ], [ ], [ ] na ramce cyfrowej lub przycisków [ ].
- Page 188 [4:3/16:9] 4:3: ekranie. 16:9: czarnymi pasami na górnym i dolnym brzegu. Uwaga: PL - 13...
-
Page 189: Wykorzystanie Menu Osd
Wykorzystanie menu OSD [OSD] ietlaczu a pokaz slajdów zostaje zatrzymany. [ ], [ ] na ramce cyfrowej lub przyciski i nacisn [ ] na ramce cyfrowej lub przycisk OK . Symbol (Play) w menu OSD (Pause) [ ] na ramce cyfrowej lub przycisk OK [ ],[ ],[ ],[ ] na ramce cyfrowej lub przycisków [ ] na ramce cyfrowej lub przycisk OK... - Page 190 [ ] na ramce cyfrowej lub przycisk OK Symbol 4:3 / 16:9. [ ] na ramce cyfrowej lub przycisk OK (Strona 13)" Wybiera [ ] na ramce cyfrowej lub przycisk OK . ( UWAGA: i nac [ ] na ramce cyfrowej lub OK na pilocie ramka cyfrowa kontynuuje pokaz slajdów. PL - 15...
- Page 191 SETUP (USTAWIENIA) wybór klawiszem [ ] na ramce cyfrowej lub przyciskiem OK pilocie. SETUP [ ], [ ] na ramce cyfrowej lub przyciski [ ], [ ] lub [ ] na ramce cyfrowej, alternatywnie lub przycisk OK na pilocie [ ] na ramce cyfrowej lub przycisku OK ] na ramce cyfrowej lub [ ] na pilocie.
- Page 192 Opis : 3 sek., 5 sek., 15 sek., 1 min., 15 min. Ustawienia zegara cyfrowy, zegar analogowy. Ustawianie godziny. Ustawienia czasu Ustawianie kalendarza. Ustawienia daty TFT. Opcje wyboru: -3, -2, -1, 0, 1, 2, 3. Ustawianie kontrastu TFT. Opcje wyboru: -3, -2, -1, 0, 1, 2, 3. Kontrast TFT.
- Page 193 Ustawianie daty i godziny Ustawianie godziny na ramce cyfrowej Intenso: menu SETUP (USTAWIENIA). [ ], [ ] na ramce cyfrowej lub przyciski [ ], [ ] na ramce cyfrowej lub przyciski [ ], [ ] na ramce cyfrowej lub przyciski...
- Page 194 RAMKI CYFROWEJ firmy Intenso o dowolnej godzinie. Uwaga: SETUP (USTAWIENIA). [ ], [ ] na ramce cyfrowej lub przyciski ], [ ] na ramce cyfrowej lub przyciski [ ], [ ] na ramce cyfrowej lub przyciski Deaktywowanie Aby potw [ ]na ramce cyfrowej lub przycisk OK...
- Page 195 Zegar. [ ]. Uwaga: W menu Setup [ ] na drugiej stronie ramki cyfrowej lub przycisk [ ], [ ] na ramce cyfrowej lub przyciski PL - 20...
- Page 196 i podlega wytycznym st nice Niektóre niezbyt popularne i rozpowszechnione Uwaga: Niektóre Uwaga: 8000*8000 pikseli. PL - 21...
- Page 197 sekund. Nale Tak, [ ], [ ] na ramce cyfrowej lub przycisków Uwaga: Nie. 800*600 pikseli. Dlaczego funkcje: POWER OFF PL - 22...
- Page 198 SPECYFIKACJE PRODUKTU Cyfrowy TFT LCD : 7 cali obrazu) : 4:3 : 800*600 pikseli Input: 100~240V AC, 50/60Hz Zasilacz Output: 5V 1A DC USB Host 2.0 Port USB SD/SDHC Secure Digital Card), MMC MultiMedia Card), MS (Memory Stick) JPEG, :8000*8000 pikseli obrazu Temperatura robocza 0°C ~ +45°C...
- Page 199 pieców elektrostatycznych. utraty danych. Prosimy nie eksponow PL - 24...
- Page 200 Czyszczenie / obudowy / ramy Utyliza 2002/96/EC. nie razem z odpadami z gospodarstwa domowego. PL - 25...
- Page 201 Intenso PHOTOMODEL...
- Page 202 ..........................................1 ................................2 ............................................3 ..................................4 ........................6 ......................................... 7 ..................................8 ....................................... 9 ........................................10 ....................................11 ..................................... 11 ................................. 13 .................................... 14 ............................15 ....................................... 17...
- Page 203 ....................................20 ..........................21 ................................... 22 ..................................23 ......................................25 ................................26...
- Page 204 RU - 1...
- Page 205 SDHC / MMC / MS RU - 2...
- Page 206 SD/MMC/MS USB Host 12 DC 5 1A RU - 3...
- Page 207 MENU 4:3/ 16:9 SETUP RU - 4...
- Page 208 RU - 5...
- Page 209 RU - 6...
- Page 210 RU - 7...
- Page 211 SDHC / SDHC / RU - 8...
- Page 212 MENU SDHC / RU - 9...
- Page 213 MENU USB. SD/MMC/MS RU - 10...
- Page 214 MENU RU - 11...
- Page 215 [ ],[ ],[ ],[ RU - 12...
- Page 216 ], [ ], [ ], [ ], [ ], [ RU - 13...
- Page 217 [4:3/16:9 4:3: 16:9: RU - 14...
- Page 218 ], [ ] ],[ ],[ ],[ RU - 15...
- Page 219 RU - 16...
- Page 220 SETUP ], [ ], [ RU - 17...
- Page 221 RU - 18...
- Page 222 -3, -2, -1, 0, 1, 2, 3. -3, -2, -1, 0, 1, 2, 3. -3, -2, -1, 0, 1, 2, 3. RU - 19...
- Page 223 ], [ ], [ [ ], [ ], [ ], [ [ ], [ RU - 20...
- Page 224 ], [ ], [ [ ], [ RU - 21...
- Page 225 [ ], [ ] RU - 22...
- Page 226 SI (International System of Units). RU - 23...
- Page 227 [ ], [ ] RU - 24...
- Page 228 USB Host 2.0 - SD/SDHC 0°C ~ +45°C 206*171.5*22 373,2 RU - 25...
- Page 229 RU - 26...
- Page 230 RU - 27...
Need help?
Do you have a question about the 7 PHOTOMODEL and is the answer not in the manual?
Questions and answers