Table of Contents
Advertisement
Quick Links
Advertisement
Table of Contents

Related Manuals for CYBELEC VisiTouch Series


Summary of Contents for CYBELEC VisiTouch Series
- Page 1 VisiTouch Series User Manual PRIL 2020 for Synchronized Press Brakes V1.1...
- Page 2 © 2020 Cybelec S.A. All Rights Reserved Copying, reproduction, modification, distribution, display or transmission of any of the contents of this manual for any purpose without the prior consent of Cybelec S.A. is strictly prohibited. 1/45 2020 User Manual – VisiTouch Series...
-
Page 3: Table Of Contents
VisiTouch series – User Manual Table of Contents Safety ..................................6 General Safety ..............................6 Signs and Icons appearing in this Manual ......................7 General warning ............................7 Information ..............................7 Settings .................................7 Navigation ..............................7 Getting started with VisiTouch ..........................8 Screen Map ...............................9 Screen Map (continued) ..........................10 General navigation ............................ - Page 4 VisiTouch Series – User Manual Offset Pinch Point function........................17 Show button up ............................17 Show L first ..............................17 Beam stop during retractation ........................17 Manual Axes Movement ..........................18 Desynchronized Beam ..........................18 Linked axis ..............................18 Information Page ............................19 USB Transfer ..............................
- Page 5 VisiTouch series – User Manual Saving a Program ............................42 Creating a Program ............................42 Loading a Program ............................43 Deleting a Program ............................43 Beam Error Messages ............................ 44 Resources ................................45 Tutorials - Videos ............................45 4/45 2020 User Manual –...
- Page 6 VisiTouch Series – User Manual 5/45 2020 User Manual – VisiTouch Series V1.1...
-
Page 7: Safety
VisiTouch series – User Manual AFETY ENERAL AFETY The users must have Read and Understood, but most of all must Respect the directives described in this manual. All people coming into contact with the machine on which the numerical control is installed,... -
Page 8: Signs And Icons Appearing In This Manual
VisiTouch Series – User Manual IGNS AND CONS APPEARING IN THIS ANUAL While using this manual, you will come across the signs and icons represented here below: they are directly related to the safety and security of persons. Carefully follow this advice and inform others about it. -
Page 9: Getting Started With Visitouch
VisiTouch series – User Manual ETTING STARTED WITH OUCH Depending on software evolutions and the press brake controlled by the VisiTouch (configuration/capabilities), the present manual may not fully correspond to the VisiTouch that you currently have. However, differences are only minor. -
Page 10: Screen Map
VisiTouch Series – User Manual CREEN Basic Page Description Punches Punches Dies Dies Correction Page Extra Bending Parameters TouchProfile Mode Bend Sequencing L-Alpha Mode Bend 9/45 2020 User Manual – VisiTouch Series V1.1... -
Page 11: Screen Map (Continued)
VisiTouch series – User Manual CREEN CONTINUED Manual Page User Preferences Set Clock Materials Service Page Machine Parameters Logs Information Page USB Transfer Backup Page 10/45 2020 User Manual – VisiTouch Series V1.1... -
Page 12: General Navigation
VisiTouch Series – User Manual ENERAL NAVIGATION Screen Cleaning button Add step or next step Status Pages Zone Menu button Menu Button The Menu button allows you to directly select (jump to) the desired screen. The content of the menu changes contextually. -
Page 13: Status Page
VisiTouch series – User Manual TATUS PAGE The Status page shows the status of all inputs and outputs and axes positions of the NC. This feature is very useful during setup or during phone service with a machine installed in the field. -
Page 14: Language
VisiTouch Series – User Manual To browse through the available languages, simply touch Language on the screen. Language Available languages are: • • • English. Suomi. Русский. • • • Brazil. Français. Slovensko. • • • 中文. Italiano. Türkçe. •... -
Page 15: Show Axes Position Values
VisiTouch series – User Manual This function will display the axes positions on the Bend Numerical Page. Show axes position values • When set to no, the position of axes Y1, X and R is displayed during the beam’s movements. -
Page 16: Bdc Correction
VisiTouch Series – User Manual • Predefined thickn.: Allows defining up to 7 different predefined thicknesses for the selected material. • Thickness min/max: Determines the maximum and minimum accepted thickness for the selected material. Three predefined default materials are available (steel, stainless steel, aluminium), but others can be added. -
Page 17: Clear Indexation
VisiTouch series – User Manual When activated, this function clears the index and the machine will search for them, as Clear indexation it does when turning the power on, allowing the operator to re-index its machine without turning it off. -
Page 18: Touchscreen Calibration
VisiTouch Series – User Manual This function allows the calibration of the touch screen. Touchscreen Calibration ETTING NSTRUCTIONS Simply follow the instructions on the page to calibrate the touchscreen. Use your finger or the plastic tip of a pen to calibrate the Touchscreen. Never use sharp objects as this will damage the screen. -
Page 19: Manual Axes Movement
VisiTouch series – User Manual ANUAL OVEMENT In the course of setting up a machine, it is sometimes necessary to be able to move the axes manually, for example when changing the tooling. This can be done on this page. -
Page 20: Information Page
VisiTouch Series – User Manual NFORMATION The Information page displays the names and versions of the software installed on the VisiTouch. (Menu Button) → … → Service → Information 19/45 2020 User Manual – VisiTouch Series V1.1... -
Page 21: Usb Transfer
VisiTouch series – User Manual USB T RANSFER (Menu Button) → Other menus → USB transfer This function opens the USB transfer screen, which allows the operator to transfer data between the VisiTouch and a USB key. Select the files you... -
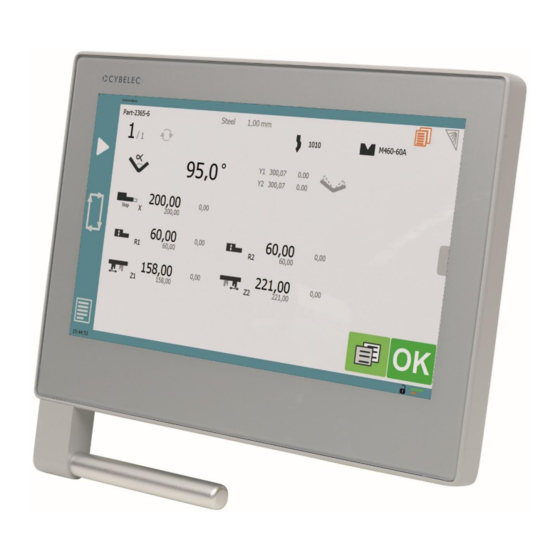
Page 22: Basic
VisiTouch Series – User Manual ASIC ESCRIPTION UMERICAL Set-point back-gauge (X axis) / flange length Material used and thickness Interactive Tool management Repeat sequence button (inactive here) message line Program name Bending and Corrections Current step (sequence) number Quick access tab... - Page 23 VisiTouch series – User Manual Set-point beam (Y axis) / bend angle The VisiTouch has three different modes to manage the Y axis. Touching one of the icons on the left allows going from one mode to another. The three modes are: In this mode, the operator simply enters the desired angle and the VisiTouch will calculate the position at which the beam will stop (BDC).
-
Page 24: Quick Access Tab
VisiTouch Series – User Manual Optional axes All the various optional axes of the machine are displayed in this zone. Their respective values are calculated by the VisiTouch and are displayed in gray. They can however be manually modified but are then displayed in black. -
Page 25: Extra Bending Parameters
VisiTouch series – User Manual Extra bending parameters can be found on this page, which displays parameters related to Extra Bending the part, and depending on the VisiTouch configuration and the type of action performed, Parameters also displays various settings for the current bend. Most of these parameters can also be... - Page 26 VisiTouch Series – User Manual Material sigma The default sigma, defined in Materials, is automatically displayed when changing material. It is however possible to change it simply by touching this icon. This is also of course a part parameter. Back gauge retractation...
- Page 27 VisiTouch series – User Manual Slow speed return This parameter allows slowing down the speed of the beam after the bend and is generally used when the part has a long flange and the operator tries not to let it “fall down too fast”.
- Page 28 VisiTouch Series – User Manual Crowning The crowning function is activated here. It is automatically calculated, according to the Material, the Material thickness, the Material sigma and the Bending length / Position offset. If the crowning needs correction, use the Crowning (see page 39) function in the correction page.
-
Page 29: Copy To All Function
VisiTouch series – User Manual Hemming Allows making conventional die hemming bends (optional). OPY TO UNCTION This function allows copying a defined value to all the steps of the current program. It appears in the numerical pad of relevant fields, such as Bending... -
Page 30: Tools Management
VisiTouch Series – User Manual OOLS ANAGEMENT Tools management allows the creation and configuration on the VisiTouch of the tools to be used on the machine. These tools are then considered in bend calculations. Once a punch and die are created and selected, you can select the bend angle you require as well as the flange length (L). -
Page 31: How To Create Or Modify A Punch
VisiTouch series – User Manual If no punch is yet created, the punch will have no name (??? is displayed). If a punch already How to create or exists, then the last punch used will be selected, here 60_S_i (modifications will not alter modify a punch? the existing punch as they will be saved under another name). -
Page 32: Dies
VisiTouch Series – User Manual Bend Numerical Page → Die mounting direction Die name Browsing through existing dies Basic die data Bottoming Return to Bend Numerical Page Touch the die to display its default shape, allowing an easier identification of... -
Page 33: How To Create Or Modify A Die
VisiTouch series – User Manual If no die is yet created, the die will have no name (??? is displayed). If a die already exists, How to create or then the last one used will be selected, here 30_12 (modifications will not alter the modify a die? existing die as they will be saved under another name). -
Page 34: Naming Tools
VisiTouch Series – User Manual AMING OOLS It is recommended that you use naming conventions for your tools. Below you will find a simple convention allowing you to precisely identify a punch or die through its name. Of course, depending on your needs you may need to create more rules for punch and die naming. -
Page 35: Creating A Part Program
VisiTouch series – User Manual REATING A ROGRAM There are three ways to create a program part: with the TouchProfile Mode, with the Numerical Mode, and with the L-Alpha Mode. In this chapter the machine is considered operational: machine parameters, tools... -
Page 36: Bend Sequencing
VisiTouch Series – User Manual Touching this icon allows erasing the last segment added Touch on the middle of a segment to modify its value. Touch on an angle to modify its value. Touching the icon will open a yellow pop-up, in which it possible to: •... - Page 37 VisiTouch series – User Manual ETTING INSTRUCTIONS Touch the bend sequence calculation button . Once the sequence is calculated, the Bend 2D screen is displayed. Pressing the back button will erase the last bend in the sequence. If you wish to delete all bends, simply touch the button.
-
Page 38: Numerical Mode
VisiTouch Series – User Manual UMERICAL It is also possible to simply create a part program directly on the Bend Numerical Page. Program name Material used and thickness Current step (sequence) number Tools selection Add step or next step Angle of the bend... -
Page 39: L-Alpha Mode
VisiTouch series – User Manual LPHA Bend Numerical Page → → Program name Angle value More parameter for step Segment length Bend Sequencing TouchProfile Mode In this mode, the operator can define each step (length or angle) of a profile on a table. -
Page 40: Bending And Corrections
VisiTouch Series – User Manual A yellow pop-up is displayed, in Special tools which it possible to: • Activate (and deactivate) a Maximum distance special tool by touching its icon to ideal curve and select it from a list by... -
Page 41: Angle Correction (Y Axis)
VisiTouch series – User Manual After physically measuring the angle, if corrections are to be made, they must be done on Angle Correction this page, and not directly in the program step. (Y axis) Bend Numerical Page → Angle correction... -
Page 42: Back Gauge Correction
VisiTouch Series – User Manual Touching the values next to any axes allows entering a correction. Back gauge Correction The axes corrections can be positive or negative and will be added to the axes positions. The back-gauge positions corrections can also directly be made on the Bend Numerical Page. -
Page 43: Managing Programs
VisiTouch series – User Manual ANAGING ROGRAMS Because the production of parts follows cycles, the programs related to those parts need to be managed. They need to be stored, called into function, and so on. On the VisiTouch, the Program name is displayed on the top left corner of different pages. -
Page 44: Loading A Program
VisiTouch Series – User Manual OADING A ROGRAM To call (load) a program: Touch the Program name. Touch Load part. Browse through the programs using the arrows and select the program to be loaded. Validate your choice by touching The selected program is then loaded into the work memory and is ready to be used. -
Page 45: Beam Error Messages
VisiTouch series – User Manual RROR ESSAGES ESCRIPTION OMMENT Command refused because pinch point is below Check the value of the PP correction, and the Y1 and Y2 bottom dead centre value of the BDC correction in the User Preference page. -
Page 46: Resources
VisiTouch Series – User Manual ESOURCES UTORIALS IDEOS Please subscribe to our YouTube channel to have our latest videos and tutorials. https://www.youtube.com/channel/UCLBu-RxCGGf_epuHtMwoAcQ Don’t forget to click on the ring bell button to stay in touch! Please, let us know if you have any suggestion at support@cybelec.ch...
Need help?
Do you have a question about the VisiTouch Series and is the answer not in the manual?
Questions and answers