Table of Contents
Advertisement
Available languages
Available languages
Quick Links
Advertisement
Chapters
Table of Contents

Related Manuals for Opvimus IF-7P4/0E


Summary of Contents for Opvimus IF-7P4/0E
- Page 3 Audio IP Mainframe IF-7P4/0E expansion unit R + D Department IF-7P4/0E version 5.0.001 ENG...
-
Page 5: Table Of Contents
12. DOCUMENT VERSION TRACKING ......................22 13. GUARANTEE ............................23 WARNING. This is a Class A unit. In a domestic environment this unit may cause radio interferences. In this case the user must take the necessary precautions. R + D Department IF-7P4/0E version 5.0.001 ENG... -
Page 6: Introduction
Each zone output has connections for A / B lines (not implemented) and input for backup amplifier. Communicates with the main IF-7P4ETH/0 unit or COMPACT unit via CAN bus. Each main unit can control up to 10 IF-7P4/0E units. *Module amplifiers available: 120 W, 150 W, 250 W, 300 W & 460 W Main characteristics: ... -
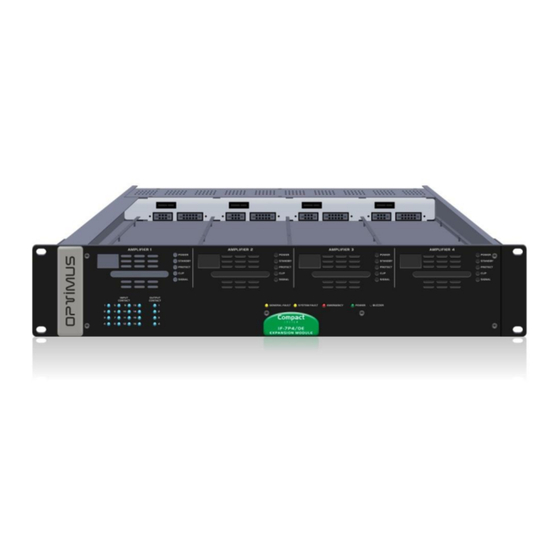
Page 7: Front View
6. Amplifier module STANDBY LED indication (see section 14. EMERGENCY LED. 10). 15. POWER SUPPLY LED. 7. Amplifier module PROTECT LED indication (see section 16. Buzzer. Acoustic alarm. 10). 8. Amplifier module CLIP LED indication (see section 10). R + D Department IF-7P4/0E version 5.0.001 ENG... -
Page 8: Rear View
12) ON/OFF Switch. 13) 100-240V AC 50/60 Hz Power entry connector. 14) Communication and control module (see section 3.1). 15) Audio expansion module (see section 3.2). * A/B Lines functionality not implemented R + D Department IF-7P4/0E version 5.0.001 ENG... -
Page 9: Communication And Control Module
NC, it indicates that the equipment is switched OFF or that alarms were detected (figure 4). Maximum DC charge current: 150mA IF-7P4/0E is turned off or alarms detected Maximum DC or AC peak charge voltage: 350V CAN BUS Contacts. See section 4.7. CAN BUS connection. -
Page 10: Audio Expansion Module
Internal DIP Switch 8 and the con- nection between the shielding of the connector to the GND is made through the internal DIP Switch 7. * DIP Switch 7 R + D Department IF-7P4/0E version 5.0.001 ENG... - Page 11 12) AUDIO LINK INPUT 2 SURVEILLANCE. Open collector output contact. Normally open contact. The contact closes when a fault is detected in the cable connection AUDIO LINK INPUT 2. See Figure 7. R + D Department IF-7P4/0E version 5.0.001 ENG...
-
Page 12: Connection
Each channel also has connections for A / B lines for installations with redundant loudspeaker lines (not implemented) and a backup amplifier input. Figure 8 4 ZONES SPEAKER LINES CONNECTION ZONE ZONE ZONE ZONE AMPLIFIER AMPLIFIER AMPLIFIER AMPLIFIER IF-7P4/0E R + D Department IF-7P4/0E version 5.0.001 ENG... - Page 13 The sum of the power ratings of the loudspeakers connected to output of an amplifier must not exceed the power of the amplifier module. The backup amplifier must be at least the most powerful of the amplifiers you must replace. R + D Department IF-7P4/0E version 5.0.001 ENG...
-
Page 14: Local Audio Inputs Connection
Ground Priority control contact. By joining this COLD Audio input contact to ground (GND) through an external device, the signal applied to the input attacks the corresponding amplifier. R + D Department IF-7P4/0E version 5.0.001 ENG... -
Page 15: Power Supply
Audio IP Mainframe IF-7P4/0E expansion unit Figure 12 Figure 13 Balanced audio connection Unbalanced audio connection to a local audio input of the IF-7P4/0E to a local audio input of the IF-7P4/0E External External equipment equipment AUDIO – AUDIO +... -
Page 16: Input Contacts
Emergency Mode indicator activated... Maximum DC charge current: 150mA Maximum DC or AC peak charge voltage: 350V To connect please follow figure 17. External device Figure 17 R + D Department IF-7P4/0E version 5.0.001 ENG... -
Page 17: Audio Link Between Matrixes
If you wish, you can monitor the AUDIO INPUT LINK connections by connecting the CTRL contacts to the input contacts of the control module. Use the PA Manager software to configure these contacts for this purpose. Figure 19 R + D Department IF-7P4/0E version 5.0.001 ENG... -
Page 18: Can Bus Connection
CAN Address Each IF-7P4/0E that is connected to the CAN bus must have a different address. This DIP switches b0, b1, b2 and b3 allows assigning this communication address. Each master audio matrix (IF-7P4ETH/0 or COMPACT) may be expanded with a maximum of 10 IF-7P4/0E units and if this were to happen, then 10 different CAN addresses would be used. -
Page 19: Inserting The Power Amplifiers Modules
6. INSERTING THE POWER AMPLIFIERS MODULES 1. Remove the frontal plate. Figure 24 2. If you want to use slots 2, 3 or 4, remove the corresponding slot panel. Figure 25 R + D Department IF-7P4/0E version 5.0.001 ENG... - Page 20 Audio IP Mainframe IF-7P4/0E expansion unit 3. Insert the amplifier module by fitting it into the slot guides. Figure 26 4. Fasten the amplifier module by means of the hot-swapping screw. Figure 27 R + D Department IF-7P4/0E version 5.0.001 ENG...
-
Page 21: Commissioning The Unit
Commissioning the unit requires sending of configurations to the audio matrix COMPACT or IF-7P4ETH/0 whose CAN bus depends on the IF-7P4/0E unit. To do this, you need a PC equipped with a network card and connected to the IP audio matrix, either through a switch, or directly through a network cable. -
Page 22: System Alarms
SYSTEM FAULT indicator light: Front yellow LED. Illuminates when the equipment detects an internal error. Acoustic alarm indicator (buzzer): Intermittent buzzing sound. The IF-7P4/0E incorporates a buzzer that generates an acoustic signal each time an alarm is received. The acoustic indication is a buzzing sound that lasts 10 seconds and is periodically repeated every 20 seconds. -
Page 23: Modular Amplifiers Mp-Wd1 Serie
<0.6% <0.6% <0.6% <0.6% Consumption Standby 3.5W Idle 6.5W 7.2W 7.2W 7.2W 134W 165W 276W 339W 520W AC Fuse NOT USED IN MP-WD1 SERIES WITH IF-7P/0E MAINFRAME Power supply (IF-7P4/0E)) 100-240 VAC R + D Department IF-7P4/0E version 5.0.001 ENG... -
Page 24: Software And Firmware Versions
3.2.002 July 2020 R+D Department 10. Software and firmware versions. 5.0.001 September 2020 Software 5.0 R+D Department Approved By Function Date Ferran Gironès i Puig R+D Director 09/2020 R + D Department IF-7P4/0E version 5.0.001 ENG... -
Page 25: Guarantee
The guarantee shall not be valid whenever the following is observed: Fax. 972 21 84 13 Amendments or corrections made to the details of the guarantee certificate e-mail:girona@optimus.es 1999/44/CE or purchase invoice. R + D Department IF-7P4/0E version 5.0.001 ENG... - Page 27 Unidad de expansión IF-7P4/0E de la matriz de audio IP R + D Department IF-7P4/0E version 5.0.001 ESP...
- Page 29 13. GARANTÍA ............................23 ATENCIÓN. Este es un equipo de Clase A. En un ambiente doméstico podría llegar a causar radio interferencias. En este caso el usuario debería tomar las medidas adecuadas. R + D Department IF-7P4/0E version 5.0.001 ESP...
-
Page 30: Introducción
Recepción y envío de datos de control mediante Bus CAN Entrada de alimentación full range (100-240Vca 50/60 Hz) así como una entrada secundaria de 24 VDC (solo para la parte de control). R + D Department IF-7P4/0E version 5.0.001 ESP... -
Page 31: Vista Frontal
6. Indicador luminoso STANDBY del módulo amplificador. (vea el apartado 10). 16. Zumbador. Indicador acústico. Indica recepción de una alarma del sistema. 7. Indicador luminoso PROTECT del módulo amplificador. (vea el apartado 10). R + D Department IF-7P4/0E version 5.0.001 ESP... -
Page 32: Vista Posterior
13) Entrada de alimentación de red 100-240VCA 50/60 Hz. 14) Módulo de comunicación y control (ver apartado 3.1). 15) Módulo de expansión de audio (ver apartado 3.2). * Funcionalidad Líneas A/B no implementada A/B R + D Department IF-7P4/0E version 5.0.001 ESP... -
Page 33: Módulo De Comunicación Y Control
Contactos de entrada CT 1 a 16. Vea el apartado 4.4. Contactos de entrada. DIP Switches de configuración del BUS CAN. Vea el apartado 5. CONFIGURACIÓN DEL BUS CAN. Fusible del módulo de control. 2.5 A. Fusible de la alimentación 24Vcc secundaria. R + D Department IF-7P4/0E version 5.0.001 ESP... -
Page 34: Módulo De Expansión De Audio
3.2. Módulo de expansión de audio Módulo de enlace de audio entre la matriz master (IF- 7P4ETH/0 o COMPACT) y la matriz esclava (IF-7P4/0E), o entre matrices esclavas. Permite enlazar 4 canales de audio (música o avisos) y un canal emergencia mediante conectores RJ45. - Page 35 12) Contacto AUDIO LINK INPUT 2 SURVEILLANCE. Contacto de salida en colector abierto. Contacto normalmente abierto (NO). El contacto se cierra cuando se detecta un fallo en la conexión AUDIO LINK INPUT 2.Vea la Figura 7. R + D Department IF-7P4/0E version 5.0.001 ESP...
-
Page 36: Conexión
Cada canal dispone de conexiones para líneas A/B para instalaciones con líneas de altavoces redundantes (no implementado) y de una entrada de amplificador de reserva. Figura 8 CONEXIÓN DE LAS LINEAS DE ALTAVOCES DE 4 ZONAS AMPLIFICADOR AMPLIFICADOR AMPLIFICADOR AMPLIFICADOR DE ZONA DE ZONA DE ZONA DE ZONA IF-7P4/0E R + D Department IF-7P4/0E version 5.0.001 ESP... - Page 37 La suma de la potencia de los altavoces conectados a las salida de un amplificador no debe exceder la poten- cia del módulo amplificador. El amplificador de respaldo debe ser de una potencia igual o superior a la potencia del mayor de los amplifi- cadores a los que debe reemplazar. R + D Department IF-7P4/0E version 5.0.001 ESP...
-
Page 38: Entradas De Audio Locales
Entrada de audio COLD Contacto de control de prioridad. Al unir este contacto a masa (GND) a través de un dispositivo externo, la señal aplicada a la entrada ataca el amplificador correspondiente. R + D Department IF-7P4/0E version 5.0.001 ESP... -
Page 39: Alimentación
IP Figura 12 Figura 13 Conexión de una señal balanceada Conexión de una señal no balanceada a una entrada de audio local del IF-7P4/0E a una entrada de audio local del IF-7P4/0E Equipo externo Equipo externo AUDIO –... -
Page 40: Contactos De Entrada
Modo Emergencia activado... Máxima corriente de carga DC: 150 mA. Máximo voltaje de carga DC o AC peak: 350V Equipo externo Para su conexión siga la figura 17. Figura 17 R + D Department IF-7P4/0E version 5.0.001 ESP... -
Page 41: Conexión De Audio Entre Distintas Matrices
Si lo desea, puede monitorear las conexiones AUDIO INPUT LINK conectando los contactos CTRL a los contactos de entrada del módulo de control. Use el software PA Manager para configurar dos contactos de entrada del módulo de control para este propósito. Figura 19 R + D Department IF-7P4/0E version 5.0.001 ESP... -
Page 42: Conexión Del Bus Can
Posición del equipo en el bus CAN Utilice los DIP switches 5 y 6 para configurar la posición que ocupa el IF-7P4/0E en el bus CAN (elemento final o elemento intermedio). Vea la figura 22. Figura 22. Posición en el BUS CAN... -
Page 43: Inserción De Los Módulos Amplificadores
IP 6. INSERCIÓN DE LOS MÓDULOS AMPLIFICADORES 1. Retire la placa frontal. Figura 24 2. Si desea utilizar los slots 2, 3 o 4, retire el panel del slot correspondiente. Figura 25 R + D Department IF-7P4/0E version 5.0.001 ESP... - Page 44 IP 3. Inserte el módulo amplificador entre las guías del slot. Figura 26 4. Fije el módulo amplificador por medio del tornillo hotswap (intercambio en caliente). Figura 27 R + D Department IF-7P4/0E version 5.0.001 ESP...
-
Page 45: Puesta En Marcha Del Equipo
La puesta en marcha del equipo requiere el envío de configuraciones a la matriz de audio COMPACT o IF-7P4ETH/0 de cuyo bus CAN depende la unidad IF-7P4/0E. Para ello, es necesario un PC equipado con tarjeta de red y conectado a la matriz de audio IP, bien a través de un switch, o directamente a través de un cable de red. -
Page 46: Alarmas Del Sistema
Indicador luminoso SYSTEM FAULT: LED amarillo frontal. Se enciende cuando el equipo detecta un error interno. Indicador acústico (zumbador) de alarma: Pitido intermitente. El IF-7P4/0E dispone de un zumbador que genera una indicación acústica cada vez que recibe una alarma. La indicación acústica, un pitido de 10 segundos de duración, se va repitiendo periódi- camente cada 20 segundos. -
Page 47: Amplificadores Modulares De La Serie Mp-Wd1
<0,6% <0,6% Consumo Standby 3.5W Idle 6,5W 7,2W 7,2W 7,2W 134W 165W 276W 339W 520W Fusible AC NO UTILIZADO EN AMPLIFICADORES DE LA SERIE MP-WD1 MONTADOS EN IF-7P4/0E Alimentación (IF-7P4/0E)) 100-240 VCA R + D Department IF-7P4/0E version 5.0.001 ESP... -
Page 48: Versiones De Software Y Firmware
3.2.002 Julio 2020 R+D Department 10. Versiones de software y firmware. 5.0.001 Septiembre 2020 Software 5.0 R+D Department Approved By Function Date Ferran Gironès i Puig R+D Director 09/2020 R + D Department IF-7P4/0E version 5.0.001 ESP... -
Page 49: Garantía
Enmiendas o tachaduras en los datos del certificado de garantía o factura Fax. 972 21 84 13 de compra. e-mail:girona@optimus.es v99/44/CE Falta de factura original o falta de fecha en la misma. R + D Department IF-7P4/0E version 5.0.001 ESP...
Need help?
Do you have a question about the IF-7P4/0E and is the answer not in the manual?
Questions and answers