Table of Contents
Advertisement
Quick Links
Advertisement
Table of Contents

Related Manuals for Cambridge Audio Alva TT V2


Summary of Contents for Cambridge Audio Alva TT V2
- Page 1 Alva TT V2 Manual Generated: 01/07/2022 - 15:57...
-
Page 2: Table Of Contents
Table of Contents Alva TT V2 ............................................Introduction ............................................What's included with the Alva TT V2? ................................... Top view ............................................. Rear view ............................................Setting up the Alva TT V2 ........................................ Getting connected .......................................... Operating instructions ........................................Troubleshooting ..........................................Technical specifications... -
Page 3: Alva Tt V2
Alva TT V2 Last updated: June 28, 2022 03:06. Revision #4963 User's Manual... -
Page 4: Introduction
This guide is designed to make installing and using this product as easy as possible. Information in this document has been carefully checked for accuracy at the time of printing; however, Cambridge Audio’s policy is one of continuous improvement, therefore design and specifications are subject to change without prior notice. -
Page 5: What's Included With The Alva Tt V2
What's included with the Alva TT V2? Last updated: June 28, 2022 03:06. Revision #4955 Inside the box of your Alva TT V2 you will receive: 1. Alva TT V2 direct drive turntable. 2. Dust Cover. 3. Quick Start Guide. -
Page 6: Top View
Top view Last updated: June 28, 2022 03:06. Revision #4956 1. Standby/On - Switches the unit between standby (indicated by a dim LED) and on (indicated by a bright LED). 2. Start/Stop and Speed Selection Buttons - Use to start or stop platter rotation at either 33, or 45 RPM. 3. -
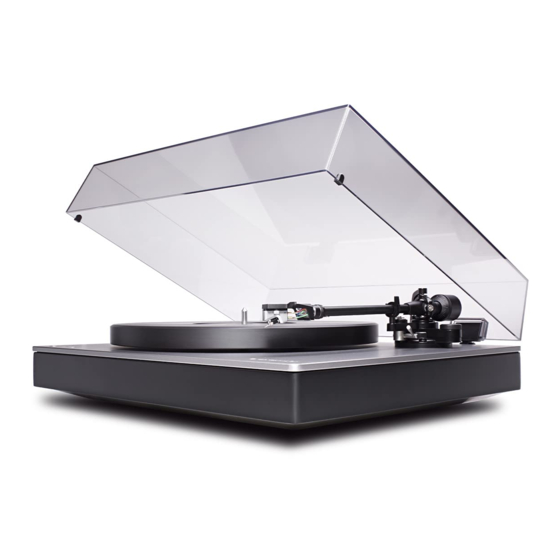
Page 7: Rear View
Rear view Last updated: June 28, 2022 03:06. Revision #4957 1. Lid. 2. Lid hinges. 3. Ground Connection Screw. 4. Output Level Switch – Select between line level, or phono level output Line: With the switch set to ‘Line’ the internal phono stage will be used Phono: With the switch set to ‘Phono’, an external phono stage will need to be used 5. -
Page 8: Setting Up The Alva Tt V2
Setting up the Alva TT V2 Last updated: June 28, 2022 03:06. Revision #4958 Once you have unboxed your turntable, please remove all the separate components in preparation for assembly. 1. Gently place the platter on the turntable. 2. Push and rotate the counterweight onto the end of the tonearm, and then carefully install the headshell and cartridge assembly. - Page 9 3. Place the slipmat onto the platter, release the tonearm from its rest and remove the stylus guard. Ensure the anti-skating dial is set to ‘0’. 4. Place the stylus tracking force gauge onto the platter and carefully lower the stylus onto '2'. Ensuring that the tracking force is set correctly is important to the performance of your turntable and helps to minimise damage to your records.
- Page 10 5. Connect the hinges to the turntable and insert the lid.
-
Page 11: Getting Connected
Switch the 'output level switch' to 'line'. Using high-quality RCA interconnects, connect the audio output of the Alva TT V2 to a line-level input on your amplifier. Note: Do not connect to an external phono-stage, or phono-level input with the turntable set to 'line'. - Page 12 Switch the 'output level switch' to 'phono'. Connect a ground lead to the ground connection screw on the Alva TT V2, and the equipment that it is being connected to. Using high-quality RCA interconnects, connect the audio output of the Alva TT V2 to the phono input of your external phono-stage, or amplifier.
- Page 13 Bluetooth Connection. Pairing: Make sure BT switch is set to ON. Press and hold the Pairing button for 2 seconds to enter pairing mode. If you haven't connected your turntable to a Bluetooth device previously, make sure your Bluetooth device is set to pairing mode (see your Bluetooth device instructions for how to do this).
-
Page 14: Operating Instructions
Auto Power Down (APD). The Alva TT V2 comes set up with Auto Power Down (APD) enabled and will automatically switch to standby mode after 20 minutes of inactivity. To disable APD: Press and hold the power button for 5 seconds when in standby. -
Page 15: Troubleshooting
Troubleshooting Last updated: June 28, 2022 03:06. Revision #4961 No sound through both channels. • Check that the amplifier is turned on. • Ensure that the correct input source is selected on the amplifier. • Confirm that all connections between the amplifier and turntable are secure. •... -
Page 16: Technical Specifications
Technical specifications Last updated: June 28, 2022 03:06. Revision #4962 Turntable. Turntable Type. Direct Drive. Turntable Speeds. 33 1/3, 45 RPM. Torque. 1.6kg/cm. Wow and Flutter. <0.1%. Platter Material. POM (Polyoxymethylene). Platter Diameter. 305mm. Tonearm. Type. Static balanced tonearm with removable headshell. Effective Length. - Page 17 Input Impedance. 47kΩ. Input Capacitance. 330pF. Outputs. Audio Output. RCA phono/line level (switchable). Bluetooth. SBC/aptX/aptX HD. General. Power Supply. AC 100-240V, 50/60Hz. Power Consumption. 5.5W approx, 20W max, <0.25W (Standby). Dimensions (W x H x D). 435 x 139 x 368 mm. Weight.
Need help?
Do you have a question about the Alva TT V2 and is the answer not in the manual?
Questions and answers