
Related Manuals for Cambridge Audio Alva TT


Summary of Contents for Cambridge Audio Alva TT
-
Page 1: Table Of Contents
Alva TT v2 and Alva ST Turntables Manual Generated: 07/01/2022 - 09:31 Table of Contents Alva TT v2 and Alva ST Turntables Top view Rear view Setting up the Alva ST Setting up the Alva TT v2 Getting connected Operating instructions Technical specifications... -
Page 2: Alva Tt V2 And Alva St Turntables
This guide is designed to make installing and using this product as easy as possible. Information in this document has been carefully checked for accuracy at the time of printing; however, Cambridge Audio’s policy is one of continuous improvement, therefore design and specifications are subject to change without prior notice. -
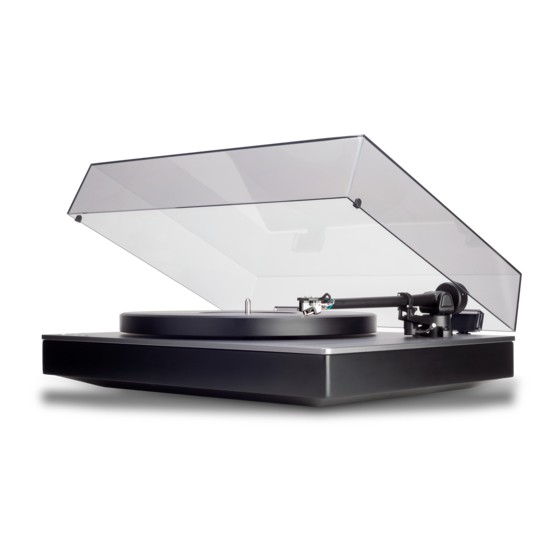
Page 3: Top View
Top view Last updated: October 14, 2021 09:36. Revision #2492 alva tt v2 and alva st turntables / top view 1. Standby/On Switches the unit between Standby mode (indicated by the dim LED) and On (indicated by the bright LED). -
Page 4: Rear View
3. Ground 4. Output level (Phone/Line) switch With the switch position set to Line (Alva TT/ST), the internal phono stage will be used. With the switch position set to Phono (External), an external phono stage needs to be used. 5. Signal output sockets Caution - You must connect appropriately based on output level switch position. -
Page 5: Setting Up The Alva St
Setting up the Alva ST Last updated: October 14, 2021 09:39. Revision #2494 alva tt v2 and alva st turntables / setting alva st 1. Place the platter on the turntable. 2. Install the belt drive. Make sure that the belt is installed properly around the motor. - Page 6 4. Place the rubber mat on the turntable. 5. Release tonearm from rest and remove the stylus guard. Important notes: - Take care when handling the cartridge. Lower gently onto the platter, do not drop. - Make sure that the Anti-Skate dial is set to '0'.
- Page 7 6. Place tonearm force gauge on the platter and carefully lower stylus onto "2". Adjusting the counterweight ensures the pressure the stylus applies to the record is correct. Too much pressure can cause distortion and lost information as well as wear to your records. Too little pressure and the stylus will jump and potentially damage your records. Return the arm to its armrest to adjust the counterweight.
- Page 8 Adjust the counterweight until the stylus force gauge is in balance. Once the stylus is in balance, return the tonearm to its armrest. The anti-skate dial should be set to match the tracking force of the cartridge. Your factory-fitted cartridge has a tracking force of '2'. 7.
-
Page 9: Setting Up The Alva Tt V2
Setting up the Alva TT v2 Last updated: October 14, 2021 09:40. Revision #2495 alva tt v2 and alva st turntables / setting alva tt v2 1. Place the platter on the turntable. 2. Push and rotate counterweight onto tonearm and then carefully insert the headshell into the tonearm. - Page 10 4. Place tonearm force gauge on the platter and carefully lower stylus onto "2" Adjusting the counterweight ensures the pressure the stylus applies to the record is correct. Too much pressure can cause distortion and lost information as well as wear to your records. Too little pressure and the stylus will jump and potentially damage your records. Return the arm to its armrest to adjust the counterweight.
- Page 11 Adjust the counterweight until the stylus force gauge is in balance. Once the stylus is in balance, return the tonearm to its armrest. The anti-skate dial should be set to match the tracking force of the cartridge. Your factory-fitted cartridge has a tracking force of '2'. 5.
-
Page 12: Getting Connected
Analogue audio connections Output Level connection Important note: Before making a connection, set the Output Level switch to 'Line (Alva TT/ST)'. Do not connect to an external phono stage. Phono connection Important note: Before making a connection, set the Output Level switch to 'Phono (External)'. Do not connect to the Line input of an amplifier. - Page 13 Pairing Press and hold the Pairing button for 2 seconds to enter pairing mode. If you haven't connected your turntable to a Bluetooth device previously, do the following. Make sure your Bluetooth device is set to pairing mode (see your Bluetooth device instructions for how to do this). Make sure that there's no other Bluetooth device that is in pairing mode near the turntable, such as a mobile phone.
-
Page 14: Operating Instructions
Operating instructions Last updated: October 25, 2021 01:36. Revision #2497 alva tt v2 and alva st turntables / operating instructions Playing Records Place your record over the spindle and press the power button on the top panel. Press required platter rotation speed (33 or 45) button on the top panel. -
Page 15: Technical Specifications
Technical specifications Last updated: October 29, 2021 09:49. Revision #2498 alva tt v2 and alva st turntables / technical specifications Alva TT v2 Turntable TYPE Static Balanced tonearm with Detachable Headhell TURNTABLE SPEEDS 33 1/3, 45 rpm MOTOR TORQUE 1.6 kg/cm WOW &... - Page 16 INPUT CAPACITANCE 100pF Outputs AUDIO OUTPUT RCA phono/line level (switchable) BLUETOOTH SBC/aptX/aptX HD General POWER SUPPLY AC 100-240V, 60/50Hz POWER CONSUMPTION 5.5W Approx., 20W max, <0.25W (Standby) DIMENSIONS (W X H X D) 435 x 139 x 368 mm WEIGHT 10.9 kg Cartridge TYPE...
- Page 17 TURNTABLE PLATTER Aluminium Die-casting DIAMETER 305 mm Tonearm TYPE Static Balanced tonearm with Detachable Headhell EFFECTIVE LENGTH 221.5 mm OVERHANG 19 mm EFFECTIVE MASS 19.8 g Internal Phono Stage GAIN @ 1kHz 42dB NOMINAL OUTPUT (WITH CA CARTRIDGE) 250m Vrms EQUIVALENT INPUT NOISE (A-WEIGHTED) 0.1u Vrms RIAA CURVE ACCURACY...
- Page 18 435 x 139 x 366.7 mm WEIGHT 9 kg Cartridge TYPE Moving Magnetic Cartridge FREQUENCY RESPONSE +/- 0.5dB 30Hz-20kHz STYLUS Elliptical CANTILEVER Alloy Tube OUTPUT LEVEL 1.8~3.6mV @ 1kHz TRACKING FORCE RECOMMENDED LOAD 47kΩ...
-
Page 19: Troubleshooting
Troubleshooting Last updated: October 25, 2021 01:38. Revision #2499 alva tt v2 and alva st turntables / troubleshooting No sound through one or both channels • Amplifier not switched on. • Amplifier is muted. • Incorrect input is selected. • Bad connection with amplifier, connector plugs not fully pushed home.
Need help?
Do you have a question about the Alva TT and is the answer not in the manual?
Questions and answers