Table of Contents
Advertisement
Quick Links
Advertisement
Table of Contents

Related Manuals for QYSEA FIFISH V6 Expert


Summary of Contents for QYSEA FIFISH V6 Expert
- Page 1 F I F I S H V6 Expert Quick Start Guide V1.1...
-
Page 3: Table Of Contents
Contents Safety and Regulations Introduction Definition ROV Definition RC Definition Spool and VR Goggle Accessories Preparation 9-15 Check and App Install Set-up 9-13 Hardware connection 9-11 Software connection ROV Sensor Cal, Deploy, and Retrieve Controlling 14-15 Definition Controlling modes FIFISH App 16-29 Operation interface 16-17... -
Page 4: Safety And Regulations
Safety and Regulations Operating FIFISH products requests training and practice. Please read through this document before operating in water. Do NOT touch the running Do NOT throw the ROV Avoid overheating of propeller motors, do NOT run the when deploying into the thrusters in air for over 30 water seconds... -
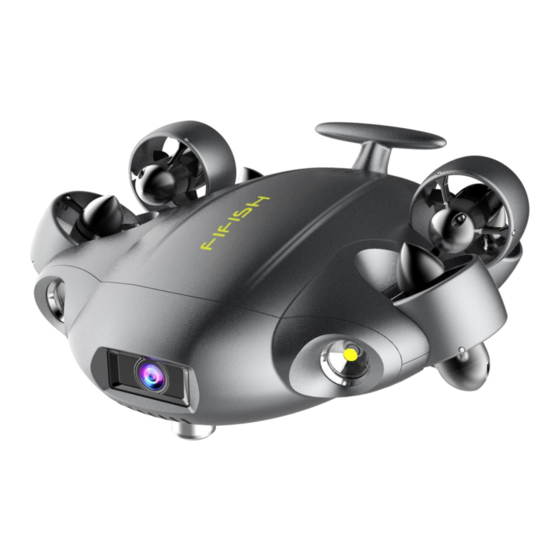
Page 5: Introduction
Definition, ROV FIFISH V6 Expert ROV 4K UHD Underwater Camera 3,000 lumens LED × 2 Vector Thruster × 6 Venting Holes Rear Wing microSD Hot Shoes Mounting Port FIFISH Q-Interface ROV Tether Port NOTE: 1. Do NOT shake or swing while holding the rear wing. -
Page 6: Definition Rc
Definition, RC RC (Remote Controller) ON/OFF Depth Holding Lock/Unlock Left Control Stick Right Control Stick Right Wheel Left Wheel Video (Record/Stop) Control Mode (Attitude / Sport / Combination) 10. Tether Port 11. Ethernet Port (mini USB) 12. LED Brightness (OFF / 1 / 2) 13. -
Page 7: Definition Spool And Vr Goggle
Definition, Spool and VR Goggle Spool and Tether Spool Handle Tether Regulator Spool Frame Tether ROV Plug Foldable Handle Tether RC Plug (3.5mm AUX plug) VR Goggle Housing Smart Phone Bracket Adjustable Clamp (suit from 3.5” to 6.0” smart phone) NOTE: Hold your cell phone when you lock and unlock the clamp. -
Page 8: Accessories
Definition, Accessories 2D Image Sonar U-QPS Scan beyond visual distance Underwater position in real or visibility time, and route plan search Robotic Arm Water Sampler (500 mL) Grab & retrieve subjects Collect water sample from below the surface certain depth and position... - Page 9 Definition, Accessories UT Thickness Gauge Q-Camera with LEDs Detect coating or metal Provide secondary view for thickness in ship, offshore underwater survey infrastructures pH Sensor Auto holding position, Monitor pH in real-time seabed speed...
- Page 10 Definition, Accessories HDMI Box 2.0 RC Sun Hood Download original resolution Provide shade for tablets videos when recording, LIVE output HDMI signal There are more accessories on the way. For more information about add-ons or accessories, contact our local authorized dealers for an on-site demonstrations.
-
Page 11: Check And App Install
2. The best compatible smart devices list in, in FIFISH App, help/FAQ/Before Dive, #6 FIFISH App download and Installations Option 1. Scan the QR code below to download FIFISH App. Option 2. Search the FIFISH on App Store (iOS) or Google Play (Android). Option 3. Go to QYSEA's website at https://www.qysea.com/support/app-download/... -
Page 12: Preparation
Preparation, Set-up, Hardware 2. Hardware Connection Overview of hardware connection 2.1. Plug the tether (3.5 mm head) into remote controller... - Page 13 Preparation, Set-up, Hardware 2.2. Take off the protect cap, tie the knot around the rear wing 2.3. Plug the ROV Plug into the ROV Tether Port (finger tight) 2.4. Turn ON the RC. Press and hold the ON/OFF button (3 seconds) •...
- Page 14 Preparation, Set-up, Hardware 2.5. Take off the protect cap, tie the knot around the rear wing • The “ON/OFF”, “Depth Holding" and "LOCK/UNLOCK” will flash and rotate clockwise, which indicates "Ready to be connected“ • In about 30 seconds, the "ON/OFF” and "LOCK/UNLOCK” buttons will stay solid that indicates the hardware connection successfully...
-
Page 15: Software Connection
Preparation, Set-up, Software 3. Software Connection 3.1. Smart device connect with the RC's Wi-Fi (5 GHz) • Find the Wi-Fi network name “FIFISHRC_xxxx” • The password is "1234567890” 3.2. Open FIFISH App, then press “Go Dive” • Allow access to photo albums, location, and notifications •... -
Page 16: Rov Sensor Cal, Deploy, And Retrieve
Preparation, ROV Sensor Cal, Deploy and Retrieve 4. ROV Sensor Calibration (Check the FIFISH App Charter, ROV Sensor Calibration Page 4.1. Go to General Setting 4.2. Select the ROV Sensor Icon 4.3. Follow the hit on FIFISH App step by step, first Gyro-Acce then 4.4. -
Page 17: Controlling
Controlling, Definition Definition of Controlling The FIFISH PRO V6 Expert uses the patented Smart Thruster Array™ to ensure the ultimate maneuverability and delivers the 6 DOF (degree of freedom). • V6 Expert can move in descend & ascend, left and right, forward and backward. •... -
Page 18: Controlling Modes
Controlling, Controlling Modes Controlling Modes FIFISH PRO V6 Expert supports 3 modes for control: A, S, and C. A is Attitude mode, S is Sport mode, C is the Combination mode. Attitude Mode Attitude mode is designed for beginners. The ROV will not roll in Attitude mode. The ROV will stay in same depth moving when depth holding is ON. -
Page 19: Fifish App
FIFISH App, Operate Interface FPV Interface in FIFISH App 1. Status 2. Navigation Information 3. Additional Features 4. General Settings 5. Additional Features 6. Image/Video Setting Shortcut 7. Image/Video Button 8. Navigation Chart NOTE: The additional features will active when attached such accessories. - Page 20 FIFISH App, Operate Interface 5 6 7 17 18 19 20 Status Navigation Chart 12. Pilot’s Heading 1. Current System Status 2. Depth Holding ON/OFF 13. Compass 14. ROV’s Heading in Degrees 3. Control Mode 4. Water Temperature in C/F 15.
-
Page 21: System Setting
FIFISH App, System Setting General Settings, Select System Setting Icon in 1 column • If you have 2 devices connect to the RC, Click “Acquire Control” to get access controlling and adjusting settings • ONLY the “Pilot” can manipulate the settings, such as, watermarks, control preferences, camera settings etc. - Page 22 FIFISH App, System Setting Scroll down the system setting page, the system version information will show up • The App Version is the FIFISH App version in your cell or tablet • The RC Version is the RC’s motherboard version •...
-
Page 23: Controlling Preferences
FIFISH App, Controlling Preferences Controlling Preferences General Settings, Select Controlling Preferences Icon in 2 column • Click “Control Mode”, the default is ROV-USA Control Mode, you can select your preferences if you like • Click “Confirm”, after setting **As for advance level pilot seek for customized setting demo. Please check FIFISH authorized local Dealer or Service Center for more details and training programs. - Page 24 FIFISH App, Controlling Preferences Control Curvature For the advance level pilot, the curvature setting can provide more ACCURATE operating experiences. Set the Move & Rotate • Adjusting the curvature (set the center sector output sensitivity) • Adjusting the attenuation (set the maximum output) **As for advance level pilot seek for explore curvature setting tips.
-
Page 25: Rov Sensor Calibration
FIFISH App, ROV Sensor Calibration ROV Sensor Calibration Select the ROV Sensor Icon in 3 column • Follow the hit on FIFISH App step by step, first Gyro-Acce then • Reboot ROV in FIFISH App, and Power ON/OFF RC if necessary... - Page 26 FIFISH App, Camera is ROV’s main camera internal memory status. Main Camera Internal Storage • Click “Main camera internal storage format” will erase the internal memory of main camera • Click “restore factory settings” will reset to default camera settings...
-
Page 27: Camera
FIFISH App, Features, Camera Image Settings Camera General Setting 1. Exposure and WB 7. Live Resolution on FPV 2. Video Setting 8. Live Bitrate on FPV 3. Camera General Setting 9. Color Encoding 4. Resolution 10. Video Format 5. Image Stabilization NOTE: Shortcut camera setting will have the same results. -
Page 28: Auto Pilot 2 Nd Gen
FIFISH App, Features, Auto Pilot Auto Pilot 2 The Auto Pilot 2nd Gen is able programable auto moving commands. 1. Press the "AUTO" to turn ON the Auto Pilot 2. Select moving behavior 3. Set speed of such segment 4. Set time of such segment 5. - Page 29 FIFISH App, Features, Auto Pilot Auto Pilot 2 The Auto Pilot 2 Gen is able programable auto moving commands.
-
Page 30: Live Streaming
FIFISH App, Features, LIVE Streaming LIVE Streaming Board casting directly on YouTube, Facebook or other social media network. 1. Generate a Stream Key Stream URL on YouTube or Facebook 2. Click the LIVE icon 3. Past the Stream URL and Stream Key in column 2, 3 4. -
Page 31: Hdmi Box
FIFISH App, Features, HDMI Box HDMI Box 2.0, Download to Flash Drive • HDMI Box 2.0 also capable to download the original resolution video from ROV while recording. • HDMI Box 2.0 will enable to display on a HDTV or transmitter for TV shows. 1, 2 1. - Page 32 FIFISH App, Features, HDMI Box HDMI Box 2.0, HDMI Output • HDMI Box 2.0 will enable to stream to a HDTV or transmitter for TV shows. 1. Connect to the HDMI Display or stream transmitter broadcasting devices 2. Click the icon to active Display Mode NOTE:...
-
Page 33: Packing Up
Do NOT squeeze or tear when packing, pay extra attention on bending or pressing on tether. 2. Video/photo download can be achieved via microSD slot on RC. Check our website for video tuitions at https://www.qysea.com/support/ or FIFISH App/Help/College. -
Page 34: After-Dive
After-Dive microSD Hot Shoes Cap Maintenance 1. Keep the cap and microSD Hot Shoes clean and dry. 2. Apply a thin layer of grease to the interior slot (Red area). Motors Maintenance (After Every Dive) 1. Connect the RC to V6 Expert and open the FIFISH App (see Hardware Connection section, in Quick Start Guide). -
Page 35: Rov Charging
After-Dive ROV Charging LED indicator illuminates while charging and GREEN LED indicator illuminates while fully charged. RC Charging Flashing ON/OFF button, RC is charging White steady ON/OFF button, RC is fully charged. Red, less than 30% Yellow, 30% to 70% White, 70% or higher... -
Page 36: Specifications
Specifications 15 in × 13 in × 5 Τ Dimension 383 mm × 331 mm × 143 mm 10 Τ Weight 4.6 kg Depth Rating 100 meters 328 feet Speed 3.0 Knots (1.5 m/s), max speed in still water Thrusters Q-Motor Tech ×... -
Page 37: Camera
Specifications Camera 1/2.3” Image Sensor SONY CMOS Pixels 12 Mega Pixels Effective Pixels ISO Range 100-6,400 Auto / Manual Lens Filed of View (in air) f/2.5 Aperture 0.4 m Minimum Focusing Distance Shutter Speed 5 to 1/5000 second Auto / Manual (Electronic) Burst Shooting 3 / 5 / 10 / 15 Frames... -
Page 38: Tether And Spool
Specifications Tether and Spool Tether Length 100 meters (Standard Package) 328 feet Τ Tether Diameter 4.0 mm inch Breaking Force 100 kgf 220 lbsf 238 mm × 213 mm × 205 mm inch × 8 Τ inch × 8 Τ 9 Τ... -
Page 39: Disclaimer
• Loss of, or damage to, your data by a product. • Any software programs, whether provided with the product or installed subsequently. • Failure of, or damage caused by, any third-party products, including those that QYSEA may provide or integrate into the QYSEA product at your request.
Need help?
Do you have a question about the FIFISH V6 Expert and is the answer not in the manual?
Questions and answers