Advertisement
Quick Links
Instruction booklet
Standard fixing bolts
!
In the event of a product
malfunction please contact
Burton Safes Ltd
Burton Safes Ltd. Brockholes
Holmfirth HD9 7BN
Tel: 01484 663388
02/01/2022 V.1 Page 2 of 2
INSTRUCTIONS
FITTING YOUR KEYGUARD
To fit your Keyguard XL you
Tools
will need the following tools:
• Power Drill
• 5mm Masonry Drill Bit
• Small Socket Driver
• 8mm Socket Head
• Marker Pen
NOTE: Your Keyguard XL
should be fitted to a solid
surface. We recommend
brickwork, stone or concrete
• To start use the rubber
cover as your template to
Fixing holes
mark the fixing holes on the
wall. Ensure you choose a
location that allows the best
possible fixing e.g. the centre
of a brick. N.B. You must
never fix into the mortar
• Now use the 5mm drill bit
5 mm
to make a hole 55mm deep in
each of the marked fixing holes
• Place the Keyguard XL
inside the rubber case
Place
• Open the door of your
Keyguard XL and place the
whole unit onto the wall lining
up the holes
• Push the bolts that have
been supplied with your
Keyguard XL into each of
the holes
• Tighten each bolt fully using
a socket set
TROUBLESHOOTING
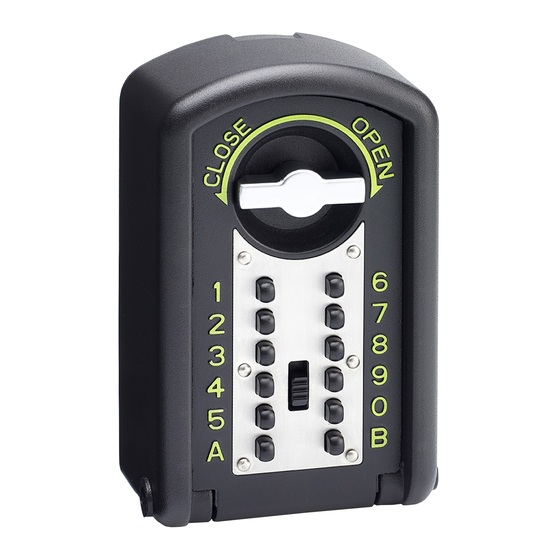
1
6
• Once the fitting is complete
if the door closes but does
2
7
not lock, test locking it when
the door is in the open
3
8
positon. If it works, it is likely
that the fixing bolts are
4
9
protruding too far into the
5
0
Keyguard XL. Try to secure
them further into the wall and
A B
close the door again
Vertical Position
• If the buttons will not press,
ensure that the dial is in the
vertical position
• If your code does not work,
Clear Button
press the
"clear"
button and
start again
Burton Safes offer a range of fixing
bolts to suit different applications
that retain the security
specification:
• Fixing kit - anchor bolt
• Fixing kit - concrete screw
with pan head
• Fixing kit - concrete screw
75 mm (for rendered walls)
• Fixing kit - concrete screw
100 mm (for rendered walls)
If you require the fitting
instructions for any of the
above please visit the website
www.burtonsafes.co.uk/products/
keyguard-digital-xl/
or call our office during office
hours on
01484 663388
for
further assistance.
Advertisement

Related Manuals for Burton Safes Keyguard DigitalXL


Summary of Contents for Burton Safes Keyguard DigitalXL
- Page 1 N.B. You must Instruction booklet never fix into the mortar Standard fixing bolts Burton Safes offer a range of fixing • Now use the 5mm drill bit 5 mm to make a hole 55mm deep in bolts to suit different applications...
- Page 2 INSTRUCTIONS OPENING YOUR KEYGUARD • Choose a personal code NORMALLY which must be between 3 and 8 digits. NOTE: You may only Vertical Position use each number/letter once • Ensure that the dial is in the • Using a flat head screwdriver, vertical position (shown in the rotate each button in your code image below)
Need help?
Do you have a question about the Keyguard DigitalXL and is the answer not in the manual?
Questions and answers
I've moved into a property and this key safe is available. The property has been renovated and had new doors locks. I have a teenage daughter and this would come in very handy. How can open the safe without knowing the current code so then I can re set the code for me??
You cannot open a Burton Safes Keyguard DigitalXL without knowing the current code. The safe is designed to be secure and resistant to decoding, even by professionals. To reset the code, the safe must be open.
This answer is automatically generated
The code to open no longer works and we cannot access the key. We clear and then enter the code and turn the dial. There is a click but the door doesn't open. The dial turns in both directions, clicking but not opening. How can we fix this, please?
If the code no longer works, press the "clear" button and try entering the code again. Ensure the dial is in the vertical position before pressing the buttons.
This answer is automatically generated