Table of Contents
Advertisement
Quick Links
Advertisement
Table of Contents

Subscribe to Our Youtube Channel
Related Manuals for Flybox APR1


Summary of Contents for Flybox APR1
- Page 1 ® ® APR1 Automatic Propeller Regulator User Manual...
- Page 2 ® FLYBOX User Manual, Safety Instructions and Warning Booklet This product is not TSO’d and cannot be installed into traditional FAA Part 23 and similarly Type- Certificate Aircraft Document A2021APR1 Revision#1.0, 09/2021 For firmware version 1.0 This booklet is suitable for printing in A5 format.
- Page 3 ® FLYBOX SECTIONS INTRODUCTION IMPORTANT NOTICE AND WARNINGS INDEX SYSTEM OVERVIEW OPERATING INSTRUCTIONS GENERAL SUGGESTIONS TECHNICAL SPECIFICATIONS WARRANTY DISCLAIMER APR1 User Manual, Safety Instructions and Warning Booklet REV 1.0...
-
Page 4: Introduction
® FLYBOX Introduction Examples of available screens Homepage: NORMAL Homepage: IASTAB Homepage: MAPTAB APR1 User Manual, Safety Instructions and Warning Booklet REV 1.0... - Page 5 ® FLYBOX Introduction Thank you for purchasing a Flybox® APR1 instrument. The APR1 instrument is available in 4 different models. This manual describes the use of each of the 4 models. APR1-LC (standard low current) APR1-HC (standard high current) APR1-M-LC (MAP - low current) APR1-M-HC (MAP - high current) All models are installable in a standard 2-1/8"...
-
Page 6: Important Notice & Warnings
WARNING: Used to indicate a dangerous situation that can cause personal injury or death if the instruction is disregarded. FAILURE TO DO SO MAY RESULT IN SERIOUS INJURY OR DEATH. APR1 User Manual, Safety Instructions and Warning Booklet REV 1.0... - Page 7 Therefore, we strongly suggest to double check all of the electronic instruments available on the aircraft and to turn them on to verify they function correctly. APR1 User Manual, Safety Instructions and Warning Booklet REV 1.0...
- Page 8 WARNING: Installation configuration this instrument should only be carried out by trained and authorised professionals. See the Flyboxavionics website for a list of authorised installers. APR1 User Manual, Safety Instructions and Warning Booklet REV 1.0...
- Page 9 Installation and user Manual, Safety Instructions and Warning Booklet, do not install this instrument in his aircraft. NOTE: Flybox Avionics reserves the right to change or improve its products as well as terms, conditions, and notices under which their products are offered without prior notice.
-
Page 10: Table Of Contents
4.3 SETUP………………………………………… 4.3.1 Control Submenu………………………….. 4.3.2 Manually Modify RPMs in ADV-ADV+ Mode 4.3.3 Home Submenu……………………………. 4.3.4 Backlight…………………………………….. 4.3.5 IAS Setup……………………………………. 4.3.6 Debug………………………………………… 4.4 Firmware Update……………………………… 4.5 Backup/Restore……………………………….. 4.6 Logger………………………………………….. 4.7 About…………………………………………… APR1 User Manual, Safety Instructions and Warning Booklet REV 1.0... - Page 11 ® FLYBOX Index INDEX 5.0 General Suggestions using the APR1……… 5.1 Use in CSPD (constant speed mode)……… 5.2 Use in ADV (advanced mode)………………. 5.3 Use in ADV+ (advanced plus)………………. Technical specification…………………………… Cleaning…………………………………………… Warranty…………………………………………… Term of use and Disclaimer……………………… Miscellaneous…………………………………….. APR1...
-
Page 12: System Overview
System overview 1.0 APR1 SYSTEM OVERVIEW CONSTRUCTION FEATURES The APR1 front panel is built from solid aluminum alloy, CNC milled and powder coated to last a long time over the years always showing a new appearance. The other parts of the housing are made of corrosion-protected aluminium. - Page 13 EASY DATALOG SAVING Easy logging of the data for debug purpose. If needed, The APR1 unit can save a last flight log on the USB pen drive. The user can then send the log via e-mail to the installer for a help/support request.
-
Page 14: Panel Indicators And Commands
If it is raised or lowered without first pulling it, it may be broken. APR1 User Manual, Safety Instructions and Warning Booklet REV 1.0... -
Page 15: Setup Menu Navigation
Setup and go directly to the main screen, “Back” is used to go back to the previous level. In the first menu level there is no the “Back” item. APR1 User Manual, Safety Instructions and Warning Booklet... -
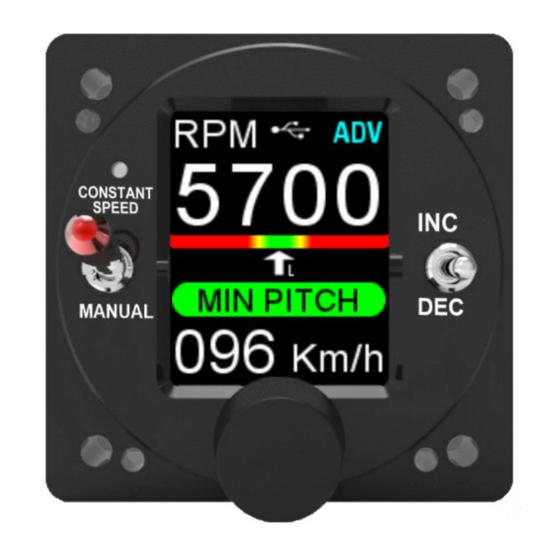
Page 16: Indication On The "Normal" Screen
Its coloring can vary in: - White > pen drive connected, datalog Off - Green > pen drive connect, datalog ON - Red > Pen drive connected, error writing data APR1 User Manual, Safety Instructions and Warning Booklet REV 1.0... - Page 17 Operating Instructions Working Mode: the Modes can be - CSPD > Constant Speed mode, available in all 4 APR1 models. Go to chapters 4.3.1 and 5.1 for a full description. - ADV > Advance mode, available in all 4 APR1 models.
-
Page 18: Indication On The "Iastab" Screen
The display shows how the Speed/RPM curve is followed. The blue reference lines run across the curve graphically indicating the intersection of Speed/RPM. The input speed value and the resulting RPMs are also shown in numerical value. APR1 User Manual, Safety Instructions and Warning Booklet REV 1.0... -
Page 19: Indication On The "Maptab" Screen
The blue reference lines run across the curve graphically indicating at the current MAP value how much minimum RPM is required. The input MAP values and the resulting RPMs are also shown in numerical value. APR1 User Manual, Safety Instructions and Warning Booklet REV 1.0... -
Page 20: Main Menu
(for example 4500 RPM for a ROTAX 912) and press the knob confirming to start the propeller test. The APR1 will increase the pitch until the propeller reach the RPM value your installer has defined. Once reached this minimum value (4000 RPM for example) it returns to the initial RPM (in this example 4500 RPM). -
Page 21: Dimmer
NOTE: To prevent unintentional activation of the Propeller test when in flight, this feature is disabled after takeoff. The APR1 considers a takeoff when the engine reaches or exceeds the minimum value that can be set with the knob for at least 30 seconds. -
Page 22: Setup
Choose the desired working mode between CSPD, ADV, ADV+. - CSPD > Constant Speed Mode This function is available in all 4 APR1 models. The instrument operates semi-automatically and requires pilot action to change the target rpm. In this mode the... - Page 23 The shape of the indicator can be shown in 2 different ways depending on the screen displayed. - ADV > Advance mode This function is available in all 4 APR1 models. ADV mode enable the controller to follow the Speed/RPM curve set by your installer.
- Page 24 MAP does not affect the RPM even if your model is an -M- and the MAP/RPM curve has been set by your installer. Read chapter x.x for more information on using in ADV mode. APR1 User Manual, Safety Instructions and Warning Booklet REV 1.0...
- Page 25 FLYBOX Operating Instructions - ADV+ > Advance Plus mode This function is available in models APR1-M-LC (MAP - low current) and APR1-M-HC (MAP - high current) only. The APR1 adjusts the engine speed according to the Speed/RPM and also to the MAP/RPM curves set by the installer.
-
Page 26: Manually Modify Rpms In Adv-Adv+ Mode
Speed/RPM curve as soon as the aircraft speed deviates significantly, either positively or negatively, from the speed at the time of the RPM request. Go to chapter 4.3.5, “Speed win” section for more. APR1 User Manual, Safety Instructions and Warning Booklet REV 1.0... -
Page 27: Home Submenu
ADV+ mode has been selected. It cannot be activated if CSPD or ADV mode has been selected. The display shows how the MAP/RPM curve is followed. APR1 User Manual, Safety Instructions and Warning Booklet REV 1.0... -
Page 28: Backlight
Default= 1 Min= 1 (faster) Max= 3 (slower) Min light(%): choose minimal backlighting when the environment is dark. Default= 1 Min= 1 (dark) Max= 20 (bright) APR1 User Manual, Safety Instructions and Warning Booklet REV 1.0... -
Page 29: Ias Setup
In the example in the next page, the speed at the time of the target RPM change was 200 Km/h. The APR1 then stores the detected istantaneous speed of 200 Km/h and establishes a window of 40 Km/h, placing the upper and lower limits at +20 and -20 Km/h. The default Speed win is 50 Kp/h. - Page 30 ADV or ADV+ mode. In the image above, the speed increased to the upper Speed Window limit of 220 Km/h and the APR1 controller returned to ADV or ADV+ mode, indicating this on the display.
-
Page 31: Debug
- Resistive value (only for certain propellers) - MAP - IAS When this information is displayed, you can leave it on the screen indefinitely or make it disappear by selecting 0. APR1 User Manual, Safety Instructions and Warning Booklet REV 1.0... -
Page 32: Firmware Update
® FLYBOX Operating Instructions 4.4 Firmware Upgrade The APR1 software can be easily updated with new versions, when available. It is advisable to check often whether a new software version is available, going to www.flyboxavionics.it under “support > software” page. -
Page 33: Backup/Restore
NOTE: A backup file is now written on the pen drive, copy it to a safe place for future use. NOTE: The USB stick must be free from any file before saving a Backup file. APR1 User Manual, Safety Instructions and Warning Booklet REV 1.0... -
Page 34: Logger
When the USB flash drive is plugged-in to the device a white icon will appear on the display indicating that the flash drive is connected. APR1 User Manual, Safety Instructions and Warning Booklet REV 1.0... -
Page 35: About
To send the Logger data to your installer, the best thing to do is to zip and send it by email. 4.7 About Enter to see instrument information. About page example APR1 User Manual, Safety Instructions and Warning Booklet REV 1.0... -
Page 36: General Suggestions Using The Apr1
General Suggestions 5.0 General Suggestions about using the APR1 Once you have had your APR1 installed by your professional installer, who has also checked and tested its correct operation and you have carefully read through the manual, you will certainly be eager to fly your new... -
Page 37: Use In Cspd (Constant Speed Mode)
5.1 Use in CSPD (Constant Speed mode) After setting the CSPD control mode, you can follow the advice below if you want to use APR1 in this semi- automatic mode. At start-up, the instrument will automatically set the target RPM to the maximum value set by your installer, e.g. 5700 or 5800 in case of Rotax or another RPM in case of a different engine. - Page 38 All this, of course, must be done within the limits declared by the engine manufacturer. This is just a general recommendation that may not work for you, so please be aware that we do not take any responsibility. APR1 User Manual, Safety Instructions and Warning Booklet REV 1.0...
- Page 39 You may need to go around or do a touch & go and you will end up with all the RPM and power you need. APR1 User Manual, Safety Instructions and Warning Booklet...
-
Page 40: Use In Adv (Advanced Mode)
Speed/RPM curve set by your installer. After setting the ADV control mode (see chapter 4.3.1) you can follow the advice below if you want to use APR1 in this automatic mode. At start-up, the instrument will automatically set the target RPM to the maximum value set by your installer, e.g. - Page 41 If not, i.e., if the RPM changes with the INC/DEC switch, then the governor electronics may be faulty and you will need to call your service technician. APR1 User Manual, Safety Instructions and Warning Booklet REV 1.0...
- Page 42 You may need to go around or do a touch & go and you will end up with all the RPM and power you need. APR1 User Manual, Safety Instructions and Warning Booklet...
-
Page 43: Use In Adv+ (Advanced Plus)
RPM curve and also to the MAP/RPM curve set by your installer. After setting the ADV+ control mode, see chapter 4.3.1, you can follow the advice below if you want to use APR1 in this automatic mode. At start-up, the instrument will automatically set the target rpm to the maximum value set by your installer, e.g. - Page 44 If not, i.e., if the RPM changes with the INC/DEC switch, then the governor electronics may be faulty and you will need to call your service technician. APR1 User Manual, Safety Instructions and Warning Booklet REV 1.0...
- Page 45 & go and you will end up with all the RPM and power you need. APR1 User Manual, Safety Instructions and Warning Booklet...
-
Page 46: Technical Specification
● Communication through 3 CAN bus. ● USB port: for USB 2.0 CLEANING The screen is very sensitive to some cleaning materials and should be cleaned with a clean, damp cloth only. APR1 User Manual, Safety Instructions and Warning Booklet REV 1.0... -
Page 47: Warranty
One Year Warranty: Product support and warranty information can be found at www.flyboxavionics.it. Flybox® warrants this Product to be free from defects in materials and workmanship for 12 months from date of delivery. The inactivity of the Products determined by periods of repair does not involve the extension of the warranty period. -
Page 48: Term Of Use And Disclaimer
Use of this product is unauthorized in any jurisdiction that does not give effect to all provisions of these terms and conditions, including without limitation this paragraph. APR1 User Manual, Safety Instructions and Warning Booklet... -
Page 49: Miscellaneous
WARNING: All photos, data, drawings, instruments layouts, technical solutions and data representation you find in this document or watching at FLYBOX® instruments working and/or you can access by means of any other media, including web sites, are sole property of MICROEL s.r.l., cannot be copied or imitate without a written permission of MICROEL s.r.l. - Page 50 ® FLYBOX Page intentionally empty APR1 User Manual, Safety Instructions and Warning Booklet REV 1.0...
- Page 51 ® FLYBOX Page intentionally empty APR1 User Manual, Safety Instructions and Warning Booklet REV 1.0...
- Page 52 Flybox® is a registred brand of Microel s.r.l.- Italy www.flyboxavionics.it MICROEL s.r.l. Via Mortara 192-194 27038 Robbio (PV) - ITALY Tel +39-0384-670602 - Fax +39-0384-671830 APR1 User Manual, Safety Instructions and Warning Booklet REV 1.0...
Need help?
Do you have a question about the APR1 and is the answer not in the manual?
Questions and answers