Table of Contents
Advertisement
Available languages
Available languages
Quick Links
Advertisement
Table of Contents

Related Manuals for Oster OGJ41010


Summary of Contents for Oster OGJ41010
- Page 1 MODELO / MODEL OGJ41010...
-
Page 2: Table Of Contents
ÍNDICE PRECAUCIONES IMPORTANTES....................P2 GUÍA DE INSTALACIÓN........................P4 INSTRUCCIONES PARA LA CONEXION A TIERRA..............P4 DIAGRAMA DEL PRODUCTO......................P6 PANEL DE CONTROL........................P7 INSTRUCCIONES PARA EL FUNCIONAMIENTO................P8 AJUSTES PARA COCCIÚN RÁPIDA.....................P11 GUÍA DE UTENSILIOS........................P13 TÉCNICAS DE COCCIÓN......................P14 MANTENIMIENTO Y LIMPIEZA....................P15 ANTES DE LAMAR A UN TÉCNICO.....................P16... -
Page 3: Precauciones Importantes
PRECAUCIONES IMPORTANTES Cuando se utilicen artefactos eléctricos deben seguirse las precauciones básicas de seguridad incluyendo las siguientes: ADVERTENCIA: Para disminuir el riesgo de quemaduras, descargas eléctricas, incendios y lesiones personales o exposición excesiva a la energía de las microondas: 1. Lea todas las instrucciones antes de utilizar el electrodoméstico. 2. - Page 4 manzanas y castañas, antes de cocinarlos. 11. Con el fin de evitar quemaduras se debe revolver o agitar el contenido de los biberones y frascos de comida para bebés y comprobar su temperatura antes de servirlos. 12. Los utensilios de cocina pueden calentarse debido a la transferencia de calor de los alimentos calentados.
-
Page 5: Guía De Instalación
GUÍA DE INSTALACIÓN 1. Asegúrese de retirar todos los materiales de empaque de la parte interior de la puerta. 2. Compruebe que el horno no tenga daños, como por ejemplo, que la puerta esté desalineada o doblada, que los sellos de la puerta o la superficie de contacto esté dañada, bisagras y cerrojos rotos o sueltos, y abolladuras en la cavidad del horno o en la puerta. - Page 6 3. Si se utiliza un cable más largo o una extensión: • La especificación eléctrica del cable o de la extensión debe ser al menos igual a la del electrodoméstico. • La extensión debe ser un cable de 3 conductores con conexión a tierra y el cable más largo debe disponerse de modo tal que no cuelgue del mostrador o de la mesada donde podrían halarla los niños u ocasionar tropiezos accidentales.
-
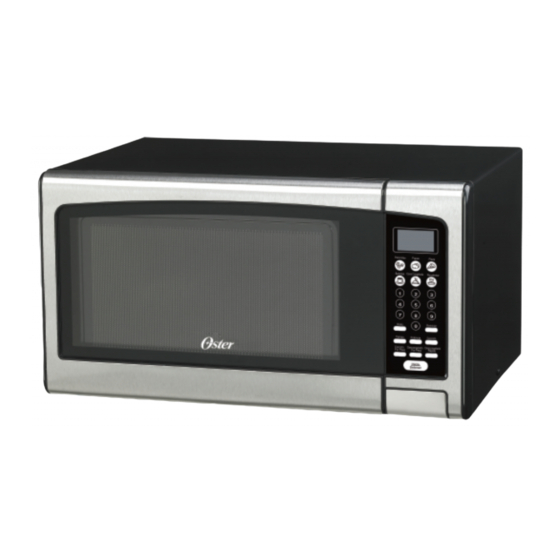
Page 7: Diagrama Del Producto
DIAGRAMA DEL PRODUCTO 1. Sistema de cierre de seguridad de la puerta 2. Ventana del horno 3. Aro deslizante 4. Eje 5. Botón para abrir la puerta 6. Panel de control 7. Guía de ondas 8. Plato de vidrio Español - 6... -
Page 8: Panel De Control
PANEL DE CONTROL • PANTALLA Muestra el tiempo de cocción, la potencia, los indicadores y la hora actual. • BOTONES DE COCCIÓN RÁPIDA Ajustes predeterminados para cocinar alimentos comunes. • TECLADO NUMÉRICO (0-9) Pulse para fijar el tiempo o el peso. •... -
Page 9: Instrucciones Para El Funcionamiento
INSTRUCCIONES PARA EL FUNCIONAMIENTO SONIDOS DE LOS AJUSTES DEL HORNO UN PITIDO: El horno acepta el ajuste. DOS PITIDOS: El horno no acepta el ajuste, compruebe y vuelva a intentarlo. AJUSTE DEL RELOJ 1. Oprima el botón RELOJ. 2. Utilice el teclado numérico para ingresar la hora adecuada. 3. - Page 10 1. FIJE LA ETAPA 1: Siga los pasos 1 y 2 descritos en la sección "Cocción en una sola etapa". No pulse el botón INICIO/DETENER; 2. FIJE LA ETAPA 2: Pulse COCCIÓN y a continuación introduzca el tiempo de cocción correspondiente y el nivel de potencia (más bajo).
- Page 11 Conversión de fracciones de libra a onzas Fracción de libra Onzas Menos de 0,03 De 0,03 a 0,09 De 0,10 a 0,15 De 0,16 a 0,21 De 0,22 a 0,27 De 0,28 a 0,34 De 0,35 a 0,40 De 0,41 a 0,46 De 0,47 a 0,53 De 0,54 a 0,59 De 0,60 a 0,65...
-
Page 12: Ajustes Para Cocciún Rápida
• Para fijar: pulse y mantenga apretado REINICIAR durante 3 segundos. En la pantalla aparecerá LOCK (bloqueado). • Para cancelar: pulse y mantenga apretado REINICIAR durante 3 segundos. La indicación LOCK desaparecerá. AJUSTES PARA COCCIÚN RÁPIDA • Los ajustes de la función de COCCIÓN RÁPIDA le permiten cocinar o recalentar alimentos automáticamente sin necesidad de fijar la potencia ni el tiempo. - Page 13 BEBIDAS Para tazas de 148 a 207 mi (5 a 7 onzas) cada una: 1. Pulse el botón BEBIDAS una vez. 2. Indique la cantidad de tazas pulsando un número del 1 al 4. 3. Pulse el botón INICIO/DETENER. Para tazas grandes de café 266 a 325 mi (9 a 11 onzas) cada una: 1.
-
Page 14: Guía De Utensilios
GUÍA DE UTENSILIOS En esta sección se indican qué utensilios pueden utilizarse en el microondas, cuáles pueden usarse de forma limitada por breves períodos y cuáles no deben usarse en ningún momento en el microondas. RECOMENDADOS Bandeja para dorar en el microondas: Utilícela para dorar el exterior de alimentos pequeños, tales como bistecs, chuletas o panqueques. -
Page 15: Técnicas De Cocción
TÉCNICAS DE COCCIÓN El horno de microondas permite cocinar más fácilmente que en una cocina convencional, siempre que se tengan en cuenta las siguientes consideraciones: REVOLVER • Revuelva alimentos tales como guisos y vegetales durante el proceso de cocción, para distribuir el calor uniformemente. -
Page 16: Mantenimiento Y Limpieza
MANTENIMIENTO Y LIMPIEZA 1. Al limpiar las superficies de la puerta y del horno que entran en contacto al cerrar la puerta, utilice únicamente una esponja o un paño para aplicar jabones o detergentes suaves, no abrasivos. 2. Apague el horno y desenchufe del tomacorrienle antes de limpiarlo. 3. -
Page 17: Antes De Lamar A Un Técnico
ANTES DE LAMAR A UN TÉCNICO Si el horno no funciona: • Compruebe que el horno esté bien enchufado. De lo contrario, desenchúfelo del tomacorriente, espere 1 O segundos y vuelva a enchufarlo bien. • Compruebe que ningún fusible se haya quemado ni que se haya disparado ningún disyuntor. Si todo parece estar funcionando adecuadamente, pruebe el tomacorriente con otro electrodoméstico. - Page 18 INDEX IMPORTANT PRECAUTIONS......................P2 INSTALLATION GUIDE........................P4 GROUNDING INSTRUCTIONS.......................P4 PRODUCT DIAGRAM........................P6 CONTROL PANEL........................... P7 OPERATING INSTRUCTIONS......................P8 QUICK COOKING SETTINGS.............................P11 UTENSIL GUIDE..........................P13 COOKING TECHNIQUES......................P14 MAINTENANCE AND CLEANING....................P15 BEFORE CALLING A TECHNICIAN....................P16...
- Page 19 IMPORTANT PRECAUTIONS When using electrical appliances, basic safety precautions should be followed including the following: WARNING: To reduce the risk of burns, electric shock, fire, and personal injury or excessive exposure to microwave energy: 1. Read all instructions before using the appliance. 2.
- Page 20 13. DO NOT cover or block any of the appliance openings. 14. DO NOT store or use this appliance outdoors. Do not use this product near water, for example, near a sink, in a wet basement, near a swimming pool, or similar locations. 15.
- Page 21 INSTALLATION GUIDE 1. Be sure to remove all packing materials from the inside of the door. 2. Check the oven for damage, such as misaligned or bent door, damaged door seals or mating surface, broken or loose hinges and latches, and dents in the oven cavity or door. If damage is observed, do not operate the oven and contact qualified service personnel.
- Page 22 Notes: • If you have any questions concerning electrical or grounding instructions, consult a qualified electrician or grounding technician. • Neither the manufacturer nor the distributor can accept responsibility for damage to the oven or personal injury caused by failure to follow proper electrical connection procedures. INTERFERENCE WITH TELEVISIONS OR RADIOS If the microwave oven interferes with your radio or television, check that the oven is on a different circuit and move the radio or television as far away as possible, or check the position and signal of...
- Page 23 PRODUCT DIAGRAM 1. Door safety locking system 2. Oven window 3. Sliding ring 4. Shaft 5. Button to open the door 6. Control panel 7. Wave guide 8. Glass plate English - 6...
- Page 24 CONTROL PANEL • DISPLAY Displays cooking time, power, indicators and current time. • QUICK COOK BUTTONS Default settings for cooking common foods. • NUMERIC KEYPAD (0-9) Press to set time or weight. • TIME "time" timer function operates independently, even if a cooking program is active.
- Page 25 OPERATING INSTRUCTIONS SOUNDS OF THE FURNACE SETTINGS ONE BEEP: The oven accepts the setting. TWO BEEPS: The oven does not accept the setting, check and try again. CLOCK SETTING 1. Press the CLOCK button. 2. Use the numeric keypad to enter the appropriate time. 3.
- Page 26 1. SET STAGE 1: Follow steps 1 and 2 described in the "Single-stage cooking" section. Do not press the START/STOP button; 2. SET STAGE 2: Press COOKING and then enter the corresponding cooking time and (lower) power level. (Most 2-stage recipes use a lower power level in the second stage). 3.
- Page 27 Conversion from fractions of pounds to ounces Fraction of a pound Ounces Less than 0.03 De 0,03 a 0,09 De 0,10 a 0,15 De 0,16 a 0,21 De 0,22 a 0,27 De 0,28 a 0,34 De 0,35 a 0,40 De 0,41 a 0,46 De 0,47 a 0,53 De 0,54 a 0,59 De 0,60 a 0,65...
- Page 28 QUICK COOKING SETTINGS • The QUICK COOK function settings allow you to cook or reheat food automatically without having to set the power or time. • For smaller portions, simply press the corresponding button and START/STOP. For larger portions, press the button twice. •...
- Page 29 For large cups of coffee 266 to 325 mi (9 to 11 ounces) each: 1. Press the BEVERAGES button twice. 2. Indicate the number of large cups by pressing a number from 1 to 4. 3. 3. Press the START/STOP button. FROZEN DINNER For one or two small frozen dinners, 198 to 255 grams (7 to 9 ounces): 1.
- Page 30 UTENSIL GUIDE This section indicates which utensils may be used in the microwave, which may be used on a limited basis for short periods of time, and which should not be used in the microwave at any time. RECOMMENDED Microwave browning tray: Use to brown the outside of small foods, such as steaks, chops or pancakes.
- Page 31 COOKING TECHNIQUES The microwave oven makes cooking easier than in a conventional kitchen, provided that the following considerations are taken into account: STIRRING • Stir foods such as casseroles and vegetables during the cooking process to distribute the heat evenly. •...
- Page 32 MAINTENANCE AND CLEANING 1. When cleaning the door and oven surfaces that come into contact when the door is closed, use only a sponge or cloth to apply mild, non-abrasive soaps or detergents. 2. Turn off the oven and unplug it from the electrical outlet before cleaning. 3.
- Page 33 BEFORE CALLING A TECHNICIAN If the furnace does not work: • Check that the oven is plugged in securely. If not, unplug it from the outlet, wait 1 O seconds and plug it back in properly. • Check that no fuses have blown or circuit breakers have tripped. If everything seems to be working properly, test the outlet with another appliance.
- Page 34 Los productos Oster™ tienen garantía de un año a partir de la fecha de compra. Esta garantía le asegura que el producto no tiene defectos de materiales o de fabricacion. Si este producto le falla bajo condiciones normales de uso y dentro del período de garantía, nosotros se lo repararemos sin costo alguno. Esta garantía no cubre uso industrial o comercial, desarme o reparaciones hechas por alguna persona que no sea de nuestro equipo de técnicos certificados, tampoco cubre el desgaste normal...
- Page 35 +1 787-444-3390 © 2021 Sunbeam Products, Inc. Todos los derechos reservados. El logotipo Oster™ es una marca comercial de Sunbeam Products, Inc. utilizada bajo licencia. Fabricado, distribuido o vendido por Household Solutions, S.A., licenciatario oficial de este producto. Garantía limitada de un año. Hecho en China.
- Page 36 ™ © 2021 Sunbeam Products, Inc., Todos los derechosreservados. El logotipo Oster es una marca comercial de Sunbeam Products, Inc. utilizada bajo licencia. Fabricado, distribuido o vendido por Household Solutions. S.A., licenciatario oficial de este producto. Garantía limitada de un año.
Need help?
Do you have a question about the OGJ41010 and is the answer not in the manual?
Questions and answers