Table of Contents
Advertisement
Available languages
Available languages
Quick Links
Advertisement
Table of Contents

Subscribe to Our Youtube Channel
Related Manuals for Proline FSE800

Summary of Contents for Proline FSE800
- Page 2 Catalogue Language of introduction Page English ------------------------------------------ GB1-GB8 French ------------------------------------------ FR9-FR17 Dutch ----------------------------------------- NL18-NL26...
- Page 3 WARNINGS This appliance is intended to be used in household and similar applications such as: staff kitchen areas in shops, offices and other working environments; farm houses; by clients in hotels, motels and other residential type environments; ...
- Page 4 Regarding the instructions for cleaning surfaces in contact with food, refer to the section “Cleaning and Maintenance” on page 7 of the manual. The appliance must not be immersed. Appliances can be used by persons with reduced physical, sensory or mental capabilities or lack of experience and knowledge if they have been given supervision or instruction concerning use of...
- Page 5 Do not let the power cord hang over the edge of a table or counter, or touch hot surfaces. Do not operate the appliance while empty or without water in the reservoir. Extreme caution must be used when moving the appliance containing hot food or water. ...
-
Page 6: Before Using Your Appliance For The First Time
BEFORE USING YOUR APPLIANCE FOR THE FIRST TIME Remove any packaging and labels from the food steamer. Wash all removable parts except the water reservoir in warm soapy water. Rinse and dry thoroughly. Wipe the surfaces of the steamer base with a damp cloth and dry thoroughly. DO NOT IMMERSE THE STEAMER BASE IN WATER OR ANY OTHER LIQUID. -
Page 7: Operation
OPERATION 1. Place the steamer base on a stable, level surface away from any objects that may be damaged by steam. 2. Fill the water reservoir with fresh, clean water between the MIN and MAX levels inside the water reservoir. ... - Page 8 Each time you press , the steaming time will decrease or increase by 5 minutes. 3. When the steaming time is set, wait for about 3 seconds and the setting will be confirmed. You will hear a beep and the red indicator light will illuminate. ...
-
Page 9: Cleaning And Maintenance
PROG 6. Press until the display shows 45. Repeatedly press to adjust the steaming time. PROG 7. Press to confirm. The display will show the current clock time and the text “PROG”, indicating the start of the timing steam function. ... -
Page 10: Specifications
SPECIFICATIONS Ratings: 220-240V~, 50Hz 800W DISPOSAL As a responsible retailer we care about the environment. As such we urge you to follow the correct disposal procedure for the appliance and packaging materials. This will help conserve natural resources and ensure that it is recycled in a manner that protects health and the environment. - Page 11 ATTENTION Cet appareil est destiné à être utilisé dans des applications domestiques et analogues telles que: des coins cuisines réservés au personnel dans des magasins, bureaux et autres environnements professionnels; des fermes; l’utilisation par les clients des hôtels, motels et autres environnements à...
- Page 12 de portée des enfants âgés de moins de 8 ans. Si le câble d'alimentation est endommagé, il doit être remplacé par le fabricant, son service après vente ou des personnes de qualification similaire afin d'éviter un danger. En ce qui concerne les informations détaillées sur la manière de nettoyer les surfaces en contact avec les aliments, référez-vous dans la section “NETTOYAGE ET...
- Page 13 Les surfaces sont de nature à chauffer pendant l'utilisation. MISE EN GARDE: Risques de blessures en cas de mauvaise utilisation du produit. La surface de l'élément chauffant présente une chaleur résiduelle après utilisation. MISES EN GARDE IMPORTANTES Lisez le mode d'emploi dans son intégralité...
-
Page 14: Avant La Première Utilisation De L'appareil
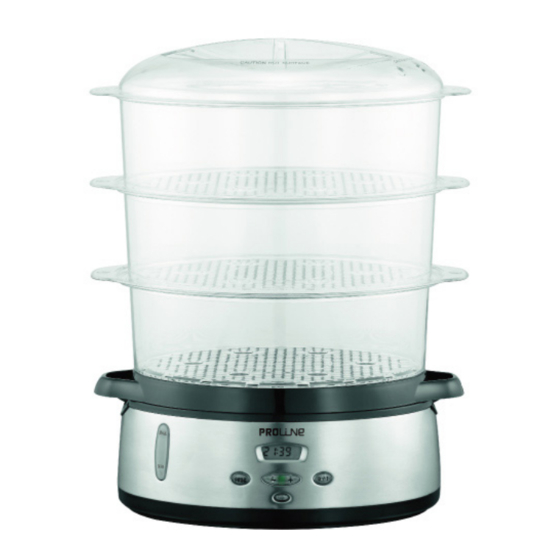
DESCRIPTION 1. Couvercle du cuiseur 2. Bac à riz 3. Panier de cuisson n°3 4. Panier de cuisson n°2 5. Supports à œufs 6. Panier de cuisson n°1 7. Bac d'écoulement 8. Bague turbo 9. Indicateurs de niveau d'eau MAX et MIN 10. - Page 15 MONTAGE DU CUISEUR Placez la base avec le réservoir d'eau sur une surface plane et stable. Placez la bague turbo sur la résistance (la partie évasée dirigée vers le fond du réservoir d'eau). Montez le bac d'écoulement sur le réservoir. Empilez les paniers de cuisson au-dessus du bac d'écoulement, et placez le couvercle au sommet.
- Page 16 3. Placez le bac d’écoulement sur la base. 4. Placez les aliments à cuire dans le(s) panier(s) de cuisson. CONSEILS : Coupez les aliments en morceaux de même taille afin qu’ils cuisent à la même vitesse. Les aliments nécessitant une cuisson moins intense ou plus courte doivent être placés dans le panier du haut.
- Page 17 Fonction de maintien au chaud Une fois terminée la cuisson à la vapeur, l’appareil émet 2 bips sonores, le témoin lumineux passe au vert et l’icône s’affiche à côté du temps de cuisson. Par la suite, la fonction de maintien au chaud s’activera pendant environ 2 minutes toutes les 10 minutes.
-
Page 18: Nettoyage Et Entretien
Appuyez sur le bouton PROG pour confirmer. L’écran affiche l’heure actuelle et le mot « PROG », indiquant l’heure de début de la cuisson à la vapeur. Pour annuler la minuterie, appuyez sur le bouton PROG. Le mot « PROG » disparaît de l’écran. -
Page 19: Spécifications
SPÉCIFICATIONS Caractéristiques nominales: 220-240V~ 50Hz 800W MISE AU REBUT En tant que distributeur responsable, nous accordons une grande importance à la protection de l’environnement. Nous vous encourageons à respecter les procédures correctes de mise au rebut de votre appareil, des piles et des éléments d’emballage. - Page 20 WAARSCHUWINGEN Dit apparaat is uitsluitend bedoeld voor gebruik in huishoudelijke en gelijkaardige toepassingen zoals: in personeelskeukens in winkels, kantoren en andere werkomgevingen; in boerderijen; door klanten in hotels, motels en andere omgevingen van het residentiële type; ...
- Page 21 Een beschadigd netsnoer mag uitsluitend worden vervangen door de fabrikant, een erkende reparatieservice of personen met gelijkwaardige kwalificaties om gevaar te voorkomen. Verwijs naar de paragraaf “Reinigen en onderhoud” op pagina 25 van de gebruiksaanwijzing voor informatie over het reinigen van oppervlakken die in contact komen met levensmiddelen.
- Page 22 De oppervlakken zullen warm worden tijdens gebruik. WAARSCHUWING: gevaar van verwonding als dit apparaat niet correct wordt gebruikt. Het oppervlak van het warmte-element blijft na gebruik nog een tijdlang onderhevig aan restwarmte. BELANGRIJKE VEILIGHEIDSVOORZORGEN Lees de volledige gebruiksaanwijzing voor ingebruikname van dit apparaat en bewaar voor toekomstig gebruik.
-
Page 23: Voordat U Het Apparaat In Gebruik Neemt
ONDERDELEN 1. Stoomdeksel 2. Rijstkom 3. Stoommand nr. 3 4. Stoommand nr. 2 5. Eierhouders 6. Stoommand nr. 1 7. Druipschaal 8. Turbo-ring 9. MAX en MIN waterpeil-markeringen 10. Stomervoet met waterreservoir 11. Warmte-element 12. Waterpeilvenster 13. Display 14. O/I knop 15. - Page 24 DE STOOMKOKER MONTEREN Zet de stomervoet met het waterreservoir neer op een vlakke, stabiele ondergrond. Zet de turbo-ring bovenop het warmte-element (de grootste kant past in de bodem van het waterreservoir). Zet de druipschaal bovenop het waterreservoir. Stapel de stoommanden bovenop de druipschaal en dek af met het deksel. DE STOOMMANDEN STAPELEN ...
- Page 25 3. Zet de druipschaal bovenop de stomervoet. 4. Leg het te stomen voedsel in de stoommand(en). TIPS: Snijd het voedsel in stukjes van gelijke grootte zodat alles gelijkmatig kan gaar worden. Voedsel dat langzaam moet gestoomd worden of een kortere bereidingstijd nodig heeft kan in de bovenste stoommand worden gelegd.
- Page 26 De warmhoudfunctie U hoort 2 pieptonen wanneer het stoomproces is voltooid, het stroomlampje kleurt dan groen en het symbool verschijnt naast de tijd op de display. De warmhoudfunctie werkt om de 10 minuten gedurende ongeveer 2 minuten. Dit proces wordt herhaald tot er onvoldoende water in het reservoir rest of de stoomkoker wordt uitgeschakeld door te drukken op O/I.
-
Page 27: Reinigen En Onderhoud
Om de timer te annuleren: druk op PROG zodat de letters “PROG” van de display verdwijnen. De display keert dan terug naar de klokmodus. Op de starttijd hoort u een pieptoon, gaat het rode stroomlampje branden en begint de stoomkoker te stomen. -
Page 28: Technische Gegevens
TECHNISCHE GEGEVENS Nominale waarden: 220-240V~, 50Hz 800W VERWIJDERING Als verantwoordelijke handelaar dragen we zorg voor het milieu. We moedigen u aan om de juiste verwijderingsprocedure voor uw apparaat en verpakkingsmateriaal te volgen. Dit draagt bij tot het behoud van de natuurlijke rijkdommen door deze te recyclen zodat zowel de menselijke gezondheid en het milieu worden beschermd.
Need help?
Do you have a question about the FSE800 and is the answer not in the manual?
Questions and answers