Table of Contents
Advertisement
Advertisement
Table of Contents

Subscribe to Our Youtube Channel
Related Manuals for HICAPS T650P


Summary of Contents for HICAPS T650P
- Page 1 HICAPS TRINITY (T650P) TERMINAL QUICK REFERENCE GUIDE...
-
Page 3: Table Of Contents
Processing a payment transaction Sale - manual card entry Processing a refund (matched refund) Processing a refund (unmatched refund) Settlements HICAPS totals Terminal accessibility features Using the accessibility features for the visually impaired Training for the visually impaired Communication settings... -
Page 4: Trinity Terminal Overview
TRINITY TERMINAL OVERVIEW Getting to know your terminal Trinity Features Contactless Reader Battery/Charge Indicator LED Swipe Reader Raised tactile dots Audio Jack USB-C Charging Port Power/Accessibility Chip Reader Button Volume Controls... - Page 5 Trinity Rear Rear Camera Charging Speaker Pads Trinity Base Micro USB USB-A Ethernet Port RS-232...
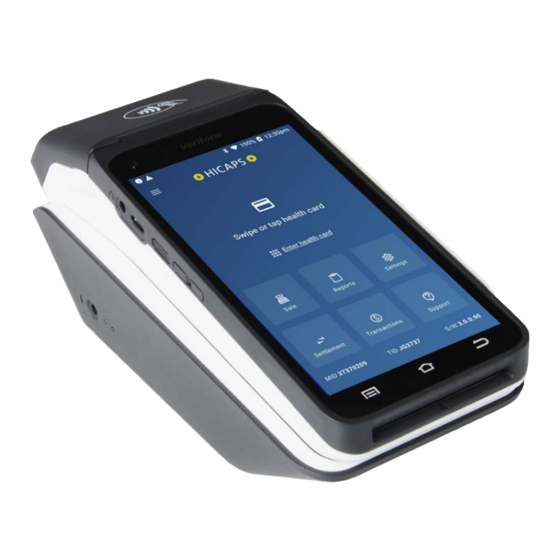
- Page 6 Trinity home screen Navigation Bar HICAPS Application Menu Reports Settings Menu Sale Other Transaction Types Settlements Support Menu Terminal ID Merchant ID Software Version Show open Home Back applications...
-
Page 7: Processing A Health Fund Claim
PROCESSING A HEALTH FUND CLAIM Follow these easy steps to process a claim: STEP 1 STEP 2 Swipe or tap the patient’s membership Select or search for the health care card to start the health fund transaction. provider from the list. Note: Patients with digital health fund membership cards can use their Android or Apple devices to commence a claim. - Page 8 STEP 4 STEP 5 Select the claim item. Enter clinical code if required, the amount > for the item and tap to proceed, followed by “Add to Claim”. STEP 6 Before proceeding with approval to the health fund, a summary of the claim is shown.
- Page 9 STEP 7 STEP 8 The claim will be sent to the member’s Additional sales can be added to the health fund for assessment. transaction prior to payment of any gap payment. After the claim has been processed by the fund, the claim summary will be displayed. Tap on the “Additional sale”...
- Page 10 STEP 9 Ask the customer to present their payment card to finalise the transaction.
-
Page 11: Processing A Health Fund Quote
PROCESSING A HEALTH FUND QUOTE STEP 2 STEP 1 Tap on “Submit a claim” at the top Swipe or tap the patient’s membership of the screen to open the dropdown list. card to start the health fund transaction. Note: Patients with digital health fund membership cards can use their Android or Apple devices to commence a quote. - Page 12 STEP 3 STEP 4 Select “Request a quote”. Select or search for the health care provider from the list. STEP 5 Enter the Patient ID (this is the number STEP 6 next to the patient’s name on the Select the item. membership card) and tap “Next”...
- Page 13 STEP 7 STEP 8 Enter the amount for the item You are now ready to send the quote to > and tap to proceed, followed the member’s fund. To add additional by “Add to Quote”. items tap “Add Item”. Note: The last value used for an item To make a claim for a different patient, will prepopulate in the Item Cost field.
-
Page 14: Cancelling A Health Fund Claim
CANCELLING A HEALTH FUND CLAIM If you need to cancel a health fund claim: STEP 2 STEP 1 Tap “Cancel a claim”. From the HICAPS home screen, tap “Transactions”. STEP 4 STEP 3 Select a claim or search for a claim to Swipe or tap the patient’s membership... - Page 15 STEP 5 STEP 6 Tap “Cancel Claim” to confirm. Tap “Cancel Claim” to proceed” Once a claim is cancelled, the claim is reversed and there is no way to reinstate the claim. If you do not wish to cancel the claim tap “Go Back”.
-
Page 16: Processing A Payment Transaction
PROCESSING A PAYMENT TRANSACTION To process a transaction without submitting a health fund claim: STEP 1 STEP 2 From the home screen, If the terminal has been configured as tap the “Sale” icon. a multi merchant terminal you will be prompted to select the appropriate merchant for the transaction. -
Page 17: Sale - Manual Card Entry
SALE - MANUAL CARD ENTRY STEP 1 STEP 2 To enter the card details, select the Select the “Payment Application” option “Transactions” icon from the Home Screen. under “NAB” group. Note: If the terminal has been configured as a multi merchant terminal you will be prompted to select the appropriate merchant for the transaction. - Page 18 STEP 5 STEP 6 Enter the card number using the on- If a PlN is required to complete the screen keypad and select “Enter”. The card transaction, a keypad will be displayed details are masked and will appear as dots. for a customer to enter their PIN and tap Enter the card details carefully and tap “Enter”...
-
Page 19: Processing A Refund (Matched Refund)
PROCESSING A REFUND Refunds can be processed via two methods, as either a matched refund or an unmatched refund. HICAPS strongly suggests that a matched refund is used in all cases, as it ensures you are limiting your potential exposure to chargebacks. - Page 20 STEP 3 STEP 4 Tap “Refund”. If you have multiple merchants, you will be prompted to select a merchant. STEP 5 STEP 6 Search or tap the relevant date to view Select a transaction to be refunded. transactions.
- Page 21 To complete the refund, you will be required to enter the merchant passcode. If you have forgotten the passcode, you will need to contact the HICAPS Help Desk on 1300 650 852. STEP 9 Select “Card or Mobile” to continue to the final step to refund.
-
Page 22: Processing A Refund (Unmatched Refund)
PROCESSING A REFUND To process an unmatched refund: Should you need to process an unmatched refund (i.e. unable to match it against the original card number), please follow the steps below: STEP 1 STEP 2 From the home screen, Tap the ‘Payment Application’ icon. tap the “Transactions”... - Page 23 To complete the refund, you will be required to enter the merchant passcode. If you have forgotten the passcode, you will need to contact the HICAPS Help Desk on 1300 650 852. STEP 7 Select from the refund options to refund to a card, a mobile or enter a card number manually.
-
Page 24: Settlements
Your terminal is configured to perform and print the day’s settlement at 9.30 pm AEST daily, if a manual settlement has not been performed. If you would like the automatic settlement to occur earlier, contact the HICAPS Help Desk on 1300 650 852. To perform a manual settlement follow the steps below:... - Page 25 STEP 3 STEP 4 Choose the merchant account you The terminal will download the latest wish to settle. settlement details. STEP 6 The terminal will print the STEP 5 settlement receipt. Tap “Settle”.
-
Page 26: Hicaps Totals
HICAPS TOTALS Your terminal is configured to perform and print the day’s HICAPS totals at midnight AEST daily. To view or print the current days HICAPS totals, please follow the steps below: STEP 1 STEP 2 From the home screen, tap the Under HICAPS, tap “Today’s totals”. -
Page 27: Terminal Accessibility Features
TERMINAL ACCESSIBILITY FEATURES: Terminal Front Raised tactile dots Headphone Jack for audio prompts Volume Controls Chip Reader Terminal Rear Speaker for audio prompts... -
Page 28: Using The Accessibility Features For The Visually Impaired
USING THE ACCESSIBILITY FEATURES FOR THE VISUALLY IMPAIRED HICAPS Trinity terminals have new accessibility features to support customers with orientating the terminal touch screen to complete their payments. There are physical features on the terminal around the screen with 14 tactile dots to help navigate PIN entry, audio instructions to help users and an audio jack on the left-hand side. - Page 29 Colour / Large Text STEP 1 STEP 2 To change the colour contrast and text After starting the transaction, size, tap the first option. at the present card screen, tap the accessibility icon: NOTE: Customers can connect headphones via the Audio Jack if required. STEP 3 STEP 4 The customer will be able to select a high...
- Page 30 STEP 5 If the card was inserted or swiped, the customer will be prompted to select their account. STEP 6 They will then be prompted to enter their PIN.
- Page 31 Speech for the Visually Impaired STEP 2 NOTE: If the customer taps their card, they STEP 1 will not be required to make an account Double tap on the middle of the screen to selection. enable Speech for the Visually Impaired Once a card has been presented, a voice A voice prompt will advise the customer will prompt to swipe left or right on the...
- Page 32 STEP 3 A voice prompt will advise the customer on how to enter the PIN: The PIN pad has telephone layout with 1, 2, 3 at the top and CANCEL, 0, OK at the bottom of the screen. Tactile raised bumps surround the screen border indicating the columns and rows of the PIN pad.
-
Page 33: Training For The Visually Impaired
TRAINING FOR VISUALLY IMPAIRED During a payment transaction, a customer STEP 2 is able to practise navigating the terminal From the vision accessibility screen, using the “Training for visually impaired” select training for visually impaired. mode. NOTE: Customers can connect STEP 1 headphones via the Audio Jack if required. - Page 34 STEP 3 STEP 4 Ask the customer if they would prefer to A demo PIN entry keypad will be shown. use the side button to confirm selection, The customer will be expected to drag one or double tap the screen to confirm their finger on the screen listening to beeps as selection.
-
Page 35: Communication Settings
In the event your internet connection is temporarily unavailable, the Trinity terminal will attempt to process transactions via previously connected Wi-Fi or mobile networks. For further information on communication settings please go to www.hicaps.com.au and view the HICAPS Terminal Communications flyer. - Page 36 STEP 3 STEP 4 Tap the network you want to connect to. Type in your Wi-Fi password, and tap “Connect”. Trinity will connect to this network automatically when in range. NOTE: The Trinity terminal will still use the Ethernet connection (via Bluetooth ®...
-
Page 37: Updating Your Trinity Terminal
UPDATING YOUR TRINITY TERMINAL Your Trinity terminal may sometimes require an update. If you are asked to perform a heartbeat by the HICAPS support team, the following will assist you in completing this process. STEP 1 STEP 2 Swipe down from the top of the screen. - Page 38 Press the Home button. Any updates will download to the terminal. SUPPORT If you need support, our team is ready to help! Call the HICAPS Help Desk on 1300 650 852. For the most up to date version of this Quick Reference Guide please scan the...
- Page 40 ©2022 HICAPS Pty Ltd ABN 11 080 688 866 A wholly owned subsidiary of National Australia Bank Limited ABN 12 004 044 937 AFSL and Australian Credit Licence A163758-0422B.
Need help?
Do you have a question about the T650P and is the answer not in the manual?
Questions and answers