
Subscribe to Our Youtube Channel
Related Manuals for Accutron Pro Series


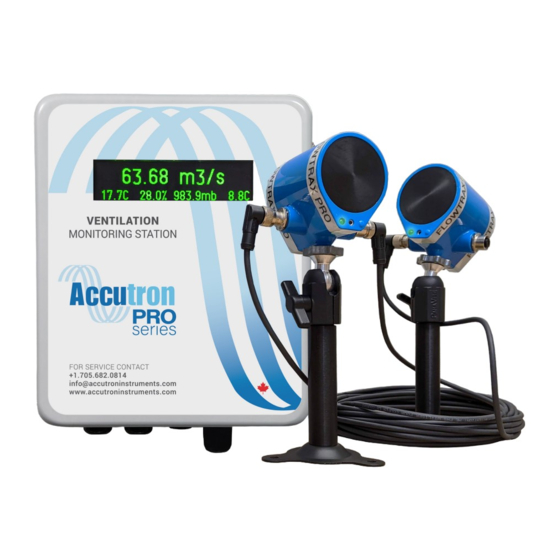
Summary of Contents for Accutron Pro Series
- Page 1 Accutron Pro Technical Operations Manual REV 1.0.0 Visit www.accutroninstruments.com Email info@accutroninstruments.com For Accutron Pro Devices Phone 1.705.682.0814 Version V2.0.0 and up...
- Page 3 Important Notice The ACCUTRON PRO line of products is the exclusive copyright property of Accutron Instruments INC. We reserve the right to make changes to the Accutron products and manuals without further notice to improve reliability, function or design. Accutron Instruments INC does not assume any liability arising out of the application or use of any product described herein, nor does it convey any license under its patent rights, nor the rights of others.
-
Page 4: The Manual
The Manual Refer to this manual for proper installation, operation, setup and maintenance of the Accutron Pro. Special attention must be followed to warnings and notices highlighted from the rest of the text to ensure it will stand out. Warning: Failure to oblige with the necessary precautions can result in death, serious injury, and/or considerable damage to the product. -
Page 5: Table Of Contents
1.1 Safety Guidelines ..........................2 1.2 Information about your Accutron Pro ....................2 Section 2: Specifications ..........................3 2.1 Accutron PRO Series ........................... 3 2.1.1 Accutron PRO - Panel Mounted ....................3 2.1.2 Accutron PRO - Transmitter ......................4 2.2 Accutron Bus Devices .......................... 5 2.2.1 FlowTrax PRO .......................... - Page 6 Section 7: Device Setup..........................22 7.1 At the Device ............................. 22 7.2 Menu Options ........................... 23 Section 8: Accutron Pro Web Interface ...................... 26 8.1 Configuring your Computer’s IP Address ..................26 8.1.1 Windows 10 ..........................26 8.1.2 Windows 7/ Windows 10 Alternative ..................26 8.2 The Dashboard ..........................
- Page 7 Appendix B: System Defaults ........................60 P a g e...
-
Page 9: Introduction
Introduction Thank you for choosing Accutron Instruments for your monitoring needs. This manual will review the setup and operating procedures of your Accutron Pro device and accessories. The Accutron Pro is a true IIOT (Industrial Internet of Things) device. This unit offers system builders unprecedented flexibility for instrument cluster interfacing, both to Industrial DCS as well the World Wide Web. -
Page 10: Section 1: General Information
Section 1: General Information 1.1 Safety Guidelines This device should only be set up and operated in conjunction with this manual. Qualified personnel are only authorized to install and operate this equipment in accordance with established safety practices and standards. 1.2 Information about your Accutron Pro When you first receive your Accutron Pro device, ensure you record the following information shown below. -
Page 11: Section 2: Specifications
EtherNet/IP - Allan Bradly (Optional Version) 2x RS-485: Modbus RTU Accutron Bus: 5-wire (M12 - 5 pin connector) Accutron Pro Series Sensor Bus 2x 4-20mA outputs: Non-loop powered (4 wire transmitter) 2x Dry Contacts: 50V AC/DC, 1A Max. WIFI (Optional): IEEE 802.11 b/g/n, Client Mode (WPA2) -
Page 12: Accutron Pro - Transmitter
Accessibility: Web Interface downloadable Environmental: Temperature Rating: -40˚C to + 80˚C Humidity Rating : ≤95 % (25°C, non-condensing) Protection Rating: IP20 Note: Supported web browsers, Firefox v52+, Chrome v57+, Microsoft Edge v80+, Internet Explorer is not supported. 2.1.2 Accutron PRO - Transmitter Enclosure: Material: Fiberglass... -
Page 13: Accutron Bus Devices
2.2 Accutron Bus Devices 2.2.1 FlowTrax PRO Airflow Set limit: 1 FlowTrax Transducer Pair 2.2.1.1 FlowTrax PRO - Drift/Tunnel/Raise Installation: Face to Face: 1.0 to 18.0 meters (Sensor Separation) Connections: 1x M12-5pin A-Coded Female Connector 1x M12-5pin A-Coded Male Connector Mounting: 1/4"... - Page 14 Power Consumption: 200mA @ 24VDC (4.8 Watts) Ultrasonic Frequency: 50kHz 2.2.1.2 FlowTrax PRO - Primary/ Main Fan Installation: Face to Face: 1.0 to 13.0 meters (Sensor Separation) Connections: 1x M12-5pin A-Coded Male Connector Mounting: Ball/Socket Assembly 2x Stainless Steel Mounting Brackets (Optional) Signalling: LED Heartbeat Status Measured Variable:...
- Page 15 2.2.1.3 FlowTrax PRO - Long Range Installation: Face to Face: 6.0 to 35.5 meters (Sensor Separation) Connections: 1x M12-5pin A-Coded Female Connector 1x M12-5pin A-Coded Male Connector Mounting: 1/4" Threaded insert - CCTV Type Compatible Alignment Assistance: Laser Alignment Function (Tap On/Off) Signalling: LED Heartbeat Status Dual-colour LED - Misalignment Indicator...
-
Page 16: Climatrax Pro
2.2.2 ClimaTrax PRO Installation: Connections: 1x M12-5pin A-Coded Female Connector 1x M12-5pin A-Coded Male Connector Mounting: Mounting Tabs Signalling: LED Status Light Measured Variable: Temperature: Range: -40 to 85°C Accuracy: ±0.8°C Resolution: 0.01°C Drift: <0.02°C/Year (Long Term Drift) Relative Humidity: Range: 0-100% (non-condensing) Accuracy:... -
Page 17: Globe Pro
Wet Bulb (Calculated): Range: -40 to 85°C Accuracy: ±0.8°C Resolution: 0.01°C Mass Flow (Calculated): Accuracy: ±0.1 kg/m ∙ s (Dimensional Analysis Requires) Resolution: 0.001 kg/m ∙ s Environmental: Temperature Rating: -50 to 80°C Humidity Rating: 0-100% (non-condensing) Area Classification: Corrosion Resistant Power Consumption: 15mA @ 24VDC (0.15 Watts) 2.2.3 GLOBE PRO... - Page 18 Resolution: 0.05°C Drift: <0.05°C/Year (Long Term Drift) WBGT (*Calculated): Range: -40 to 80°C Accuracy: ±0.2°C Resolution: 0.05°C Drift: <0.05°C/Year (Long Term Drift) Environmental: Temperature Rating: -40 to 60°C Humidity Rating: 0-100% (Condensing) Area Classification: Corrosion Resistant Power Consumption: 10mA @ 24VDC (0.10 Watts) 10 | P a g e...
-
Page 19: Section 3: Communication & Power Wiring Diagram
Section 3: Communication & Power Wiring Diagram AC Power Input DC Power Input Note: If using PoE, it is only recommended to Power the device via the Accutron Bus PoE if only the Accutron Pro and Accutron Bus devices are used. - Page 20 Figure 2: Accutron Pro Module Wiring Diagram 12 | P a g e...
-
Page 21: Connection Entry Diagram
3.1 Connection Entry Diagram Bottom View Figure 3: Accutron Pro Connection Entry Diagram 13 | P a g e... -
Page 22: Section 4: Inside The Enclosure
Section 4: Inside the Enclosure USB A receptacle Navigation Buttons (Under the Lid) Power Input 1.5" Color Display 128px X 128px Micro SD Card (Under the Lid) Reboot button 4-20mA Out Dry Contact Accutron Bus + A B - Ethernet 8P8C Port Figure 4: Accutron Pro Module - Inside the Enclosure LED Indicators: Power and 4 user settable LEDs... -
Page 23: Section 5: Initial Setup
Section 5: Initial Setup Your Accutron Pro device is shipped with factory settings, as shown in Appendix B. When you first receive your device, it is recommended to power the device up and familiarize yourself with operation, as well as configure your network settings. Your Accutron Pro may be powered with either 24 VDC, PoE, or 110-240 VAC. - Page 24 Figure 6: Reboot System Menu Once the device reboots, return to the Network menu and select ‘Wired Info’. You should see your newly entered IP address shown here (figure 7). Figure 7: Current IP Info Menu DHCP: If you wish to automatically set your IP address using DHCP, enter the ‘Network menu’, navigate to ‘Wired Mode’, and select ‘DHCP’...
-
Page 25: Section 6: Installation
Section 6: Installation Note: During installation, be sure to record the exact values of the baseline of the Transducers. If possible, the face to face should be recorded as well. This will be further explained below. These values will assist with configuring the device later. It is recommended that you bring a laser range finding device, or tape measurer, to measure out your baseline values after installation. -
Page 26: Calculating The Baseline
6.2.3 Calculating the Baseline It is recommended that the airflow Transducers be installed such that the face-to-face vector intersects the direction of flow at an angle between 30 and 60 degrees. This can be achieved by installing the Transducers with the proper baseline. The baseline is the separation downstream between the two Transducers. -
Page 27: Calculations
Figure 11: Better in High Velocity Applications 6.2.4 Calculations To Find Angle from Baseline and Face to Face: ���������������� ���� = ������������ −1 ������������ ������������ ���������������� ���� = ������������ −1 �������������������� ���� ���� ���� �������� To Find Baseline from diameter and desired angle ������������... -
Page 28: Drift Transducers
Please refer to the applicable section below for your Transducer Type installation. 6.2.5 Drift Transducers When mounting the transducers to the wall, it is recommended that one be installed near the ceiling of the tunnel and the other located downstream near the bottom of the drift (figure 12). The distance downstream between the two Transducers is called the baseline. -
Page 29: Fan Transducers
Once the mounts are installed, thread the Transducers onto the mounts and point them at each other using pan/tilt adjustment on the mount. Once power is run to the unit these Transducers can be aligned properly using the Laser Alignment. The laser can be activated by double tapping the Transducer, or through the local menu of the transmitter or the Accutron Pro Webpage. -
Page 30: Section 7: Device Setup
Section 7: Device Setup There are two methods for configuring your new Accutron FlowTrax Pro airflow monitor: On the device itself, or remotely through the web interface. 7.1 At the Device During normal operations, the transmitter will display the measured airflow velocity or calculated airflow volume on the screen. -
Page 31: Menu Options
7.2 Menu Options Setup Airflow Setup • Face to Face - Sets the face-to-face distance between the two airflow monitors. Leave this at 0 for auto face-to-face ranging. • Baseline - Sets the downstream distance of the two airflow monitors •... - Page 32 Wired Mode - Sets how the wired device IP is configured. Setting this to DHCP will allow • the device to automatically set an available IP, if your network is configured for DHCP. Wired IP Address - Sets the IP address of the device when wired to the network •...
- Page 33 Airflow Velocity ft/min • Airflow Volume m • Airflow Volume CFM • Airflow Volume KCFM • • Airflow Volume ft • Mass Airflow Kg/s • Temperature F (Sensor A) • Temperature F (Sensor B) • Temperature C (Sensor A) • Temperature C (Sensor B) •...
-
Page 34: Section 8: Accutron Pro Web Interface
Section 8: Accutron Pro Web Interface The Accutron Pro Web Interface allows you to remotely configure and monitor your Accutron device. To access the web server, ensure you are on a device connected to the same network as your Pro, and navigate to the Pro’s IP address. -
Page 35: The Dashboard
8.2 The Dashboard When Connecting to the Accutron Pro Web Interface, you will be greeted with the Dashboard screen (figure 16). Depending on what devices are connected to the Pro, this screen may appear slightly different. The dashboard provides you with an overview of your Accutron Pro device, and displays the variables currently being read, and if there are any errors present. -
Page 36: System
8.3.1 System The System page (figure 18) is where your Accutron Pro device unit settings can be configured. The same System settings which can be accessed on the device using the navigation buttons can also be accessed in the Pro Web Server. Figure 19: Accutron Pro Web Interface - Setup Page Figure 20: System Settings Options Figure 19 shows which settings may be configured on this page. - Page 37 ‘Display Mode’ configures what is shown on the Pro Module display, as well as the external green display. This can be configured between volume and velocity. The units these are displayed in can be configured with the options below. ‘Velocity Units’ specifies which units the system will use for velocity. This can be configured between ft/s and m/s.
-
Page 38: Airflow
8.3.2 Airflow Airflow Setup The Airflow page is where your Accutron Pro airflow measurement settings can be configured (figure 20). Figure 21: Airflow Setup Options Face to Face Distance (User) – This can be used to manually set the face-to-face distance of the transducers. - Page 39 JFilter Min. Amplitude – This sets the minimum amplitude that the Accutron JFilter will look for. This is further explained in System Diagnostics, below. It is recommended to leave this as is, unless otherwise instructed by an Accutron technician. ...
-
Page 40: Networking
The ‘Alignment Laser On/Off’ switch is used to toggle the alignment laser on each transducer (Note: This can also be done through the menu on the physical system, or by firmly double tapping on the back of the transducer). The ‘Identify Mode On/Off’ switch is used to toggle Identify Mode on each transducer. When this is enabled, the LED on the transducer will begin flashing red and green. -
Page 41: Analog Output
the right, under ‘Interface Details’. When setting to DHCP, you may need to reboot your device with an ethernet cable connected to your network for an IP address to be properly assigned. This can be done by clicking the blue ‘Reboot Device’ button. After rebooting your device, return to the Network menu on the physical device and select ‘Wired Info’. -
Page 42: Alarms And Relays
blue button labelled “Change”. You can also set the minimum and maximum values to be read at 4mA and 20 mA. The units of the values are independent of the system units. Each unit for each measured variable is available to output over analog. This provides flexibility between the displayed system units and what is required at the PLC. -
Page 43: Date And Time
be set by clicking the blue “Change” button. The “Trigger When Above/Below” setting allows you to configure if the relay will trigger either above, below, or at your trigger value. The “Trigger Value” setting allows you to set what the trigger value will be. Depending on your set trigger parameter, the units of the trigger value will be based on what the Pro device is set to in previous menus. -
Page 44: Firmware Update
8.3.9 Firmware Update This page allows you to upload firmware updates to your Pro System remotely. Select the firmware update file (Provided from Accutron) and click on the corresponding update button of which device you would like to update. It is recommended that you consult with an Accutron technician before attempting a firmware update. -
Page 45: Data Logs
8.5 Data Logs Figure 28: Data Logs Web Page The Data Logs page (figure 27) allows you to view the data logs stored on the system, as well as control the log interval and enable/disable what parameters you wish to store(figure 28). The System must be reset after changing the data log interval for the setting to take effect. -
Page 46: Diagnostics
Under ‘Loggable Data Variables’, the desired data variables can be enabled or disabled by toggling the switch buttons next to the variable name. Stored Log Files can be downloaded by right-clicking on the blue text under ‘Available Log Files’ and selecting ‘Save link as…’. -
Page 47: Section 9: Modbus Slave Settings
Section 9: Modbus Slave Settings Click on ‘Settings’ to open the settings menu, and then click ‘Modbus Slave’ to open the Modbus Slave Settings screen (figure 30). Figure 31: Modbus Slave Settings Here you can configure the Modbus RTU Slave settings and the Modbus TCP Slave settings. Under the Modbus RTU Slave Settings, you can configure: ... -
Page 48: Modbus Register Map
9.1 Modbus Register Map Base unit mapping Table 2: Modbus Registers Register Device/Data Point Type Size Size Read/Write (Bits) (Registers) 40001 Airflow Transducer Pair/Airflow Velocity Float32 Read/Write (m/s) 40003 Airflow Transducer Pair/Airflow Velocity Float32 Read/Write (ft/s) 40005 Airflow Transducer Pair/Airflow Velocity Float32 Read/Write (ft/min) - Page 49 Register Device/Data Point Type Size Size Read/Write (Bits) (Registers) 40019 Transducer B/Temperature (C) Float32 Read 40021 Transducer A/Temperature (F) Float32 Read 40023 Transducer B/Temperature (F) Float32 Read 40049 Airflow Transducer Pair/Transducer Float32 Read Face-to-Face distance (Calculated) (m) 40051 Analog (4-20mA) Output/Analog Float32 Read Channel 1 Output (mA) (mA)
- Page 50 Register Device/Data Point Type Size Size Read/Write (Bits) (Registers) 40060 Airflow Transducer Pair/Flow Volume Int16 Read (x10) (CFM) 40061 Airflow Transducer Pair/Flow Volume Int16 Read (x100) (KCFM) 40062 Airflow Transducer Pair/Mass Airflow Int16 Read (x10) (Kg/s) 40063 Airflow Transducer Pair/Mass Airflow Int16 Read (x10) (lb/s)
- Page 51 Register Device/Data Point Type Size Size Read/Write (Bits) (Registers) 41004 Accutron FlowTrax Pro/System Int16 Read Communications Heartbeat Additional Devices Additional devices slave registers will be added after the base unit mapping in the 40000 range, in the order that the device was added or auto discovered. The Modbus Slave Registers are dynamic, after adding a device to the Accutron bus, or to the Modbus Master page, reload this page to see the changes.
- Page 52 2 Device 3 Loss of Device = 1 ; Good = 0 3 Device 4 Loss of Device = 1 ; Good = 0 4 Device 5 Loss of Device = 1 ; Good = 0 5 Device 6 Loss of Device = 1 ; Good = 0 6 Device 7 Loss of Device = 1 ;...
-
Page 53: Section 10: Modbus Master Settings
Section 10: Modbus Master Settings This page (figure 31) is used to configure the Pro as a Modbus Master. When the Pro operates as a Master, the values from the Slave Devices can be viewed on the Dashboard webpage. The Pro will also remap the Slave Modbus RTU devices over to Modbus TCP. - Page 54 Figure 33: Adding a New Modbus Device Device Description: Name giving to the device Slave ID: Modbus Address set on the device. Update Interval: 1000 ms is the recommended minimum Clicking add will save the device and give the option to add register information in the next window (figure 33).
- Page 55 Description: Enter a description of the register. (ex Temperature…) Unit: Enter engineering units (ex mA, °C…) this field can be left blank. Register: Modbus Register to read. (ex: 40001) Type: Select the Modbus data type (Integer, Unsigned Integer, Float 32) Float32 byte ordering can be changed by the “Float Type”...
-
Page 56: Section 11: Ethernet/Ip
Section 11: EtherNet/IP The EtherNet/IP webpage (figure 35) will bring up the EtherNet/IP settings you need to configure your PLC with your Accutron Pro for EtherNet/IP communications, as well as the Assembly Index (table 4). Note that this option is only available for EtherNet/IP equipped devices. If you do not see this page on your device and require EtherNet/IP communications, please contact Accutron Instruments. - Page 57 Table 4: EtherNet/IP Assembly Index: Assembly Device/Data Point Units Data Size Index Type (Bytes) Airflow Transducer Pair/Airflow Velocity float32 Airflow Transducer Pair/Airflow Velocity ft/s float32 Airflow Transducer Pair/Airflow Velocity ft/min float32 Airflow Transducer Pair/Airflow Volume m3/s float32 Airflow Transducer Pair/Airflow Volume float32 Airflow Transducer Pair/Airflow Volume KCFM...
- Page 58 Assembly Device/Data Point Units Data Size Index Type (Bytes) Airflow Transducer Pair/Transducer Face-to- float32 Face distance (Calculated) Analog (4-20mA) Output/Analog Channel 1 float32 Output (mA) Analog (4-20mA) Output/Analog Channel 2 float32 Output (mA) Accutron FlowTrax Pro/Airflow System int16 Heartbeat Airflow Transducer Pair/Flow Velocity (x100) int16 Airflow Transducer Pair/Flow Velocity (x100) ft/s...
- Page 59 Assembly Device/Data Point Units Data Size Index Type (Bytes) Transducer B/Temperature (x100) int16 Transducer A/Temperature (x100) int16 Transducer B/Temperature (x100) int16 Accutron FlowTrax Pro/System Error Code int16 Accutron FlowTrax Pro/Modbus Master Device int16 Error Code Accutron FlowTrax Pro/Accutron Bus Device int16 Error Code Accutron FlowTrax Pro/System...
-
Page 60: Section 12: Troubleshooting
Section 12: Troubleshooting 1) Why am I not seeing anything on the display? a) Check power connections. b) Verify that the Green LED is lit. c) Ensure that the Accutron was not damaged in any way during shipping. If this is the case, please contact your supplier. -
Page 61: Appendix A: Drawings & Dimensions
Appendix A: Drawings & Dimensions Transmitter Enclosure Figure 37: Transmitter Enclosure Dimensions 53 | P a g e... - Page 62 Accutron Pro Module Power LED1 LED2 LED3 LED4 Width 4.395" Accutron Pro (111.63mm) PN: ACC-PRO www.accutroninstruments.com 705.682.0814 Flow Pro Module Accutron Bus 4-20mA Out Dry Contact + A B - Length 4.236" (107.59mm) Top View 1.775" (45.09mm) Height 2.400" (60.96mm) 1.4"...
- Page 63 Drift Transducer Mount Figure 39: Drift Transducer Mount Tri-Foot Base (4"/101.6mm outside diameter with three 0.265"/6.7mm holes on a 3.25"/82.5mm bolt circle Drift Transducer Figure 40: Drift Transducer Dimensions in mm 55 | P a g e...
- Page 64 Fan Transducer Figure 41: Fan Transducer Dimensions in inches 56 | P a g e...
- Page 65 Figure 42: Stainless Steel Sensor Mounting Plate 57 | P a g e...
- Page 66 Figure 43: IDM Sensor Dimensions in mm 58 | P a g e...
-
Page 67: System Wiring Diagram
A.1 System Wiring Diagram Figure 44: System Wiring Diagram 59 | P a g e... - Page 68 Appendix B: System Defaults Setup > Airflow Setup Setup > Transducer Setup System of measure metric RX gain step Velocity units Filter mode J filter Volume units M3/s J Filter min Amp Display mode velocity J Filter Min Dur Flow Direction normal Moving Average Analog >...
- Page 69 REV 1.0.0 Visit www.accutroninstruments.com Email info@accutroninstruments.com For Accutron Pro Devices Phone 1.705.682.0814 Version V2.0.0 and up...
Need help?
Do you have a question about the Pro Series and is the answer not in the manual?
Questions and answers