Advertisement
Quick Links
Advertisement

Related Manuals for Congo Play MONKEY PLAYSYSTEM TOWER


Summary of Contents for Congo Play MONKEY PLAYSYSTEM TOWER
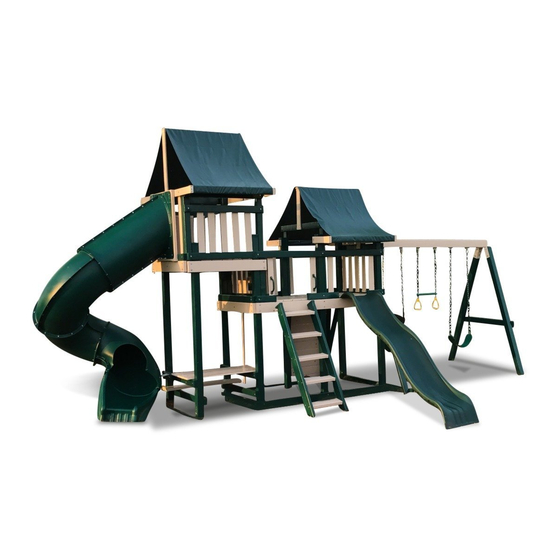
- Page 1 ...
-
Page 2: Hardware Identification
HARDWARE I DENTIFICATION 051/6" x 6 LAG SCREWS (4) �--1 --- - 05/16" x 5 1/2" HEX BOLTS (12) 05/16" x 4 1/2" LAG SCREWS (4) 05/16" X 1-1/2" 05/16" x 3" LAG SCREWS (42) LAG SCREWS (4) � ...____ I - - ------ 05/16"... -
Page 4: Parts Identification
PARTS I DENTIFICATION WOOD COMPONENTS cont. QUANTITY DESCRIPTION ID LETTER 2"x4"x36 3/8" - TURBO SLAT 7 + 3 from fort 2"x4"x45" - WALL RAIL *PPA with upgraded turbo 2"x4"x22 1/2" - TURBO WALL SLAT ¾" - 1 "x4"x37 END FLOOR BOARD l"x4"x35"... - Page 13 PHASE 43 WALL SLATS ATTACHMENT TABLE 43 - PARTS AND HARDWARE II> LETTER DESCRIPTION WALL SLATS 1-5/8" DECK SCREWS STEP 1: Gather parts and hardware shown in table 43. STEP 2: Attach wall slats 'Z23' to wall rails 'P' and 'MM' with 1-5/8"...
- Page 14 W A LL SLATS ATTACHMEN T - Cont. PHASE 44 TABLE 44 - PARTS AND HARDWARE STEP 1: Gather parts and hardware shown in table 44. It> LETTER DESCRIPTION WALL SLATS STEP 2: Attach wall slats 'HH' to ladder wall slats 'II' LAt>t>ER SLATS with 1-5/8"...
- Page 15 PHASE 45 TARP SUPPORT ASSEMBLY TABLE 45 - PARTS AND HARDWARE ***If you have the wood roof upgrade skip Phase 45 and 47 and attach only the M boards to KK and LL as shown in Phase 46*** It> LETTER DESCRIPTION TARP SUPPORTS STEP 1: Gather parts and harware shown in table 45.
- Page 16 PHASE 46 TARP ASSEMBLY ATTACHMENT TABLE 46 - PARTS AND HARDWARE IC> LETTER DESCRIPTION 05/ 1 6" x 5 1/ 2 " HEX BOLTS STEP 1: Gather parts and hardwawre shown in table 46. 05/ 1 6" SPLIT WASHERS NOTE: An adult helper is required with assembly. 05/ 1 6"...
- Page 20 PHASE 50 TURBO WALL SLATS ATTACHMENT TABLE 50 - PARTS AND HARDWARE IO LETTER DESCRIPTION STEP 1: Gather parts and hardware shown in table 50. TURBO WALL SLATS STEP 2: Attach turbo wall slats 'PP', PPA for upgraded turbo TURBO WALL SLATS centered on tarp support 'M' and wall rail TURBO WALL SLATS 'P' with 2"...
- Page 21 PHASE 51 TURBO SLIDE BRACKET ATTACHMENT ***Phase 51 only applies to the standard turbo. DO NOT SKIP TABLE 51 - PARTS AND HARDWARE PHASE 52 this is very important regardless of slide type. It> LETTER DESCRIPTION STEP 1: Gather parts and hardware shown in table 51. SUt>E BRACKET BOARI) STEP 2: Attach slide bracket.
- Page 22 *PHASE 52 TURBO SUPPORT RING ATTACHMENT TABLE 52 - PARTS AND HARDWARE ID LETTER DESCRIPTION STEP 1: Gather parts and hardware shown in table 52. TURBO SUPPORT RING STEP 2: Center turbo slide opening in wall opening, secure 05/16" x 3" LAG SCREWS the top with Clamp and attach the bottom with 05/16"...
Need help?
Do you have a question about the MONKEY PLAYSYSTEM TOWER and is the answer not in the manual?
Questions and answers