Table of Contents
Advertisement
Quick Links
Advertisement
Table of Contents

Related Manuals for Curtiss-Wright DuraCOR 312

Summary of Contents for Curtiss-Wright DuraCOR 312
- Page 1 USER MANUAL DuraCOR 312 NVIDIA Jetson TX2i Modular Mission Computer...
- Page 2 Curtiss-Wright reserves the right to change the contents and form of this document, as well as the features and specifications of its products, at any time without notice.
-
Page 3: Table Of Contents
DuraCOR 312 Table of Contents Table of Contents Table of Contents ........................3 Chapter 1 - Introduction ......................8 About This Document ............................ 8 Manual Organization ..........................8 Definitions ............................... 8 Description of Safety Symbols ........................ 8 Functional Description ..........................10 Features .............................. - Page 4 DuraCOR 312 Table of Contents USB1 .............................. 29 USB2 .............................. 29 USB 3.0 ..............................29 Ethernet ............................... 29 GbE1 .............................. 29 GbE2 .............................. 30 Serial ................................30 BIT Port ..............................30 Console ..............................30 Multiprotocol Ports ..........................30 CAN ................................32 GPIO ................................
- Page 5 DuraCOR 312 Table of Contents Chapter 7 Contact Info ......................41 Appendix A ..........................42 NVIDIA Jetson TX2i configurations ......................42 NVIDIA Documentation ..........................42 Appendix B ..........................43 BIT Port ............................... 43 High Temperature Operation ........................44 Appendix C ..........................48 Linux Software Development ........................
- Page 6 Figure 1: System Block Diagram ........................ 12 Figure 2: SATA Expansion .......................... 14 Figure 3: DuraCOR 312 J1 Front Pinout ..................... 17 Figure 4: DuraCOR 312 J2 Front Pinout ..................... 18 Figure 5: DuraCOR 312 J3 Front Pinout ..................... 20 Figure 6: DuraCOR 312 J4 Front Pinout .....................
- Page 7 List of Tables Table 1 DuraCOR 312 Standard Configurations ..................11 Table 2: Chip List ............................13 Table 3: DuraCOR 312 Connector Identification Table ................16 Table 4: J1 Connector Information ......................17 Table 5: J1 Pinout ............................17 Table 6: J2 Connector Information ......................18 Table 7: J2 Pinout ............................
-
Page 8: Chapter 1 - Introduction
Chapter 1 - Introduction Chapter 1 - Introduction The DuraCOR 312 is an ultra-small form factor (USFF) modular mission computer built around the high- performance, yet power efficient NVIDIA® Jetson™ industrial Jetson® TX2i “supercomputer-on-a module” integrated in a miniature rugged chassis with MIL-grade high-density connectors. Combining powerful NVIDIA Pascal™/CUDA-core GPU signal processing with 64-bit hex-core ARMv8... - Page 9 DuraCOR 312 Chapter 1 - Introduction Caution! Hazard to individuals, environment, devices, or data! If you do not adhere to the safety advice next to this symbol, there is obvious hazard to individuals, to environment, to materials, or to data.
-
Page 10: Functional Description
Pascal GPU architecture (supporting Max-Q and Max-P dynamic energy profiles), larger memory bandwidth, and support for CANbus, the DuraCOR 312 can deliver up to twice the performance or power efficiency of TX1-based systems together with native vehicle bus interfaces. The unit also deliver an unparalleled modular system design, boasting multiple Mini-PCIe I/O card slots, high-speed M.2 internal storage, removable SATA Flash SSD capabilities, and an aerospace-grade power supply... -
Page 11: Applications
SWaP-sensitive C4ISR autonomous vehicles, ISR, EW, targeting systems Configurations Due to the modularity of the DuraCOR 312 (M.2 / mSATA / Removable SSD and pre-integrated Mini-PCIe cards), numerous configuration variants are possible. Please consult with your sales representative and application engineer to assess your technical requirements and recommended system configuration. -
Page 12: Base System With Removable Storage Bay Option
Chapter 1 - Introduction Example ordering code: C312-03: DuraCOR 312, NVIDIA Jetson TX2i, 32 GB onboard flash storage, 64 GB M.2 storage Base system with Removable Storage Bay Option The base system with removable storage bay integrates a NVIDIA Jetson TX2i module. The base system comes pre-installed with the Linux 4 Tegra (L4T) with the LTS Linux Kernel on the 32 GB onboard flash. -
Page 13: Shared Resources And Connectors Location
DuraCOR 312 Chapter 1 - Introduction Table 2: Chip List Interface Description MFG Part Number Processor Jetson TX2i NVIDIA P3489 Broadcom Broadcom BCM54610C1IMLG Ethernet USB 3.1 Gen 1 to 10/100/1000 Ethernet Microchip LAN7800 Bridge Dual TXRX RS232/422/485 Multiprotocol Serial Linear Technologies... -
Page 14: Figure 2: Sata Expansion
DuraCOR 312 Chapter 1 - Introduction Figure 2: SATA Expansion Page 14 of 59 MNL-0670-01 Rev A2 ECO-5931 Effective: 03 Jun 20... -
Page 15: Chapter 2 - Quick Start Guide
Power-on Sequence To power on the DuraCOR 312, follow these steps: 1. Connect a power cable to port J1 on the DuraCOR 312 (use the cable from the breakout cable set or an equivalent power cable) 2. Connect the other end of the power cable to the unpowered DC power source Caution! Ensure that the DC power source is set to provide 9 to 36VDC (28 nominal) and can deliver the required power prior to attaching DuraCOR 312. -
Page 16: Chapter 3 - Connector Descriptions
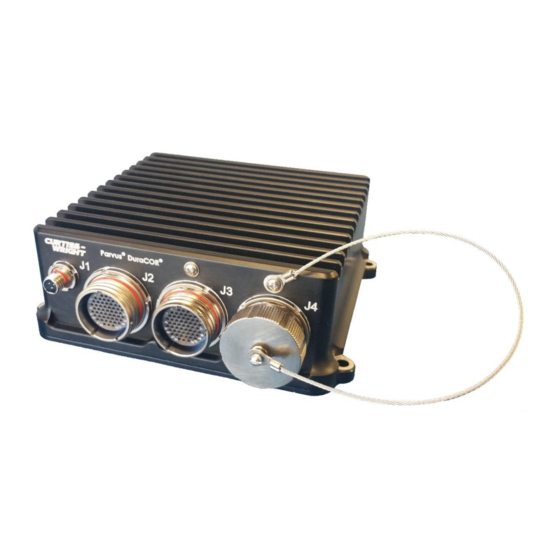
DuraCOR 312 Chapter 3 - Connector Descriptions Chapter 3 - Connector Descriptions This chapter identifies the pinouts and signal descriptions for the DuraCOR 312. It also provides connector part numbers along with suggested mating connector details as necessary. Connector Identification... -
Page 17: Connector Pinouts
Connector Pinouts This section provides the pinouts necessary for creating cables to connect to this assembly. If custom cabling is not designed and built by Curtiss-Wright, all EMI and EMC consideration must be handled by the customer. J1 Power Connector... -
Page 18: J2 I/O Connector
Caution! ESD Sensitive Components Follow standard ESD and FOD controls to avoid damage to the internal components. Figure 4: DuraCOR 312 J2 Front Pinout Table 6: J2 Connector Information Amphenol (Glenair) Jam... -
Page 19: Table 7: J2 Pinout
DuraCOR 312 Chapter 3 - Connector Descriptions Table 7: J2 Pinout Signal Name Note Description Signal Name Note Description J2_1 GbE_P2_B_P Note 1 GbE2 J2_29 USB3_RP1_N USB3.0 p1 Rx- J2_2 USB3_RP2_N USB3.0 p2 Rx- J2_30 Note 3 USB2.0 p0 Gnd... -
Page 20: J3 I/O Connector
J3 contains HDMI, RS232/422/483 Serial ports, 8x GPIO signals, CAN ports, Remote on/off, Write protect, and GPIO Caution! ESD Sensitive Components Follow standard ESD and FOD controls to avoid damage to the internal components. Figure 5: DuraCOR 312 J3 Front Pinout Page 20 of 59 MNL-0670-01 Rev A2 ECO-5931... -
Page 21: Table 8: J3 Connector Information
DuraCOR 312 Chapter 3 - Connector Descriptions Table 8: J3 Connector Information Amphenol (Glenair) Jam Amphenol (Glenair) Receptacle Receptacle # of Wire Gauge Nut Receptacle Mating Connector Label # Pins (AWG) Part Number Part Number 2M801-033-07M16-55SB 2M801-008-16M16-55PB 22-28 (801-033-07M16-55SB) (801-008-16M16-55PB) -
Page 22: J4 Configurable I/O Connector
DuraCOR 312 Chapter 3 - Connector Descriptions J3_26 HDMI_HPD HDMI J3_54 HDMI_D0_P HDMI RS485_RX1_ RS232/485/422 RS232/485/422_ J3_27 J3_55 In/Bi Port 2 GND (RS232_CTS1 RS485_RX2_P RS232/485/422 J3_28 In/Bi Note 4 GND Information (RS232 RX2) Port 2 Note1) GPIO implemented using TI TCA9539 GPIO chip. 5V Tolerant I/O Ports. See TI datasheet. -
Page 23: Optional Internal Io Expansion Connectors
DuraCOR 312 Chapter 3 - Connector Descriptions Figure 6: DuraCOR 312 J4 Front Pinout Table 10: J4 Connector Information Amphenol (Glenair) Jam Amphenol (Glenair) Receptacle Receptacle # of Wire Gauge Nut Receptacle Mating Connector Label # Pins (AWG) Part Number... - Page 24 DuraCOR 312 Chapter 3 - Connector Descriptions HDMI Power Holdup Optional Internal Connections: 1) HDMI. 2 HDMI port which would be connected externally using connector J4. 2) Power Holdup. Up to 50-ms of power holdup for base system, not counting power draw for USB ports.
-
Page 25: Chapter 4 - Operational Description
Chapter 4 - Operational Description This section describes the steps a user may have to perform during configuration of the DuraCOR 312. It assumes that a user has already followed the quick start instructions in Chapter 2.It also describes the interfaces that are available to the user. -
Page 26: Installing Mini-Pcie Cards Into The Duracor 311 Mission Computer
DuraCOR 312 Chapter 4 - Operational Description ARINC 429 CAN Bus Frame grabbers (video capture) Wi-Fi Serial ports Analog/digital data acquisition cards GPIO SATA Figure 8: Mini-PCIe Cards from various Manufactureres... -
Page 27: Storage Options
M.2 Socket The DuraCOR 312 contains an M.2 B-key for use with an M.2 B+M key with a single (x1) or dual (x2) PCIe lane card. As mentioned above, the PCIe lanes are Gen 2 (approximately 500 MBps per lane). -
Page 28: M.2 Socket
2.5” drive. With the addition of a removable media baseplate, the user can increase the storage capacities to those of a 2.5” drive. Capacities are limited to those available in the industrial market. Standard off-the-shelf 2.5” drives are compatible with the DuraCOR 312 system. Installing the Removable Device Below are the basic steps to install a 2.5”... -
Page 29: Usb
USB 3.0 to GbE chip to provide the customer with an additional Gigabit Ethernet port. See Ethernet section for more details. If the DuraCOR 312 default OS configuration is altered, it can cause errors in this port and other ports functioning correctly. Depending on the TX2i configuration (Appendix A: NVIDIA Jetson TX2i configurations) chosen, the USB 3.0 port may not function which would cause the three external USB 3.0... -
Page 30: Gbe2
Flow Control: off Note: if using the lab cables set provided by Curtiss-Wright, the use of a null modem is not required. If a custom cable set is used, it is the responsibility of the user to ensure proper connection to the device. - Page 31 DuraCOR 312 Chapter 4 - Operational Description Baud: 115200 Data: 8 bit Parity: None Stop: 1 Flow Control: off The TX2i module enumerates these ports as ttyS0 and ttyS1. MNL-0670-01 Rev A2 ECO-5931 Effective: 03 Jun 20 Page 31 of 59...
-
Page 32: Can
DuraCOR 312 Chapter 4 - Operational Description The DuraCOR 312 supports up to two (2) CAN bus interfaces. Supported bitrates for the TX2 CAN module mttcan include 125000, 250000, 500000, and 1000000. 500000-bps is recommended. Testing CAN bus. Open a terminal window and type the following commands to install required CAN... -
Page 33: Audio
DuraCOR 312 Chapter 4 - Operational Description Audio The C312 carrier board has an SGTL5000 codec onboard to provide Audio Line Out and Microphone input. The ALSA sound system remembers the ALSA amixer setting through reboots, so the settings may not need to be refreshed at the time of your audio applications start-up. -
Page 34: Zeroization
DuraCOR 312 Chapter 4 - Operational Description Zeroization Zeroization can be implemented via GPIO. This approach allows for flexibility on what data to sanitize and can vary depending on the storage configuration. Contact slp_tsupport@curtisswright.com information about Zeroization methods. Built-In-Test (BIT) -
Page 35: Chapter 5 Specifications
DuraCOR 312 Chapter 5 Specifications Chapter 5 Specifications Technical Specifications Multi-Core Arm/Pascal GPU NVIDIA Jetson TX2i “Parker” System on Module (SOM) (EAU units integrate TX2, whereas qualified production units integrate industrial TX2i SOM) • Multi-Processor CPU Complex (6-core): Arm Cortex-A57 (quad-core) - optimized for multi-threaded application NVIDIA Denver 2 (dual-core) - optimized for single-threaded performance •... -
Page 36: I/O Expansion
DuraCOR 312 Chapter 5 Specifications Audio • Stereo audio (left/right) and microphone GPIO • 8 x general-purpose digital I/O I/O Expansion • Up to 2x native slots for Mini-PCIe card I/O modules (for optional MIL-STD-1553, ARINC 429, video frame grabber, additional serial, Ethernet, CAN, USB ports, civilian GPS, or Wi-Fi, etc.) and 1x M.2 slot. -
Page 37: Dimensions
Optional removable 2.5” storage add-on: ~2.8 x 5.2 x 5.4” (6.7 x 13.2 x 13.8 cm) excluding • connectors and mounting features. Mounting the System The DuraCOR 312 is mounting using 4x #10 hardware. Mounting hole locations: Power • 28 VDC nominal power; input range: 9-36 VDC •... -
Page 38: Environmental Specifications
DuraCOR 312 Chapter 5 Specifications Environmental Specifications Temperature • Operating temperature: -40 to +71°C (-40 to +160°F) ambient (per MIL-STD-810G Methods 501.5 and 502.5) and -40 to +70°C (per DO-160G, Sect 4 Cat A2 and D2 and Section 4.5.5, Category V/Table 4-1) •... -
Page 39: Other Specifications
DuraCOR 312 Chapter 5 Specifications Other Specifications Reliability • Designed and manufactured using AS9100 aerospace grade / ISO 9001:2000 certified quality program • NVIDIA TX2i and other system components are industrial temperature rated • No moving parts. No fan nor cold plate required •... -
Page 40: Chapter 6 Troubleshooting
DuraCOR 312 Chapter 6 Troubleshooting Chapter 6 Troubleshooting Product Identification The product is labeled with the Parvus P/N and serial number. Please refer to this information when communicating with Technical Support. Technical Assistance If you have a technical question or if you cannot isolate a problem with your product, please call or e-mail... -
Page 41: Chapter 7 Contact Info
DuraCOR 312 Chapter 7 Contact Info Chapter 7 Contact Info Company contact info: Curtiss-Wright Defense Solutions Division 3222 S. Washington St. Salt Lake City, Utah, USA 84115 T: +1.801.483.1533 F: +1.801.483.1523 www.curtisswrightds.com Sales: T: +1.800.483.3152 or +1.801.483.1533 slp_sales@curtisswright.com Product Technical Support: T: +1.801.433.6322... -
Page 42: Nvidia Jetson Tx2I Configurations
The Jetson TX2i module has a number of possible PCIe/USB 3.0 configurations, see Figure 11. These can be selected and changed by the user. Not all configurations have been tested. The tested and validated configuration on the DuarCOR 312 system is NVIDIA’s configuration 5. The DuraCOR 312 system does not support other NVIDIA supported configurations. -
Page 43: Bit Port
DuraCOR 312 Appendix B Appendix B BIT Port The BIT console port is internally connected to the BIT microcontroller (uC) and contains a number of useful functions. This code provides several useful configuration functions including Flash EEPROM operations, BIT monitoring, and Serial Port configuration. -
Page 44: High Temperature Operation
The NVIDIA Jetson TX2i is rated from -40C to 85C and is built using a Thermal Transfer Plate (TTP) as part of the housing for the six (6) ARM cores and a large number of GPU’s. The DuraCOR 312 is certified for operation from -40C and up to 71C, external box temperature, but the higher temperatures can only be achieved with some form of thermal management, most notably for the GPU section of the TX2i. - Page 45 We have opt’ed to not build in automatic throttling to the DuraCOR 312 because there are so many situations where this activity needs to be under the complete control of the user. Therefore, it is up to the user to make sure that the system does not shut down when running high temperatures.
- Page 46 DuraCOR 312 Appendix B /sys/devices/system/cpu/cpu5/cpufreq/scaling_max_freq:1420800 /sys/devices/gpu.0/devfreq/17000000.gp10b/max_freq:1134750000 /sys/devices/system/cpu/cpu0/cpuidle/state0/disable:0 /sys/devices/system/cpu/cpu0/cpuidle/state1/disable:0 /sys/devices/system/cpu/cpu1/cpuidle/state0/disable:0 /sys/devices/system/cpu/cpu1/cpuidle/state1/disable:0 /sys/devices/system/cpu/cpu1/cpuidle/state2/disable:0 /sys/devices/system/cpu/cpu2/cpuidle/state0/disable:0 /sys/devices/system/cpu/cpu2/cpuidle/state1/disable:0 /sys/devices/system/cpu/cpu2/cpuidle/state2/disable:0 /sys/devices/system/cpu/cpu3/cpuidle/state0/disable:0 /sys/devices/system/cpu/cpu3/cpuidle/state1/disable:0 /sys/devices/system/cpu/cpu4/cpuidle/state0/disable:0 /sys/devices/system/cpu/cpu4/cpuidle/state1/disable:0 /sys/devices/system/cpu/cpu5/cpuidle/state0/disable:0 /sys/devices/system/cpu/cpu5/cpuidle/state1/disable:0 /sys/devices/17000000.gp10b/devfreq/17000000.gp10b/min_freq:114750000 /sys/devices/17000000.gp10b/railgate_enable:0 /sys/kernel/debug/bpmp/debug/clk/emc/mrq_rate_locked:0 /sys/devices/pwm-fan/target_pwm:255 /sys/devices/pwm-fan/temp_control:1 With a corresponding .conf file for the non-throttle case (no throttling or default): Default Clock Speed………….
- Page 47 DuraCOR 312 Appendix B /sys/devices/system/cpu/cpu5/cpuidle/state0/disable:0 /sys/devices/system/cpu/cpu5/cpuidle/state1/disable:0 /sys/devices/17000000.gp10b/devfreq/17000000.gp10b/min_freq:114750000 /sys/devices/17000000.gp10b/railgate_enable:0 /sys/kernel/debug/bpmp/debug/clk/emc/mrq_rate_locked:0 /sys/devices/pwm-fan/target_pwm:255 /sys/devices/pwm-fan/temp_control:1 Also, here is the command to set CPU use all six cores. system("sudo nvpmodel -m2"); MNL-0670-01 Rev A2 ECO-5931 Effective: 03 Jun 20 Page 47 of 59...
-
Page 48: Linux Software Development
DuraCOR 312 Appendix C Appendix C Linux Software Development Developing code and applications for use with C312 includes many different tasks. Here are some specific techniques to use during the development, deploy, and maintenance cycle for your dedicated systems. The assumption we will be making is that you know how to do configuration and development on a Linux system for your target application. -
Page 49: Instructions For Setting Up A Project Directory
DuraCOR 312 Appendix C Provide an example setup for generating distributing and applying updates. Description of directories: Resource directory: All local source archive materials needed to set up, build, and deploy are stored in one directory kept under git version control for easy customization. -
Page 50: Overview
DuraCOR 312 Appendix C release build. This also serves as an example of how you can archive and a custom release build and then flash it to other units. obtain: from Curtiss Wright support team if really needed. create: The real point here is to make your own local custom images. - Page 51 DuraCOR 312 Appendix C mkdir <path>/<workspace_name> tar -C <path>/<workspace_name> -Jxvf /opt/ARC/c-w_c312_resource.tar.xz 2. Create an overlay This is done automatically as part of the next step. 3. Mount the overlay by sourcing the setup script (as root user) Please note that the setup script sets many environment variables needed for nvidia build tasks. The script will also create or mount the overlay as needed.
- Page 52 DuraCOR 312 Appendix C Do your customizations now. Now we are back to the standard build process. C312_GetReadyToMake is a first nod toward doing this but for now do those steps by hand. cd $DEVDIR/sources/kernel/kernel-4.9 make mrproper make ARCH=arm64 O=$TEGRA_KERNEL_OUT mrproper cp arch/arm64/configs/defconfig_B $DEVDIR/images/.config # this should...
- Page 53 DuraCOR 312 Appendix C Hold the “Force Recovery” Button while applying power to the C312 You can release the button 5 seconds after the current stabilizes after dipping. Run the C312_ImageFlash routine. (without any arguments so that the images will be created and signed.)
-
Page 54: How To Deploy An Image To C312
DuraCOR 312 Appendix C How to deploy an image to C312 Suggested hardware for this task: Micro-USB to USB A cable USB based keyboard and mouse. A power supply, we recommend an adjustable laboratory supply with voltage and current meters. - Page 55 DuraCOR 312 Appendix C So far all of our image development has been of an additive nature so the delete capture has not been an issue for us. If you have an immediate need for such a tool you will need to write it. If not it will be available in one of the next releases.
-
Page 56: Lan 7800 Notes
DuraCOR 312 Appendix D Appendix D LAN 7800 Notes Ethernet tuning The target throughput and latency for the Ethernet ports can vary from project to project. No tuning has been done to the system as shipped. In order to allow Ethernet tuning to be most effective, the c312 is shipped with the kernel clock set to 1000hz. - Page 57 DuraCOR 312 Appendix D LAN7800 eeprom programming The D revision carrier boards (Product shipped after December 26th 2019 ) provide a configuration eeprom for the LAN7800 chip. The factory setting for this chip were taken from the Microchip Lan7800 evaluation board with two modifications. 1. The assigned MAC address for the carrier board has been added to the eeprom.
-
Page 58: Glossary
Non-Volatile Memory Express, PCIe based Line Replaceable Unit System on Module Early Access Unit Operating System. This refers to the NVIDIA Jetpack (L4T) and the DuraCOR 312 specific image Linux for Tegra. NVIDIA Jetson specific Linux build Page 58 of 59... - Page 59 DuraCOR 312 Glossary {Parvus back cover, 8.5 x 11 picture inserted in front of text. DO NOT DELETE THE COMMENTS OR THIS PAGE. These comments are only visible in Normal view. The picture hides the header and these comments when you print the manual or view it in Print Layout or Print Preview.}...
Need help?
Do you have a question about the DuraCOR 312 and is the answer not in the manual?
Questions and answers