Advertisement
Quick Links
Advertisement

Related Manuals for Elitech V700

Summary of Contents for Elitech V700
- Page 1 Intelligent Vacuum Pump User Manual V700/V900/V1200...
-
Page 2: Table Of Contents
Contents Disclaimer ···························································································1 Product Features ···············································································2 Technical Parameters ·········································································2 Service Parts ······················································································3 Operation Guide ···············································································4 Care and Maintenance ·······································································9 App Operating Instructions ······························································11... -
Page 3: Disclaimer
Disclaimer The vacuum pump is heavy. Be careful while handling to prevent personal injury. • Use only ISO 46 mechanical oil to avoid vacuum pump damage. • Do not cover the exhaust port during vacuum pump operation. • Do not expose the suction port continuously to atmosphere for more than 3 minutes. •... -
Page 4: Product Features
Vacuum Change in Graph • 4" Touch Screen Display • Estimated Job Completion Time • Data Logging and Storage via App • Technical Parameters Models V700 V900 V1200 2 stages Stage Power Supply 110V/60Hz; 220V/50Hz AC induction motor Motor Fixed speed... -
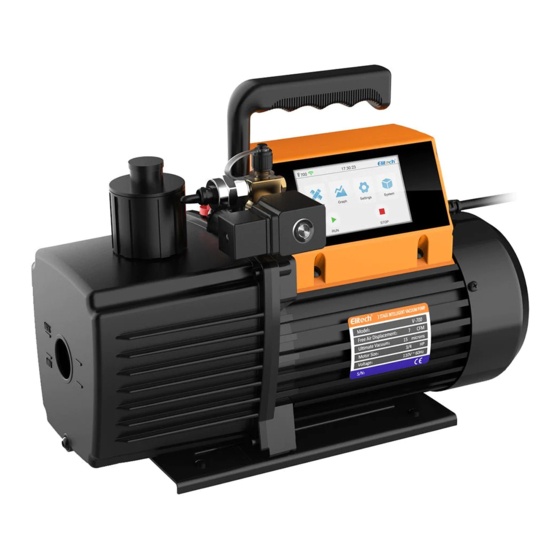
Page 5: Service Parts
Service Parts ⑧ Motor ① Display screen ⑨ Motor housing ② Handle ⑩ Power button ③ Air inlet Vacuum sensor ④ Solenoid valve ⑪ Oil window ⑤ Catcher ⑫ Oil drain plug Oil tank ⑬ ⑥ ⑦ Base... -
Page 6: Operation Guide
Operation Guide Conditions that must be met 1. Place on a flat surface. 2. Confirm the voltage and frequency at the outlet match with the vacuum pump specifications. 3. Confirm the oil level is within the Min and Max level. 4. Remove the air inlet cap (1/4 SAE fitting as shown in the 1/4 SAE right image ), connect the pumped system (make sure the pipe... - Page 7 (1) The status bar on top of the page shows the product model, time, Bluetooth status. ① Model numbers varies depending on the product models. ② Bluetooth not connect; Bluetooth connected. ③ During operation, appear when temperature exceeds the upper alarm limit, appear when temperature below the lower alarm limit.
- Page 8 (1) Motor Status: show the current status of the motor. (2) Motor Temp/Limit: show the surface temperature of the pump chassis and set the alarm temperature. (3) Oil Temp/Limit: show vacuum pump oil temperature and set the alarm temperature. (4) Vacuum Status: display the current vacuum value status, "Decrease", "Stable", "Rise", "--".
- Page 9 3. Settings Click the “Settings”button on the main menu to enter the setting interface. Unit(P/T) Select Unit to set the unit for vacuum and temperature. The selected units are in blue. Vacuum Set the minimum vacuum value, logging interval, and recording status. (1) Minimum Vacuum: set the target vacuum value.
- Page 10 Time (1) Set and save the time then it shows at the top of the screen. : Change key. : return to the main interface. 4. System In the main menu, click the “ System” button to enter the system interface. (1) Running Time: refer to the accumulated running time of the motor.
-
Page 11: Care And Maintenance
Other functions 1. Temperature alarm: When the oil temperature or motor chassis temperature exceeds the upper limit alarm temperature set by the APP, the motor and solenoid valve are closed, the temperature alarm icon " " is displayed at the top of the screen; When the temperature decrease within the alarm temperature, the alarm will be cleared, and the vacuum work continues . If temperature exceeds the o ine alarm temperature, the temperature alarm icon "... - Page 12 How to replace the vacuum pump oil 1. Run the pump for about 3-5minutes until it is warmed up to runs out the pump oil. 2. When the pump is running, open the air inlet port at the same time to let the oil flow back to the oil tank.
-
Page 13: App Operating Instructions
Check and repair 5. The Power Supply Voltage Is Too Check the power supply voltage APP Operating Instructions 1. Power on the vacuum pump. 2. Turn on the Bluetooth function of the mobile phone. 3. Open the “Elitech Gauge”APP. -11-... - Page 14 4. Click "Add Device" to enter the device management interface. And the devices that can be connected are displayed in red. Click on the top right of the device to establish a connection. After successful connection,the device bar turns green and the Bluetooth icon displays 5.
- Page 15 Screenshot Historical device Device name Real-time vacuum value Mac address Search to add a new device The interface includes historical devices and the new devices. (1) The history device displays the previously connected devices, click the device bar to automatically connect the device. When the connection is successful, and " "...
- Page 16 7. Click“ ” in the top left corner of the working interface to enter the menu. (Only some functions related to vacuum pump are described here). (1) REPORTS Job Settings: Click the work button to enter the work list. Add a work list at the top right. ①...
- Page 17 Reporting: Click the report button to enter the report interface. ② Click the New report button, select data information by work or time, click the chart analysis button to view historical graph, click the “Export" button at the bottom to export data in Excel or PDF. Click the saved report to view historical Excel and PDF reports,and long press the report to delete.
- Page 18 (2) CONFIGURATION Settings:Click the “Settings”button to enter the system settings. ① Keep Screen On: control the backlight of the screen. Switch language: select language English or Other Languages. General Alarm Preferences: single sound, single vibration or sound vibration alarm at the same time. Help: Click the "Help"...
- Page 19 8. Device Detail Click the connected device icon to enter the detailed interface of the device, display the vacuum pump status, and control the vacuum pump. Graph Expected completion Motor control button time Temperature status of Real-time vacuum oil and shell Vacuum status Edit device name Leakage level...
- Page 20 (7) Leakage Rate: under the stable state of the vacuum value, make a judgment on the possibility of leakage of the current system, which is represented by 0-100; 0 means the uncertain of the leakage status. The larger the number, the possibility of leakage is larger.
- Page 21 Interval Time: set the logging interval , 1S, 5S, 10S, 30S, 1Min, 2 Min, 5 Min. ② iOS system: Enter the APP Store and search for "Elitech Gauge" to download. Android system: Enter Google Play search for “Elitech Gauge” to download or scan QR code below to download.
- Page 22 Made in China V1.0...
Need help?
Do you have a question about the V700 and is the answer not in the manual?
Questions and answers