Table of Contents
Advertisement
Quick Links
Advertisement
Table of Contents

Related Manuals for Boss Audio Systems MGV520B


Summary of Contents for Boss Audio Systems MGV520B
-
Page 2: Table Of Contents
Thank you for purchasing this marine gauge radio! Please read the instructions carefully, so you will know how to operate your product properly. After you have finished reading the instructions, keep this document in a safe place for future reference. Table of Contents Introduction ........................ -
Page 3: Introduction
Introduction This product is designed as a marine gauge radio with an integrated four-channel amplifier. You can stream audio from a mobile phone to this product via Bluetooth. You can also play music/movie/photo files stored in a USB flash drive, and music from an external device (e.g. a CD player) can be played via RCA inputs. - Page 4 • Start volume at a low setting then gradually increase the volume until you can hear it comfortably, without sound distortion or ear discomfort. • In the event of smoke, strange noise or odor emitted from the product or any other abnormal operational signs appearing on the product, disconnect the product from the power supply.
-
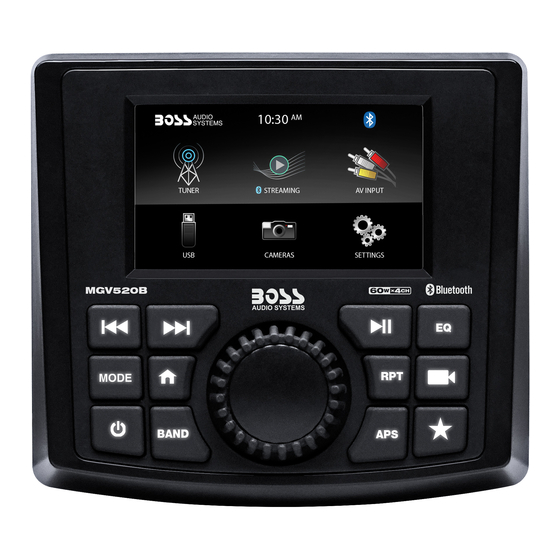
Page 5: Control Panel
Control Panel • In USB/Bluetooth mode, start, pause or resume play. • Select a preset sound mode (a preset equalizer setting). • Switch to camera mode. • Turn on or off external accessory power. • In radio mode, press to tune to a radio station. •... -
Page 6: Mounting
BAND • In radio mode, press to select a FM or AM band. • In USB mode, press and hold to access music/movie/photo folders; press to select music/movie/photo folders. • In Bluetooth mode, press to disconnect Bluetooth connection. • Press to turn on the unit; press and hold to turn off the unit. •... -
Page 7: Wiring
You can have two options to fasten the unit. Option 1: Mounting bracket Fasten the unit from behind the dashboard using the supplied mounting bracket and two hex bolts and flange nuts. If needed, cut off one or two break-away tabs on the bracket to shorten the bracket for firm fastening to the dashboard. - Page 8 Orange: to rear camera Rear Camera Input for video signal input Yellow: to video output Video Input on a playback device Audio Input To audio output on a playback device White Front Output To front audio input on an amplifier Black To rear audio input on Rear Output...
-
Page 9: Turn On/Off
Turn On/Off • To turn on the unit, press - When turned on, the unit switches to the last selected mode. Startup volume level is the one when the unit was previously turned off. • To turn off the unit, press and hold - When turned off, clock is displayed if clock display is enabled. -
Page 10: Set Clock
Set Clock In power-on, press to access the home menu. Rotate the function knob to select the “SETTINGS” icon, then press the function knob to access the settings options. Rotate the function knob to select an option; press the function knob to confirm the selection. - Page 11 Press repeatedly BAND to select FM1, FM2, FM3, AM1 or AM2. Tune To A Radio Station Option 1 In radio mode, press APS. The unit will find a station with strong reception. - While searching a radio station, “AUTO” is displayed. If an FM radio station with stereo signal is reached, the icon will be displayed.
-
Page 12: Bluetooth
Press repeatedly MODE to access Bluetooth mode. Or in the home menu (press use the function knob to select the “STREAMING” icon. On your mobile device, enable Bluetooth then select “Boss Audio MGV520B” to pair the unit with your mobile device. If prompted for password, input “0000” on your mobile device. -
Page 13: Music/Movie/Photo From Usb
Control playback as follows. • To pause or resume playback, press • To select the previous or next music file, press - During playback, the display shows the music title and artist. - If there is an incoming call during playback, the music will automatically pause and resume after the call ends. -
Page 14: Av Input
• To play the current track repeatedly, press RPT. When the repeat mode is activated, is displayed. To cancel the repeat mode, press RPT again. Movie Playback • To pause or resume playback, press • To select the previous/next movie file, press •... -
Page 15: Output Audio
Output Audio You can output audio from the unit to an external amplifier or powered speakers. Using audio cables with RCA plugs (not included), connect the RCA audio outputs labelled “Front Output”, “Rear Output” and “Sub Output” on the unit to the corresponding RCA audio inputs on your amplifier or powered speakers. -
Page 16: Audio Settings
view from the rear camera. Using the “Video Input” wire with RCA jack (Yellow, not orange), display live view from the front camera Note: You need to enable front camera input. In the home menu (press ), go to “SETTINGS” > “Camera” and select “Enable”. •... -
Page 17: Preference Settings
• SUB VOL: Change output level of your subwoofer. • SUB FILTER: Select a cutoff frequency for your subwoofer (80Hz, 120Hz or 160Hz). The subwoofer will reproduce sound of the frequencies below the selected frequency. • SYSTEM TONE: Enable or disable beep tone every time you press a button. •... -
Page 18: Specifications
Specifications Audio Output power ..........60 W x 4 (Max) Speaker impedance ........4 - 8 Ω Frequency response .........20 Hz - 20 kHz Signal-to-noise ratio ........>65 dB RCA input sensitivity .........500 mV Pre-amp outputs......... 2V RMS Full range for front, rear, and subwoofer (mono) FM Tuner Frequency range ........ - Page 19 Compatibility ..........Type A, USB 2.0 (High-Speed) File system ..........FAT32 USB storage supported ......32GB (Max) Audio playback ......... MP3 USB charging ........... 5VDC, 1A (not for mobile device playback) General Power supply ..........12VDC Current consumption ........ 15A (Max) 0.75"...
-
Page 20: Troubleshooting
Troubleshooting If you have problems using this product, check the following points before you request service. If you still have a problem, contact our technical support. Problem Solution No power Check that power supply is securely and properly connected (see “Wiring” on page 6). The fuse is blown. - Page 21 Problem Solution Audio quality from Bluetooth Move the device closer to the unit, or remove obstacles connection is poor. or sources of interference that are affecting Bluetooth reception No camera view when Check that rear camera (“CAMERA 1”) or front camera pressing (“CAMERA 2”) is correctly connected.
Need help?
Do you have a question about the MGV520B and is the answer not in the manual?
Questions and answers