Table of Contents
Advertisement
Quick Links
Q9VOIP SERIES MANUAL
QUANTUM Q9000VOIP SERIES
Table of Contents Limitation of Liability
General Wiring Diagram
Function Code 05: Enable or disable Call
file:///C|/PACH-CO.COM-2022-B/online_manual/q9000voip_manual.htm[4/27/2022 8:57:08 AM]
PROGRAMMING MANUAL V04262022
TABLE OF CONTENTS
Special Code
CHAPTER 6 QWCM
Advertisement
Table of Contents

Subscribe to Our Youtube Channel
Related Manuals for Quantum Q9000VOIP Series


Summary of Contents for Quantum Q9000VOIP Series
-
Page 1: Table Of Contents
Q9VOIP SERIES MANUAL QUANTUM Q9000VOIP SERIES PROGRAMMING MANUAL V04262022 TABLE OF CONTENTS Table of Contents Limitation of Liability Function Code 23: Lock-out Count Function Code 24: Alarm Products Limited Warranty Function Code 25: Keypad Beep Function Code26: Door Beep Limited Warranty Limits and Exclusions... -
Page 2: Products Limited Warranty
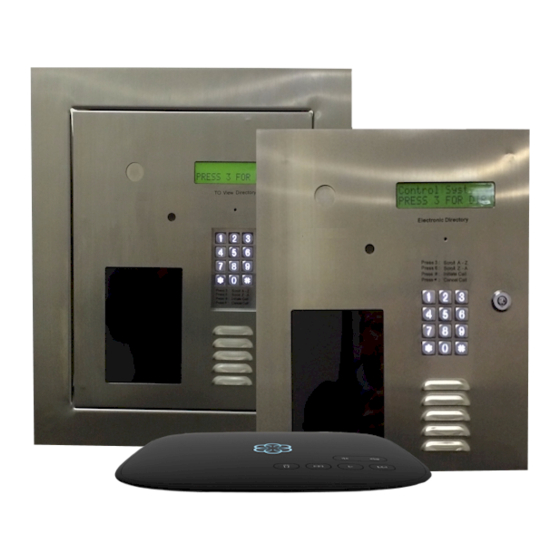
Pach & Company thanks and congratulates you on the purchase of your Quantum Q9000VOIP Series Telephone Entry Access Control Systems. The manual is designed to guide you through the proper programming and use of the Quantum Q9000VOIP Series It is important for you to read and follow the manual completely. -
Page 3: Chapter 2 Installation And Wiring Diagram
The product comes with two years Limited Warranty, see above for more detail Description The Quantum Q9000VOIP Series is multi tenant telephone entry system. Analog dial tone is supplied by AATA2 Capacity 900 tenants, 2000 cards or keyfobs and 900 access codes. - Page 4 Q9VOIP SERIES MANUAL 1. AC1 and AC2, Input Power 12VAC 40VA (supplied) or 12VDC 3.0A (not supplied). Measurement voltage under load must be 12.50-14.00 VAC (AC Transformer) or 13.50-14.00 VDC (DC power supply) 2. BAT and GND, Battery backup 12VDC 4.5Ahr. 3.
-
Page 5: Chapter 3 Keypad Correlation Table
Q9VOIP SERIES MANUAL LCD Display OK --- Flash OK --- RTC OK --- DTMF OK --- INIT START --- INIT COMPLTE --- SCROLLING CHAPTER 3 Keypad Correlation Table The QR5 buttons are lighted. Below are the correlation table for each key. = 1 _ . -
Page 6: Function Code 02: Edit Existing Directory
Q9VOIP SERIES MANUAL Enter directory number (2, 3 or 4 digits depending on the setup, see function code 19) then # Chapter 3 for keypad layout Enter name up to 16 characters (name can be a person name, apartment number, etc., directory is sorted in alphabetical order) then press # Enter the tenant phone number up to 16-digit (land line, VOIP or cellular number, i.e: 9494982951) then press #. -
Page 7: Function Code 04: Clear All Tenant Directories
Q9VOIP SERIES MANUAL if directory does not exist Function Code 04 - Clear All Tenant Directories Log-in to programming Enter 04 then # Do the following: - Press 1 (to clear all directories) then press # - Press * to cancel Function Code 05 - Call Forwarding Enable or disable call. -
Page 8: Function Code 07: Delete Access Code
Q9VOIP SERIES MANUAL Enter 00 (24 hours) - 20 see function code 17 then press # Enter satellite system ID 0-7 (enter 0 if no satellite system connected to the main system) then press # Enter 0= no more additional time zone then press # and return to step 3 to program another access code 1= add additional time zone then press # and return to... -
Page 9: Function Code 10: Add Card
Q9VOIP SERIES MANUAL 3. Enter 4, 5, 6, 7 or 8 (default setting is 4 digit) then press # Function Code 10 - Add C Log-in to programming Enter 10 then # Present the card or keyfob against the black window, the card or keyfob number will show on the display (or enter the last 8 digits of the number of the keyfob or card, then press #) Chapter 3 for keypad layout... -
Page 10: Function Code 12: Clear All Cards
Q9VOIP SERIES MANUAL if card exists if card does not exist Repeat this step to delete another code Function Code 12 - Clear All Cards Log-in to programming Enter 12 then # Enter 1 to clear all keyfobs or cards press # or * to cancel Function Code 13 - Set Time Log-in to programming... -
Page 11: Function Code 15: Initializing Event Recording
Q9VOIP SERIES MANUAL 5. Enter 0= NO Daylight Saving Zone (Hawaii, Indiana and Arizona) 1=Daylight Saving Zone then press # Function Code 15 - Initializing Event recording The events are stored in the RAM buffer. The Event RAM buffer can hold 800-2000 events. The Events are stored as first in first out (FIFO). This function code will clear the event buffer. -
Page 12: Function Code 17: Time Zone (Tmz)
Q9VOIP SERIES MANUAL 2= Relay 2 (door 2) 3= Both relay 1 and 2 then press # Return to step 3 to enter another AUS Function Code 17 - Time Zone (TMZ) A maximum of 20 Time Zones can be programmed and up to three time zones can be assigned to each access code or card to allow access during a certain time of the day. - Page 13 Q9VOIP SERIES MANUAL 0= Delete the existing holiday zone then press # 1= add new holiday zone then press # 5. Enter month and date (i.e. 0704 for U.S.A Independence Day) then press # Return to step 3 to add more holiday zones. Function Code 19 - Directory Digit Directory digit is a unique number that must be assigned for each tenant.
-
Page 14: Function Code 23 Lock-Out Count
Q9VOIP SERIES MANUAL Function Code 22 - Do Not Disturb If Do Not Disturb is enabled, then the calling feature is disabled. Log-in to programming 2. Enter 21 then # 3. Entert 0= disable, 1= enable then press # Function Code 23 Lock-out Count The system will be disabled in about 60 seconds after pressing invalid access code or swiping invalid card as specified on the Lock-out Count. -
Page 15: Function Code 27 Talk Time
Q9VOIP SERIES MANUAL Turn the door beep On or Off Log-in to programming 2. Enter 26 then # 3. Enter 0= off, 1= On (default) then press # Function Code 27 Talk Time The amount of time the visitor can talk to the tenant. The timer starts as soon as the system is offhook. Log-in to programming 2. -
Page 16: Function Code 34 Special Code
Q9VOIP SERIES MANUAL 3. Enter 0= delete existing temporary code or 1= add temporary code then press # 4. Enter code number 01-10 then press # Enter 4-8 digit code, see digit setting on function code 09 Chapter 3 for keypad layout 6. -
Page 17: Function Code 35 Temporary Card
Q9VOIP SERIES MANUAL 4. Enter code 01-10 then press # 5. Enter 4-8 digit code, see digit setting on function code 09 Chapter 3 for keypad layout 6. Enter name then press # 7. Enter 1= relay 1(door 1), 2= relay 2 (door 2) or 3= both relay then press # 8. -
Page 18: Function Code 36 Special Card
Q9VOIP SERIES MANUAL Chapter 3 for keypad layout 6. Enter name and press # 7. Enter 1= relay 1(door 1), 2= relay 2 (door 2) or 3= both relay then press # 8. Enter time zone 1-3 then press # 9. -
Page 19: Function Code 38 System Acknowledge
Q9VOIP SERIES MANUAL 7. Enter 1= relay 1(door 1), 2= relay 2 (door 2) or 3= both relay then press # 8. Enter time zone 1-3 then press # 9. Enter 00 (24 hours) - 20 see function code 17 then press # 10. -
Page 20: Function Code 41 Dtmf Relay 2
Q9VOIP SERIES MANUAL Log-in to programming 2. Enter 40 then # 3. Press 1-9 (9 is default setting) then press # Function Code 41 DTMF Relay 2 By default the DTMF remote opening relay 2 (door 2) key number is set to 8 means pressing 8 will remotely trigger relay 2 (door 2). The number can be changed by selecting 1-9 to trigger relay 2 (door 2). -
Page 21: Function Code 44 Disable Time Zone Relay
Q9VOIP SERIES MANUAL 6. Enter end time then press # (military time, end time must be later than start time, if start time: 22:00 hour and end time: 06:00, two time zone must be created (22:00 hour - 24:00 hour, 00:01 hour 06:00 hour) 7. -
Page 22: Function Code 46 Firmware Version
Q9VOIP SERIES MANUAL 2. Enter 45 then # 3. Enter relay 1 (door 1) then press # then press # or relay 2 (door 2) then press #, then press # Function Code 46 Firmware Version To check the system's firmware version Log-in to programming 2. -
Page 23: Function 50: Erase Memory To Factory Default
Q9VOIP SERIES MANUAL 3. Editing an Access Code click here Editing a Temporary Code, click here Editing a Special code, then click here Function Code 50 Erase Memory to Factory Default Warning: This function code will erase the memory to factory default, no way to restore them unless the database has been saved in the computer. Log-in to programming 2. -
Page 24: Opening Door Using Card, Temporary Card, And Special Card
5.4 Opening Door Using Card, Temporary Card, and Special Card The Quantum Q9000VOIP Series has built-in card reader. The door can be access using UFOB, UCLAM or UISO. Card Standard Operation is used to open the door and door will be closed automatically, see... - Page 25 Q9VOIP SERIES MANUAL file:///C|/PACH-CO.COM-2022-B/online_manual/q9000voip_manual.htm[4/27/2022 8:57:08 AM]...
Need help?
Do you have a question about the Q9000VOIP Series and is the answer not in the manual?
Questions and answers