Table of Contents
Advertisement
Quick Links
Advertisement
Table of Contents
Troubleshooting

Related Manuals for MEND Technology IS02PROs


Summary of Contents for MEND Technology IS02PROs
- Page 1 MEND Professional (IS02PROs) User’s Manual Ver 2.7, 2021.8.5...
- Page 2 Phone: 503-594-4045 Fax: 503-594-4046 © 2021 MEND Tech, LLC. All rights reserved. MEND Technology and the logo are the trademarks of MEND Tech, LLC. Trademarks or registered trademarks are the property of their respective holders. Software and specifications are subject to change without...
-
Page 3: Table Of Contents
Table of Contents 1 Introduction ......................5 1.1 Indications ...................... 6 1.2 Warning and Contraindications ..............6 1.3 Adverse Effects ....................7 1.4 Precautions and Safety Notices ..............7 1.5 Warranty and Service ..................9 2 MEND Professional Device and Accessories ........... 10 2.1 Top Panel and Keypad ................. - Page 4 Make Run Time Changes ................22 Change CH1 & CH2 Frequencies, Current Intensity ......... 22 Change Polarity, Waveform, Run Time ............22 HOLD, SKIP, STOP ................... 23 Batch Protocols ....................23 Manual Run Mode ..................25 Getting to Manual Mode ................25 Change Frequencies, Current, Polarity ............
-
Page 5: Introduction
The MEND Professional is the most advanced two channel programmable transcutaneous electrical nerve stimulator or "TENS" device currently available. MEND Technology is a leading distributor of state-of-the- art medical devices. The MEND Professional is a high-end precision medical device used for the relief of pain. -
Page 6: Indications
1.1 Indications The MEND Professional is intended for the symptomatic relief of chronic intractable pain. The degree of efficiency will vary with patient selection. 1.2 Warnings and Contraindications • Microcurrent stimulation should not be used on patients whose pain syndromes are not diagnosed and etiology is not established. If another electrode is used as a dispersive electrode, placement of the dispersive electrode should ensure transthoracic stimulation is not possible. -
Page 7: Adverse Effects
• Electronic monitoring equipment such as ECG monitors and ECG alarms may not operate properly when Inspirstar IS02 PMS is in use. • Simultaneous connection of a patient to a high frequency surgical medical equipment may result in burns at the site of the IS02 PMS electrodes and possible damage to the IS02 PMS. - Page 8 1.5 Warranty and Service The MEND Professional has a one-year limited warranty. MEND Technology warrants that the Product is manufactured by Inspirstar Inc in accordance with the specifications. There is no warranty of merchantability nor of fitness for a particular use.
-
Page 9: Warranty And Service
Lead wires have a limited warranty of 3 months. The lead wires may need to be returned to the manufacturer for replacement. To replace products or obtain service, first call your doctor or MEND Technology. If necessary, send the entire unit with the carrying case and accessories, insured, postage prepaid, and well-packaged, along with the Return Merchandise Authorization (RMA) number obtained from MEND Technology. -
Page 10: Mend Professional Device And Accessories
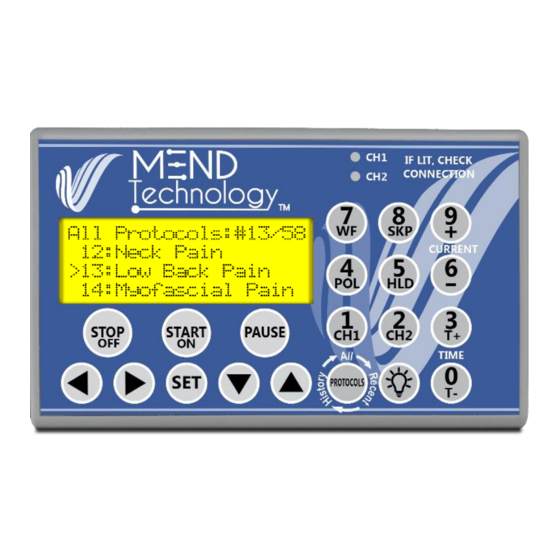
2 MEND Professional Device and Accessories 2.1 Top Panel and Keypad ② ① ⑧ ③ ④ ⑦ ⑥ ④ ⑤ Figure 1 Top Panel ① Display Area: Menu selection, protocol information, running information and status, etc. are displayed on LCD screen. ②... - Page 11 • Key STOP to stop the protocol in running, or to turn off MEND IS02PROs. ④ Arrow Keys: • Left Arrow: Back to previous menu level; or move cursor to left. • Right Arrow: Enter menu selection; or move cursor to right.
-
Page 12: Rear Panel
2.2 Rear Panel Micro USB connection to PC Combined Channel Jacks: Refer to user’s manual for safety cautions. Positive Jack +: Positive leads of CH1 and CH2 Negative Jack -: Negative leads of CH1 and CH2 Separated Channel Jacks: (Use with probes) CH1 Jack: positive and negative of CH1 CH2 Jack: positive and negative of CH2 Figure 2 MEND Professional... -
Page 13: Microcurrent Output Ports
Microcurrent Output Ports Output Ports Plugs Connection Connector CH2+ Positive Combined Channel Output Ports Jack (+) Ring CH1+ Yellow CH2- Blue Negative Jack(-) Ring CH1- Green CH1+ Separated Channel Output Jacks Jack Ring CH1- Yellow CH2+ Blue Jack Ring CH2- Green Table 1 Color Mapping of Output Ports to Wire Connectors... - Page 14 Combinable Leadwires Carrying Case Sticky pads Conductive Strip Alligator Clips...
-
Page 15: Operations
3 Operations 3.1 Prepare for Running The MEND Professional device can be used inside or outside the soft back carrying case. There are two Velcro strips attached inside the soft back carrying case. Install Batteries The MEND Professional device uses two alkaline batteries in size “AA”. -
Page 16: Connect Wires To Gloves, Strips Or Electrodes
Connect Wires to Gloves, Strips or Electrodes Insert the push pins on gloves, strips, alligator clips or electrodes. Refer to your Frequency Specific Microcurrent (FSM) training instructions on where to place the electrodes, gloves, towels or strips on the body. Gloves, towels, and strips need to be wet to provide conduction. -
Page 17: Basic Operations
3.2 Basic Operations Power ON Press START/ON to power on the unit. The Power-On Initial Screen displays the protocol number of last run protocol. Press START to run this last used protocol. All, Recent, History or Batch Protocols All Protocols lists all protocols in user programmed profile. Recent Protocols lists the protocols that were recently used. -
Page 18: Select A Protocol
To switch between All Protocols, Recent Protocols, History and Batch Protocols: press the Protocols key to cycle between the four protocol list screens. Select a Protocol There are a number of preloaded therapy protocols in the MEND Professional device. Select by protocol number: from Power-On Screen, or from All Protocols screen, press the protocol number with the numeric keys. -
Page 19: Protocol Details
Protocol details: Press the RIGHT arrow key to see the details of the protocol. Use the UP/DOWN keys to scroll the screen to view the full details of the protocol. Protocol details include: • Name • Description • Time • # of frequency pairs •... -
Page 20: Stop The Therapy Protocol
Stop the Therapy Protocol You can press the STOP key to stop running a protocol at any time. If you accidently press STOP, you can restart the protocol and skip to the last frequency pair you were running. Turn on the Back Light To turn on the back light: press the lightbulb key to turn on the LCD back light. -
Page 21: Advanced Operations And Display Information
3.3 Advanced Operations and Display Information Protocol Running Information and Status When a protocol is running, the screen will display the protocol information and status. Protocol number and name Output channel frequencies Waveform name Output current ± polarity intensity (μA) Total frequency pair numbers and Remaining time for the running remaining time... -
Page 22: Make Run Time Changes
Make Run Time Changes To change CH1 frequency: Press CH1, the edit cursor will jump to CH1 frequency value. Then enter the digits of the new frequency value. For example, to enter frequency 970 Hz, press CH1, 9, 7, 0, 0 and SET. To change CH2 frequency: Press CH2, the edit cursor will jump to CH2 frequency value. -
Page 23: Hold, Skip, Stop
frequency pair. Press HLD again to resume the timer. To SKIP current frequency pair: press SKP key to skip the current frequency pair and move to next frequency pair. To LOCK the keypad when running a protocol to avoid accidental change or stop of the protocol, press both the LEFT and RIGHT keys, a lock sign will appear that indicates the keypad is locked. - Page 24 Select from other protocols: Press Protocols key to rotate between All Protocols, Recent Protocols and History Protocols. Enter a protocol number using number keys or use UP/DOWN arrows to select a protocol. See Select a Protocol on page 18. Assign a protocol to the slot: press START key to assign the protocol to the slot.
-
Page 25: Manual Run Mode
Manual Run Mode Manual Run Mode is the mode to run a frequency pair with any parameters programmed directly from keypad. The new value will be applied on the microcurrent output in 3 seconds after SET. To go into Manual Run Mode: press Back key to Main Menu and use UP/DOWN to select Manual Run Mode and press RIGHT arrow to enter into... -
Page 26: Change Waveform, Period, Timer
To change waveform: Press WF key to rotate the list of predefined waveforms. Use UP and DOWN arrow to scroll forward or backward the waveforms. To change period: Press SET key multiple times until the edit cursor has moved to the digits for period, then enter the numbers or UP and DOWN to change the digits of number. -
Page 27: To Turn On/Off Protocol End Beeping
To turn ON/OFF protocol end beeping: press SET key multiple times until the edit cursor has moved to the ON/OFF setting of protocol end beeping, use UP/DOWN to change the value. Press Enter again when the new value is set. To change output drive voltage: press SET key multiple times until the edit cursor has moved to the setting of the... -
Page 28: Low Battery Indication
Low Battery Indication Low battery will be indicated on startup screen and on protocol running screen. You can continue to use the IS02 but the machine may shut down unexpectedly any time. On startup screen: On protocol running screen... -
Page 29: Maintenance & Troubleshooting
Separate the touch of the two pins. The CH2 LED should start to flash to indicate that the continuity is broken. Stop using the IS02 device if the leadwires or unit failed the above inspection and contact MEND Technology for recommendations. -
Page 30: Sanitizing
Sanitizing Clean and disinfect the IS02 main device, the leadwires and reusable accessories and electrodes at least once a week or between uses. To sanitize the IS02 main device, wipe the device with non-dripping cotton balls or sanitizing wipes with germicide or alcohol. It would be safe to wipe the faceplate (keypad), display (LCD screen) and the whole enclosure if the wipe does not drip. -
Page 31: Troubleshooting
Internal failure. Change with new batteries No LCD display and 3 short and try again. If problem persists, contact beeping sound MEND Technology for services. LCD displays “Low Battery” Change to new batteries. The contact from MEND Professional CH1/CH2 LEDs flashing or the skin may be lost. -
Page 32: Technical Manual
5 Technical Manual 5.1 Technical Specifications Carrier Frequency Frequency Range: 0.1 Hz to 999.9 Hz programmable Frequency Accuracy: 0.1 Hz to 99.9 Hz: +/-0.1% 100.0 Hz to 499.9 Hz: +/-0.3% 500.0 Hz to 999.9 Hz: +/-.5% Frequency Waveform: Square pulses Frequency Duty Cycle: 0.1 Hz to 99.9 Hz 49% ~ 51% 100 Hz to 499.9 Hz... - Page 33 Output Connector: 2x 2.35mm jacks for combined ports 2x 2.35mm jacks for separated ports Timer Timer: Up to 18 hours for each frequency pair Timer Accuracy: +/- 0.2% Protocols Number of Protocols: Up to 999 programmable Frequency Pairs: Up to 28000 frequency pairs, limited by memory size and complexity of the protocols General Power Supply:...
-
Page 34: Protocols And Frequency Pairs
* Wait for at least 10 minutes before use from the extreme non-operating temperature. 5.2 Protocols and Frequency pairs MEND IS02PROs provides preloaded protocols and can store up to 999 customer protocols. Long descriptions for each protocol can impact the number of protocols the customer can load. - Page 35 No. Protocol Name Time Description Full body pain. Treat spinal cord. Positive polarity. Body Pain 16 min Place positive on neck and negative on feet. Arthritis Pain in Joints 20 min Treat Arthritis pain in any joint. Improve overall activities to treat pain, nerve shock Overall Activity 21 min and increase vitality.
-
Page 36: Waveform Description
5.3 Waveform Description The output from MEND IS02 unit is current pulses. The waveform and parameters are illustrated in Figure 3. Both channels have the parameters marked on the CH1 waveform (at the top). Frequency of the carrier, also called chopper frequency. Therapy time in minutes, programmable from 1 minute to 60 minutes for each frequency pair. - Page 37 100% of the period of the envelope. When a period has 0% duty, the period will be eliminated. K0: Off period, there is no output current at this period, or i=0. K1: current ramp up period, current ramps up to the peak current intensity I from 0 μA.
- Page 40 MEND Technology 10117 SE Sunnyside Rd, Suite F40 Clackamas, OR 97015 (Toll-free) 855.445.3971 (Direct) 503.594.4045 (Fax) 503.594.4046 www.MENDTechnology.com support@mendtechnology.com © Copyright 2021 MEND Tech, LLC. All rights reserved...
Need help?
Do you have a question about the IS02PROs and is the answer not in the manual?
Questions and answers