
Related Manuals for OKM ROVER UC


Summary of Contents for OKM ROVER UC
- Page 1 INTRODUCTION TECHNICAL SPECIFICATIONS CONTROL ELEMENTS ASSEMBLY & PREPARATION OPERATING MODES OKM ROVER UC MANUAL FILE TRANSFER...
- Page 2 This documentation is available "as presented" and without any kind of warranty. In no circumstances OKM takes responsibility for lost profits, usage or data losts, interruption of business activities or all kind of other indirectly damages, which developed because of errors in this documentation.
-
Page 3: Table Of Contents
3.1 TELESCOPIC PROBE ..................9 5.6.6 Length Unit ....................27 3.2 ANDROID SMARTWATCH ................10 5.6.7 Activation ....................28 3.3 ROVER UC APP SCREEN OVERVIEW ............11 5.6.8 Update ....................... 29 3.3 BLUETOOTH HEADPHONES ...............11 5.7 INFORMATION ..................... 29 4 ASSEMBLY AND PREPARATION ...........13... -
Page 4: Introduction
Please take your time to read this User Manual and familiarize yourself with the operation, func- tionality and how to utilize the Rover UC. We also offer training for OKM equipment in our head- quarters and on-site. We strive to maintain a worldwide dealer network for assistance and sup- port. -
Page 5: Important Notes
• atmospheric conditions (electrical storms, lightning, etc.). Being an electronic device, the Rover UC has to be treated with caution and treated with care as 1.3 MAINTENANCE AND SERVICES with any electronic device. Any failure to observe the safety precautions given or any use for pur-... -
Page 6: Danger Of Explosion During Excavation
• When shipping, use the original heavy-duty container (Protection case) and provide sufficient The Rover UC is a sturdy instrument, but it is not designed to withstand abuse. In caring for your padding around all parts. ground scanner, there are several important DOs and DON‘Ts to remember: •... -
Page 7: Technical Specifications
2 TECHNICAL SPECIFICATIONS The technical specifications are medial values. During operation slight variations are possible. 2.1 TELESCOPIC PROBE Dimensions (L x W x H) 670 – 1380 x 65 x 80 mm Weight 0.5 kg Input Voltage (max) 5 V DC, 2 A 3 h @ 10 –... -
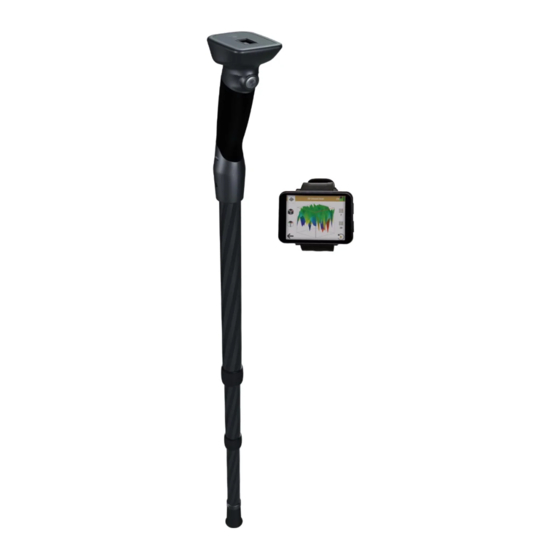
Page 8: Control Elements
3 CONTROL ELEMENTS In this section you learn more about the fundamental use of all control elements for this measur- ing instrument. All connections, inputs and outputs are explained in detail. CONTROL ELEMENTS Telescopic Probe Smartwatch 8 / 34... -
Page 9: Telescopic Probe
Telescopic Rod: The Telescopic Rod can be extended or collapsed according to the user's height. To make it easier to transport the Rover UC, you can completely collapse every single section. Charging Minidisplay: The Minidisplay shows indications of the battery status and compass at any time while operating the detector. -
Page 10: Android Smartwatch
3.2 ANDROID SMARTWATCH The Rover UC must be operated with an Android device by using the OKM Rover UC App. The standard delivery scope of the Rover UC already includes a pre-configured Android Smartwatch. Button B Button A Button A... -
Page 11: Rover Uc App Screen Overview
3.3 ROVER UC APP SCREEN OVERVIEW 3.3 BLUETOOTH HEADPHONES The Rover UC can be operated with any Bluetooth headphones available on the market. Your Rover UC already includes Bluetooth headphones. Selected language Toggle Activity Screen / Selected Return to Main Menu... - Page 12 ASSEMBLY & PREPARATION 12 / 34...
-
Page 13: Assembly And Preparation
Please follow these instructions to assemble your detector and get ready for your first scan. Make sure to recharge the internal battery of Push the Trigger to power on the detector. The Start the OKM App on the Smartwatch Release the lock by turning the grip clockwise. Trigger LED turns... -
Page 14: Operating Modes
The detector is controlled by a Smartwatch (alternatively Smartphone) with pre-installed OKM Rover UC application. Power on the Smartwatch and select the OKM Rover UC App icon by tapping on it. The application will start and display the main menu. -
Page 15: Pedometer Reset
Compass Calibration Compass Calibration Calibration successful! Calibrating ... After clicking on the icon, the Rover UC App Rotate very slowly around your own axis After finishing your 360° rotation, press the As soon as the calibration is completed, the will start the calibration. -
Page 16: Ground Scan
Select Default to use the preset parameters that we recommend for fast scans: Field Length: Auto | Impulse Mode: Automatic | Scan Mode: Parallel Start the OKM Rover UC App and select the operating mode 3D Ground Scan from the main menu. - Page 17 Confirm your settings by pressing Start Scan. The Bluetooth connection to the detector will As soon as the Bluetooth connection is be established automatically. established, the App is ready to record the first scan line. As soon as the Bluetooth connection is established successfully, the Trigger LED Continue with section 5.2.2 Performing a 3D...
-
Page 18: Performing A 3D Ground Scan
5.2.2 Performing a 3D Ground Scan After all parameters have been adjusted, the Rover UC App is ready to start the first scan line. Go to your starting point of the first scan line and press the Trigger on the Probe. - Page 19 Scan Modes Parallel and Zigzag Read more about the scanning procedure in the "3D Ground Scan Guide" (see infobox on page 33) If you have selected the Scan Mode Parallel, all scan lines head into After finishing and saving your 3D Ground Scan, you can view your scan image directly on the the same direction.
-
Page 20: Magnetometer
The fewer small metal items in the soil, the deeper you can detect targets with 3D Ground Scan. 5.3.1 Performing a Magnetometer Scan In this operating mode all measured data will be directly displayed in the OKM Rover UC App. 90°... -
Page 21: Performing A Ground Balance
Move slowly forwards, backwards and to the sides, but avoid turning the probe. The probe should always point vertical to the ground. DO NOT pivot, swing or rotate it. 5.3.2 Performing a Ground Balance You may perform a Ground Balance if: •... -
Page 22: Pinpointer
3D Ground Scan you can determine the position of a located object. 5.4.1 Performing a Pinpointer Scan In this operating mode all measured data will be directly displayed in the OKM Rover UC App. 90° Power on the detector and the Smartwatch. Start... -
Page 23: Performing A Ground Balance
5.4.2 Performing a Ground Balance You may perform a Ground Balance if: • you get any target indications right at the start even though you do not move the probe or Non-ferromagnetic metals • your signal becomes unstable while scanning. Non-ferrous targets have a pure Press to perform a Ground Balance. -
Page 24: File Explorer
6 FILE TRANSFER on page 30 Power on the detector and the Smartwatch. Start Browse all saved scan files with the Rover UC App and select File Explorer. The number of available scan files is indicated on the right. Delete Scan File... - Page 25 The replay will show you the complete scan Replay your measurement by tapping on Switch to Perspective View by tapping on generated line by line. or rotate and scale individually with intuitive finger gestures (pinch / drag). 25 / 34...
-
Page 26: Settings
Length Unit • Activation • Update Volume Settings of the Rover UC Operating Modes with acoustic feedback must be adjusted via the Smartwatch Settings! 5.6.1 Language The Rover UC can be used in different languages to sim- plify the handling. -
Page 27: Vibration
5.6.3 Vibration 5.6.5 App Theme Toggle between the App Themes Toggle between ON and OFF. Day Mode and Night Mode. The operating modes 3D Ground Scan and Day Mode is very useful on sunny days and in bright Magnetometer provide a haptic feedback (vibration) environments. -
Page 28: Activation
5.6.7 Activation If you have received a QR Code from OKM for Use the Smartwatch camera to scan the QR an automatic activation, select QR Code. Code that comes with the detector. The OKM Rover UC App is usually pre-confi- gured on the included Android device. -
Page 29: Update
This section shows information concerning the detector: • App Version / Telescopic Probe Firmware • Serial Number • OKM contact information Confirm the Activation by pressing If the activation failed, please try again and make sure that all entered data are correct. 29 / 34... -
Page 30: File Transfer
6.1 PAIRING BLUETOOTH Prior to transferring scan data to the Visualizer 3D Studio software for the first time, your comput- er's Bluetooth must be paired with your OKM Rover UC App. Power on the Smartwatch. Start the Rover UC After starting the transfer, the App wants to es- App and select File Explorer. - Page 31 In the "Add Bluetooth or other device" dialog select Scroll down in the dialog window and Bluetooth and OKM Rover UC. In order to connect, select More Bluetooth options. confirm the PIN: Make sure your device is powered on. 1. Click Pair on the Smartwatch.
-
Page 32: Importing Scan Data
Main Toolbar. with Visualizer 3D Studio. Tap on to start transferring scans. When pairing the Rover UC App for the first time, please make sure you have processed the steps in section 6.1 PAIRING BLUETOOTH on page 30... - Page 33 Documentations: You can mark the checkbox "Delete all ..." if you want to delete all transferred scan files from the Rover UC Tutorials and Trainings device after transfer. www.okmdetectors.com/blogs/videos-tutorials/tagged/rover-uc-2022 OK to finish the import.
- Page 34 OKM GERMAN DETECTORS Based in Altenburg, Germany, we are developing and manufacturing geophysical detectors since 1998. Our unique detection technology helps to visualize buried objects and structures. OKM GmbH Julius-Zinkeisen-Str. 7 | 04600 Altenburg | Germany +49 3447 499300 0 +49 162 419 2147 info@okmdetectors.com...
Need help?
Do you have a question about the ROVER UC and is the answer not in the manual?
Questions and answers