Table of Contents
Advertisement
Quick Links
Raspberry PI Developer Board
Model: XPI-S905X2
User's Guide
Thank you for purchasing this Geniatech product.
.Before using it, be sure to read the precautions contained in this User's Guide.
.Keep the User's Guide in a safe place for future reference.
.For the most up-to-date information about this product, visit official website at
http://www.geniatech.com
1
Advertisement
Table of Contents

Related Manuals for Geniatech XPI-S905X2


Summary of Contents for Geniatech XPI-S905X2
- Page 1 Raspberry PI Developer Board Model: XPI-S905X2 User’s Guide Thank you for purchasing this Geniatech product. .Before using it, be sure to read the precautions contained in this User’s Guide. .Keep the User’s Guide in a safe place for future reference.
-
Page 2: Table Of Contents
Contents 1. Safety Information ....................3 1.1 Warning ......................3 1.2 Precautions ......................3 1.3 Handling Cautions .................... 4 2. Introduction ......................5 2.1 Package Contents ....................5 2.2 Product Features....................5 2.3 Panel Introduction ..................... 6 2.4 Power Up ................错误!未定义书签。 3. -
Page 3: Safety Information
1. Safety Information Read and understand all instructions before using this product. If damage is caused by failure to follow the instructions, the warranty does not apply. 1.1 Warning To reduce the risk of electric shock, DO NOT remove the cover (or back). DO NOT attempt to repair the product, this could lead to the risk of injury, damage to the product . -
Page 4: Handling Cautions
1.2.9 Protect the power cord from being walked on or pinched particularly at plugs, convenience receptacles, and the point where it exits the apparatus. 1.2.10 Only use attachments/accessories specified by the manufacturer. 1.2.11 Use only with the cart, stand, tripod, bracket, or table specified by the manufacturer, or sold with the apparatus. -
Page 5: Introduction
2. Introduction 2.1 Package Contents Amlogic S905X2 Developer board - XPI-S905X2 User’s Guide HDMI Cable Optional Remote Controller 2.4G wireless Remote Controller USB wire/wireless Mouse & Keyboard Power Adapter, Input: AC100 ~ 240V, 50/60Hz, Output: 5V/2A 2.2 Product Features •... -
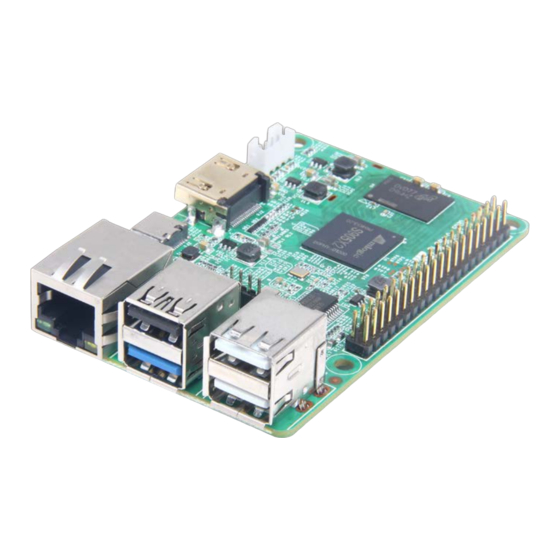
Page 6: Panel Introduction
2.3 Interface Introduction... -
Page 7: Power Up
2.4 Power Up 2.4.1 After power up, the TV will first show Android logo,Then four circles loading. When finished, it will go to Home screen. 2.4.2 Home Screen display. 3. Settings Select icon,you can choose the button ‘Display’,‘HDMI CEC’,‘Audio Output’,‘Powerker definition’,‘Picture’ as your needs. -
Page 8: Wifi
Or fail to connect and need reset password. Once build up the connection with a certain WiFi network successfully, XPI-S905X2 will connect this WiFi network automatically when restart. Note: If factory reset, the password of WiFi network have to be reset. - Page 9 3.1.2 WiFi Hotspot If you want to share WIFI with your friends, you can set the Portable hotspot here, set the wi-fi password, and turn on the hostpot switch for transmission.
-
Page 10: Bluetooth
3.2 Bluetooth Connected devices--Bluetooth setting 3.3 Ethernet Network&internet---Ethernet---Setting Interface(shown picture) -
Page 11: Sound
3.4 Sound Select icon,then press ‘More settings’ ,and find the sound button 3.4.1 Media Volumes and Alarm volume Increase or decrease sound volumes 3.4.2 Touch Sounds If enable Touch sound, sound will be heard while move remote controller. 3.4.3 Default notification sound and Default alarm sound The type of the sound can be setting in this part. -
Page 12: Screen Saver
3.5.2 Font size Change the font size of OSD.,Make the text on screen smaller or larger 3.6 Screen saver Select icon,then press ‘More settings’ ---‘Display’---‘Screen saver’. Interface Settings:can set the clock, color, theme, page photos. -
Page 13: Storage
3.7 Storage Shows the storage used of the OS and SD card. -
Page 14: Apps
3.8 Apps List all apps installed. You can choose an application and force to shut down the app, uninstall the app, clear user data, move to SD card and clear cache data. 3.9 Google Select icon,then press ‘More settings’ ,and find the Google button. -
Page 15: Apps & Notifications
3.10 Apps & Notifications Select icon,then press ‘More settings’ ,and find the ‘Apps & Notifications ‘button. 3.11 Location Select icon,then press ‘More settings’ ,Security & Location ---Location . -
Page 16: Security
3.12 Security Select icon,then press ‘More settings’ ,find the ‘Security & Location’ button and the security setting interface will shown. 3.13 Language & input Select icon,then press ‘More settings’ , ‘System’ --- ‘Languages&input’ --- bellow is the shown interface . Change OSD language and input method. -
Page 17: Reset
The default input method is android standard keyboard. 3.14 Reset Select icon,then press ‘More settings’ , ‘System’ --- ‘Reset options’ --- bellow is the shown interface . Factory data rest: You can reset all the settings and apps to factory default. Note: You might want to backup important data before resetting the box. -
Page 18: Add An Account
3.16 Account Select icon,then press ‘More settings’ ,find the Accounts button. -
Page 19: Date & Time
3.17 Date & time Select icon,then press ‘More settings’ , ‘System’ --- ‘Date&time’ --- bellow is the shown interface . 3.18 Wallpaper ‘Display’---‘Wallpaper’. “Users can choose wallpaper photos from albums and historical wallpapers according to their preferences. -
Page 20: About Device
3.19 About device. Select icon,then press ‘More settings’ ---‘System’ --- ‘About device’ 3.20 Display Setting Select icon,you can choose the button ‘Display’. User can set the screen position, display resolution,HDR to SDR,SDR to HDR in this part. -
Page 21: Hdmi Cec
3.21 HDMI CEC Select icon,you can choose the button ‘HDMI CEC’. User can set the CEC Switch, One key play,One key power off, Auto change language in this part. 3.22 Audio Output Select icon,you can choose the button ‘Audio Output’. User can set the Dolby and Audio Format in this part. -
Page 22: Powerker Definition
3.23 Powerker definition Select icon,you can choose the button ‘Powerker definition’. User can set the power mode in this part. 3.24 Picture Select icon,you can choose the button ‘‘Picture’. User can set the Picture mode, Custom Settings,DNR, Backlight in this part. -
Page 23: Apps Install & Uninstall
4. Apps Install & Uninstall On XPI-S905X2, you can install apps from Android Market over the Internet or other sources, such as other online sources, the internal storage and the USB storage device and SD card that you have mounted onto XPI-S905X2. -
Page 24: Specification
We will provide you with the amount of the administration fee before we make a home visit or begin any work on your player. We recommend you read this manual throughly, search for a solution on line at www.geniatech.com, or contact Geniatech Customer Care before seeking to repair your player. 8.Specification Quad Core ARM Cortex-A53 CPU up to @ 2.0GHz... -
Page 25: Trademark Notice
Multiple language and multiple format sub-title video support MJPEG and JPEG unlimited pixel resolution decoding (ISO/IEC-10918) Supports JPEG thumbnail, scaling, rotation and transition effects Supports *.mkv,*.wmv,*.mpg, *.mpeg, *.dat, *.avi, *.mov, *.iso, *.mp4, *.rmand *.jpg file formats Size 85*56 mm 9.Trademark Notice The terms HDMI and HDMI High-Definition Multimedia Interface, and the HDMI Logo are trademarks or registered trademarks of HDMI Licensing LLC in United States and other countries.
Need help?
Do you have a question about the XPI-S905X2 and is the answer not in the manual?
Questions and answers