Table of Contents
Advertisement
Advertisement
Table of Contents

Related Manuals for Stiegelmeyer Libra


Summary of Contents for Stiegelmeyer Libra
- Page 1 Instruction Manual Care Bed Libra Last updated: 09-12-2021 294236_V1...
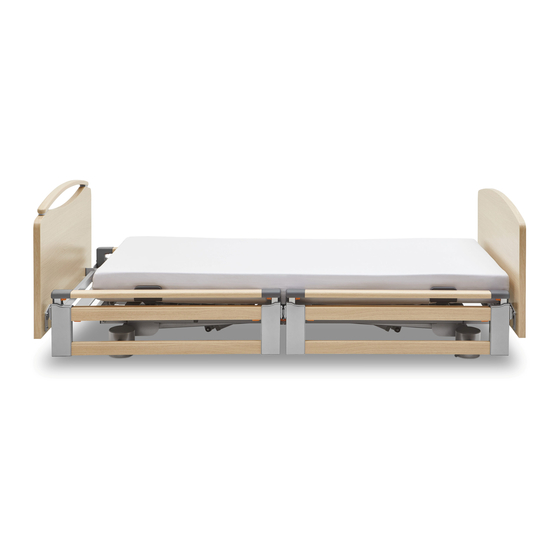
- Page 2 Instruction Manual for Libra Care Bed Libra care bed Similar to illustration! In this instruction manual, numbers and letters that appear in round brackets () and bold type refer to the care bed’s operating devices as shown in this and the following images.
- Page 3 “Vario Safe system” split safety side (telescopic, on both sides) “Easy-floor-access” double castors (head and foot end) (individual axle braking) Libra beds can also be supplied without safety sides. Refer to chapter 4.5.6 for more information about this Page 3...
- Page 4 Instruction Manual for Libra Care Bed Libra – movo variant Item Description Central locking - only operated at foot end 100 mm double castors Page 4...
-
Page 5: Table Of Contents
Instruction Manual for Libra Care Bed Contents FOREWORD ........................7 GENERAL INFORMATION ....................8 2.1 Definition of the groups of persons involved ........... 9 2.2 Safety information ..................10 2.2.1 Explanation of the safety symbols used ..........10 2.2.2 Safety information for the operator ............11 2.2.3... - Page 6 Instruction Manual for Libra Care Bed 4.5.6 Variant - without safety sides * ............76 4.5.7 Comfort mattress base - 90 cm width (optional) ........77 4.5.8 Comfort mattress base - 100 cm width (optional) ........ 78 4.6 Inserting the mattress ................... 79 CLEANING AND DISINFECTION ..................
-
Page 7: Foreword
It is a practical reference book and should be kept close to hand at all times. Even after you have purchased a bed, Stiegelmeyer is still on hand to help at any time. Our Service business division can provide you with customised solutions in all matters relating to inspection and maintenance, repair and process optimisation. -
Page 8: General Information
Instruction Manual for Libra Care Bed 2 General information The Libra care bed is simply referred to as the 'bed' or 'care bed' in this instruction manual. In addition to the standard functions of the bed, this instruction manual also describes optional functions and special bed equipment which might not apply for the model that you have selected. -
Page 9: Definition Of The Groups Of Persons Involved
In this instruction manual, the following groups of persons are defined as: Operator The operator (e.g. nursing homes operators) are all natural and legal persons with property rights to the Libra care bed. The operator is responsible for the safe operation of this medical device. Users Users (nursing staff, carers, attendants etc.) are persons who, based on their... -
Page 10: Safety Information
Instruction Manual for Libra Care Bed 2.2 S AFETY INFORMATION At the time of leaving the factory, this bed represents state-of-the-art technology. • Only use the bed if it is in perfect working order. The most important objective of the safety information is to prevent personal injuries. -
Page 11: Safety Information For The Operator
• Check that your staff are complying with the safety information. • Allergic reactions when using upholstered components Please note: The headboards, footboards and side-panels of the Libra bed can be supplied in the upholstered version according to customer specifications. If the resident is especially sensitive and tends to allergic... -
Page 12: Safety Information For The User
Instruction Manual for Libra Care Bed 2.2.3 Safety information for the user • Route the cable of the switch mode power supply in such a way that it cannot be pulled, driven over or damaged by moving parts when the bed is operated. - Page 13 Instruction Manual for Libra Care Bed Danger of death due to electric shock! • If a damaged cable continues to be used, this can lead to electric shock, fire and other hazards as well as malfunctions. • A damaged cable must be replaced immediately.
-
Page 14: Product Description
Instruction Manual for Libra Care Bed 2.3 P RODUCT DESCRIPTION 2.3.1 Intended use • This bed is designed for positioning and transporting residents, as an aid to diagnosing, monitoring, treating, and alleviating illnesses or compensating for injuries or disabilities. For detailed instructions for use, see chapter 9.7 •... -
Page 15: Side Effects
100 cm (depending on model) • Electrical height adjustment range for mattress base: approx. 25 to 80 cm (for Libra – movo variant approx. 28 to 83 cm) • Electrical thigh rest adjustment from 0° to approx. 40° • Electrical backrest adjustment from 0° to approx. 70°... -
Page 16: Special Electrical Equipment (Optional)
– Eight castors: With Libra – access Plus variant, lockable in pairs – Thanks to its deep venting slits, the removable polypropylene hygiene mattress base is also highly breathable. -
Page 17: Materials Used
The chassis is constructed from welded steel tubing with an optimised scissor lift design and is equipped with four castors (optionally with 8 castors for the Libra – floor access Plus variant) which can all be locked in pairs on the foot and head end. -
Page 18: Putting Into Service
Instruction Manual for Libra Care Bed 3 Putting into service No electrical measurements are necessary prior to putting this bed into service for the first time, since the bed has been tested by the manufacturer for electrical safety and functionality and left our factory in perfect condition. -
Page 19: Checklist: Inspection By The User
Instruction Manual for Libra Care Bed 3.1 C HECKLIST NSPECTION BY THE USER Description Check of defect WHAT ? HOW ? Visual inspection of the electrical components Handset Damage? Handset cable Damage, cables routed away from moving parts? Switch mode power supply... -
Page 20: Location Requirements
Instruction Manual for Libra Care Bed 3.2 L OCATION REQUIREMENTS • There must be sufficient room available to accommodate the bed’s entire range of adjustments. Furniture, window sills, must not be in the way. • Before using the bed on parquet flooring, check whether the castors could leave marks on the parquet varnish. - Page 21 Instruction Manual for Libra Care Bed • If any other additional equipment is attached to the bed, (e.g. compressors for positioning systems, etc.), ensure that this is securely fastened and is functioning properly. Pay special attention here to the safe routing of all loose connector cables, tubing, etc.
-
Page 22: Operation
• The bed is not suitable for being moved often and over long distances outside the room in corridors, across thresholds or on very uneven floors (except for Libra – movo variant, as the chassis is equipped with larger castors). -
Page 23: Individual Axle Braking (Standard)
Instruction Manual for Libra Care Bed 4.1.1 Individual axle braking (standard) Operate the castors, one set after the other, on either side at the head or foot end of the bed. This Move allows the castor sets at each end of the bed to be operated with one lever. -
Page 24: Mechanical Adjustment Options
Instruction Manual for Libra Care Bed 4.2 M ECHANICAL ADJUSTMENT OPTIONS 4.2.1 Lower leg rest (LR) The lower leg rest can be raised and lowered manually when the thigh rest is raised It is possible to adjust the bed to an orthopaedic (stepped bed) position or so that the lower leg rest is sloping downwards. -
Page 25: Manual Cpr Release Of The Backrest
Instruction Manual for Libra Care Bed Lowering the lower leg rest using the handset If the thigh rest is lowered using the handset, the lower leg rest is automatically lowered as well. Raising the lower leg rest using the handset If the thigh rest is raised using the handset, the lower leg rest is automatically moved as well and locks into place in several intermediate positions. - Page 26 Instruction Manual for Libra Care Bed • The motor is now disconnected from the backrest • Put the motor down on the bed frame. • After the second person has left the danger zone, the first person (with the help of the second person) lowers the backrest carefully.
-
Page 27: Electrical Adjustment Options
Instruction Manual for Libra Care Bed 4.3 E LECTRICAL ADJUSTMENT OPTIONS 4.3.1 Special safety information on the electrical drive system • When making any adjustments to the position of the bed, always ensure that there are no limbs belonging to residents, users, other persons, and especially playing children, that could be trapped underneath the rests or the bed frame. - Page 28 Instruction Manual for Libra Care Bed • Before moving the bed, always make sure that you have unplugged the switch mode power supply from the mains socket. The switch mode power supply must not fall down or touch the floor. Failure to observe this may result in permanent damage to the switch mode power supply.
-
Page 29: Handset (Standard)
Instruction Manual for Libra Care Bed 4.3.2 Handset (standard) The electrical bed functions can be activated by the resident or the user by using the handset. For safety reasons, the handset is equipped with a locking function. Depending on the clinical condition of the patient, the user can lock handset adjustments when deemed necessary by the supervising doctor ( chapter 4.3.4). - Page 30 Instruction Manual for Libra Care Bed 4.3.2.1 Adjustment functions of the standard handset Auto contour Raise: The backrest and thigh rest are raised at the same time. Lower: When lowering, the thigh rest follows the backrest after a five second delay.
- Page 31 Instruction Manual for Libra Care Bed 4.3.2.2 Special functions Switch the under bed light on/off * (optional) Standard setting: The LED under bed light is active when connected to the mains power supply Press the two buttons “Backrest UP” and “Backrest DOWN”...
-
Page 32: Trendelenburg Handset (Optional)
Instruction Manual for Libra Care Bed 4.3.3 Trendelenburg handset (optional) The Trendelenburg handset is optional and is used when using the bed for long-term medical care. 4.3.3.1 Adjustment functions Pressing this button will move the mattress base into the reverse- Trendelenburg position. -
Page 33: Handset Locking Functions
Instruction Manual for Libra Care Bed 4.3.4 Handset locking functions Only users are authorised to operate the locking function! If the clinical condition of the resident is so critical that a particular adjustment using the handset places him/her at risk, then the user must lock this adjustment function immediately. -
Page 34: Attachments And Special Equipment
TTACHMENTS AND SPECIAL EQUIPMENT Optional special bed equipment is indicated by an asterisk (*) . 4.4.1 LED reading light * The Libra bed can optionally be fitted with a reading light. The reading lamp can be supplied in two versions: Version: Sola... -
Page 35: Under Bed Light
Instruction Manual for Libra Care Bed 4.4.2 Under bed light * The energy-saving, long-lasting LED under bed light provides safe orientation during the night and can reduce the risk of falls. The light is sufficiently subtle, however, to not disturb the resident of the adjacent bed. -
Page 36: Patient Lifting Pole
Instruction Manual for Libra Care Bed 4.4.3 Patient lifting pole * The two corners of the mattress base frame at the head end E of the bed are each fitted with a round sleeve with a recess at the top. These sleeves are the location sleeves for the patient lifting pole. -
Page 37: Grab Handle* (Triangular Grab Handle)
Instruction Manual for Libra Care Bed 4.4.4 Grab handle* (triangular grab handle) A grab handle can be attached to the patient lifting pole (accessory, see chapter 8). Residents can use this grab handle to sit up and readjust their position. -
Page 38: Bed Extension (Adaptable)
Instruction Manual for Libra Care Bed 4.4.5 Bed extension (adaptable) * The bed can be fitted with an adaptable bed extension at the foot end which extends the mattress base by approx. 10 cm or 20 cm (if used with full-length and combined safety sides) or by approx. - Page 39 Instruction Manual for Libra Care Bed Check that the bed extension is securely engaged. Install: • the footboard (see chapter 4.4.8 • any side panels (see chapter 4.4.9 • and any safety sides (D) (see chapter 4.5.4 Removal: Proceed in reverse order to the installation process with the only difference: Pull the orange safety lock E...
-
Page 40: Handset Holder (Optional)
Instruction Manual for Libra Care Bed 4.4.6 Handset holder (optional) This bed can be equipped with a handset holder which is simply clipped onto the upper bars of the split safety sides (Vario Safe system) in a place that is convenient to reach from inside the bed. -
Page 41: Removing/Assembling The Headboard/Footboard
Instruction Manual for Libra Care Bed 4.4.8 Removing/assembling the headboard/footboard The headboard and footboard can be quickly removed/assembled without tools to provide easier access to the resident. Use the locking lever attached to the cross tubing to fit/remove the headboard/footboard. - Page 42 Instruction Manual for Libra Care Bed 4.4.8.1 Attachment 1. Standing behind the 2. Insert the locking hooks 1 of the headboard/footboard, firmly grip the adapters into the slits of the cross uppermost corners of the tube 2 as far as they will go and...
- Page 43 Instruction Manual for Libra Care Bed 4.4.8.2 Remove 1. Use a finger to pull the orange safety lock 1 towards the centre of the bed and keep holding it in this position. Page 43...
- Page 44 Instruction Manual for Libra Care Bed 2. Swivel the locking levers 1 (left and right side) downwards Page 44...
- Page 45 Instruction Manual for Libra Care Bed 3. Standing behind the headboard/footboard, firmly grip the uppermost corners of the headboard/footboard with both hands 4 Pull the headboard/footboard straight up and then outwards out of the slits in the cross tube, as evenly as possible...
-
Page 46: Fit/Remove The Side Panels
Instruction Manual for Libra Care Bed 4.4.9 Fit/remove the side panels The bed can optionally be fitted with side panels. A total of four side panels are needed: 2 x long (110 cm) and 2 x short (90 cm). 1x short and 1x long side panel are mounted on each side of the bed. - Page 47 Instruction Manual for Libra Care Bed 2. Attach the side panel for the head end to the long tube (head end) as shown. 3. Place the locking hooks of the adapters 1 into the slits in the long tube as far as they will go .
- Page 48 Instruction Manual for Libra Care Bed 4. Swivel the locking lever 2 (left and right side) upwards and press until it audibly clicks into place. 5. Check that the side panel is firmly in place by jiggling the top edge of the panel to and fro.
- Page 49 Instruction Manual for Libra Care Bed Removal Loosen the locking levers to release the side panels. 1. Use a finger to pull the orange safety lock of the locking lever 1 outwards and keep holding it in this position. 2. Swivel the locking levers 2 (left and right side) downwards...
- Page 50 Instruction Manual for Libra Care Bed 3. Grasp the lower edge of the side panel with both hands. 4. Pull the side panel straight up and then outwards out of the slits in the tube, as evenly as possible. Page 50...
-
Page 51: Safety Sides
Instruction Manual for Libra Care Bed 4.5 S AFETY SIDES The bed has safety sides to protect the resident from falling out of bed. The bed is supplied as standard with full-length safety sides (2) on both sides of the bed. At the customer's request, the bed can be fitted with the following variants of safety sides. -
Page 52: Full-Length Safety Sides (Standard)
Instruction Manual for Libra Care Bed 4.5.1 Full-length safety sides (standard) 4.5.1.1 Raising • At the headboard and footboard, pull the upper bar of the safety side upwards as far as it will go, first at one end and then at the other. The lower bar follows. -
Page 53: Special Safety Information For Safety Sides
Instruction Manual for Libra Care Bed 4.5.2 Special safety information for safety sides Safety sides protect the resident from unintentionally falling out of bed. They are not intended as a device to prevent the resident from intentionally leaving the bed. - Page 54 Instruction Manual for Libra Care Bed The patient’s risk of falling can be reduced: o The smaller and more settled the patient is o The softer the mattress is (the patient sinks deeper into the mattress) • Lock the operating functions for the resident on the handset if the...
-
Page 55: Combined Safety Sides
Instruction Manual for Libra Care Bed 4.5.3 Combined safety sides * Please note the following regarding removed combined safety sides: Danger of trapping and injury for the resident! Failure to heed this warning may result in residents injuring themselves on the safety side guides as they get out of bed if: −... - Page 56 Instruction Manual for Libra Care Bed Position as delivered Safety side raised Raise the safety sides at the head end • Grasp the middle of the top safety side bar and pull the safety side bar upwards as far as it will go. Both ends must audibly click into place.
- Page 57 Instruction Manual for Libra Care Bed Lowering the safety side Before lowering the safety side, make sure that the resident’s limbs are not located within the area of movement of the bars. This prevents the resident from being crushed or sustaining other injuries.
- Page 58 Instruction Manual for Libra Care Bed • Store the central support at the foot end of the bed by sliding it into the special holder 3 underneath the mattress base, as illustrated here. • Slide the centre support in gently as far as it will go.
- Page 59 Instruction Manual for Libra Care Bed Fix the centre support in place • Pull the centre support out of the holder 3 at the foot end of the bed. • Open the cover 2 by hand and hold it firmly.
- Page 60 Instruction Manual for Libra Care Bed Other uses for the centre support If safety sides are not needed (foot end), the centre support can be used as a mobilisation aid. The sturdy centre support helps the resident to get in and out of bed easily.
-
Page 61: Removal/Installation Of The Safety Side (2) And (6)
Instruction Manual for Libra Care Bed 4.5.4 Removal/installation of the safety side (2) and (6) The removal/installation of the full-length (2) or combined (6) safety sides is necessary if the integrated bed extension (optional) is to be pulled out. • To avoid any injuries, removal work may be carried out only when the bed is unoccupied. - Page 62 Instruction Manual for Libra Care Bed 4.5.4.2 Removing full-length safety sides (2) The bars are removed and replaced with longer bars. Proceed as described in chapter 4.5.4.1. Difference: In the case of (2) there is no centre support. 4.5.4.3 Installing combined safety sides...
- Page 63 Instruction Manual for Libra Care Bed Attention! After they have been installed, the bars can fall and cause injuries or damage to property if the release buttons 1 are jammed. − Push and pull the bars to check that they have been locked in place by the release buttons.
-
Page 64: Split Safety Sides
Instruction Manual for Libra Care Bed 4.5.5 Split safety sides * Libra can be fitted with optional split safety sides “Vario Safe system”. Risk of injury due to incorrect installation or storage of split safety sides, headboards, footboards or side panels with the “Vario Safe”... - Page 65 Instruction Manual for Libra Care Bed Attach the side panel at the head end to the long tube Page 65...
- Page 66 Instruction Manual for Libra Care Bed Insert the locking hooks of the adapters into the slits in the long tube as far as they will go, and ensure that the safety side is inserted properly Swivel the locking lever (left and right side) upwards and press until it audibly...
- Page 67 Instruction Manual for Libra Care Bed Check that the safety side is firmly attached by holding it at the lower edge with both hands and rocking it up and down. Repeat steps 1 to 5 with the remaining three sections of the split safety side.
- Page 68 Instruction Manual for Libra Care Bed 4.5.5.2 Combination of split safety side and side panels Risk of injury due to combined installation of split safety side (90 cm wide) and side panel (110 cm wide) Failure to heed this may result in fall injuries for residents.
- Page 69 Instruction Manual for Libra Care Bed 4.5.5.3 Sticker – split safety sides Risk of injury through incorrect installation of split safety sides! Non-observance can lead to entrapment of body parts. Please note: There is a sticker in the middle of the long side of the mattress base frame (see illustration).
- Page 70 Instruction Manual for Libra Care Bed With a bed extension The following is permitted: 2x size 110 cm The following is permitted: 2x split safety sides size 110 cm split safety sides Bed extension approx. 20 cm Without bed extension...
- Page 71 Instruction Manual for Libra Care Bed 4.5.5.4 Covering cap – split safety side Please note: Slits are provided in the frame of the mattress base to accommodate split safety sides or side panels. Two slits are left open when the large safety side/side panel is mounted at the head end and the small one at the foot end and vice versa.
- Page 72 Instruction Manual for Libra Care Bed 4.5.5.5 Removal 1. Use a finger to pull the orange safety lock 1 of the locking lever outwards and keep holding it in this position 2. Swivel the locking lever (left and right side) downwards...
- Page 73 Instruction Manual for Libra Care Bed 3. Grasp the lower bar of the safety side with both hands 4. Pull the safety side straight up and then outwards out of the slits in the tube, as evenly as possible. Page 73...
- Page 74 Instruction Manual for Libra Care Bed 4.5.5.6 Operation The split safety sides can be easily raised or lowered and can be adjusted to various positions. Raising Grasp the top bar 1 with both hands and pull the safety side up as far as it will go.
- Page 75 Instruction Manual for Libra Care Bed Various position options The split safety sides can be positioned as follows: Fully-lowered safety side Top bar raised Fully-raised safety side Angled position of the top bar Page 75...
-
Page 76: Variant - Without Safety Sides
4.5.6 Variant - without safety sides * Libra beds can also be supplied without safety sides if the customer prefers. Should it later be necessary to use a safety side, the bed can easily be fitted with this at a later date. -
Page 77: Comfort Mattress Base - 90 Cm Width (Optional)
Instruction Manual for Libra Care Bed 4.5.7 Comfort mattress base - 90 cm width (optional) When ordered with a bed extension, 5 additional elements are supplied for the Comfort mattress base. The following assembly instructions refer to the 90 cm wide mattress base:... -
Page 78: Comfort Mattress Base - 100 Cm Width (Optional)
Instruction Manual for Libra Care Bed 4.5.8 Comfort mattress base - 100 cm width (optional) When ordered with a bed extension, 5 additional elements are supplied for the Comfort mattress base. The following assembly instructions refer to the 100 cm wide mattress base: Wings of the black elements face outwards 1 . -
Page 79: Inserting The Mattress
Instruction Manual for Libra Care Bed 4.6 I NSERTING THE MATTRESS Place a suitable mattress on top of the mattress base. Please comply with the permissible dimensions and characteristics of the mattress (for mattress dimensions, see chapters 4.5 and 9.1... -
Page 80: Cleaning And Disinfection
Instruction Manual for Libra Care Bed 5 Cleaning and disinfection This bed is not suitable for machine washing or for cleaning in a decontamination unit. The bed is only suitable for manual cleaning and disinfection. To extend the bed’s service life and preserve its operability, always follow the instructions given in this chapter. -
Page 81: Cleaning And Disinfection Plan
Instruction Manual for Libra Care Bed 5.2 C LEANING AND DISINFECTION PLAN • Remove the bed linen and have it laundered. • Clean all surfaces, including the slatted frame and mattress base made of synthetic or metal sections, with a mild and environmentally friendly cleaning agent. -
Page 82: Instructing Users And Staff
Instruction Manual for Libra Care Bed 5.3 I NSTRUCTING USERS AND STAFF In order to ensure that cleaning and disinfection are conducted properly, we recommend that users and staff are appropriately instructed. They should be instructed to observe the following points: •... -
Page 83: Cleaning Of Firmly Upholstered Components
5.4 C LEANING OF FIRMLY UPHOLSTERED COMPONENTS The headboards, footboards and side panels of the Libra bed can be supplied in the upholstered version, with fabric or faux leather upholstery, according to customers' wishes. Any soiling of these components must be removed immediately. - Page 84 Instruction Manual for Libra Care Bed Cleaning method 2 Apply a generous amount of solvent-based cleaning agent to the stain with a soft cloth or sponge. Rinse the area with clean water and dry with a soft cloth. Cleaning method 3 Apply a strong, solvent-based cleaning agent diluted with water (70% water, 30% acetone) with a soft cloth or sponge.
-
Page 85: Cleaning Agents And Disinfectants
• The choice of cleaning agents and disinfectants available on the market may change from time to time. Stiegelmeyer therefore routinely tests the most commonly used materials for compatibility. The most up-to-date list of tested cleaning agents and disinfectants can be obtained on request. - Page 86 Instruction Manual for Libra Care Bed Our customer service centre in Germany: Stiegelmeyer GmbH & Co. KG Ackerstraße 42, 32051 Herford, Germany Phone: +49 (0) 5221 185 - 777 Fax: +49 (0) 5221 185 - 219 Email: service@stiegelmeyer.com Internet: www.stiegelmeyer.com Customers outside Germany can contact our distribution companies in their particular country if they have any questions.
-
Page 87: Handling Cleaning And Disinfection Agents
Instruction Manual for Libra Care Bed 5.6 H ANDLING CLEANING AND DISINFECTION AGENTS • Pay attention to the exact dosage! We recommend the use of automated dosing devices. • Always prepare solutions with cold water in order to avoid the formation of vapours that are mucous membrane irritants. -
Page 88: Maintenance
Instruction Manual for Libra Care Bed 6 Maintenance Legal principles Operators of medical beds in Europe are obliged, in accordance with the new Medical Device Regulation (EU) 2017/745 (MDR) and existing relevant national laws/regulations, e.g. in Germany currently the •... -
Page 89: By The User
Instruction Manual for Libra Care Bed 6.1 B Y THE USER If any damage or a malfunction is suspected, the bed must be withdrawn from use immediately and disconnected from the mains electricity supply until the defective parts have been... -
Page 90: Responsibilities Of The Operator
Instruction Manual for Libra Care Bed 6.2 R ESPONSIBILITIES OF THE OPERATOR The operator of this care bed is obliged according to MPBetreibV (Medical Devices Operator Ordinance) Section 4 to conduct regular inspections after each renewed assembly, after each maintenance and during regular operation... - Page 91 Instruction Manual for Libra Care Bed Switch mode power supply • Preparation: o Unplug the switching power supply from the mains socket in the wall. o Plug the switching power supply into the test socket on the test device. • Test procedure:...
- Page 92 Instruction Manual for Libra Care Bed Inspection Report following an Inspection of Electromedical Equipment according to DIN EN 62353 (VDE 0751-1): 2015-10 – Page 1 of 3 Customer / Medical facility / Practice: Address: Carried out: Repeat inspection Inspection prior to initial operation (reference value)
- Page 93 Instruction Manual for Libra Care Bed II. Electrical Measurement (use only measuring instruments according to DIN EN 62353 (VDE 0751-1)) Note: To minimise measuring errors, route the test leads as far away as possible from and not parallel to the power cables and handset cables of the bed.
- Page 94 Instruction Manual for Libra Care Bed Inspection Report following an Inspection of Electromedical Equipment according to DIN EN 62353 (VDE 0751-1): 2015-10 – Page 2 of 3 III. Description Functional test of defect What? How? Functional check of the electrical components...
- Page 95 Data from Stiegelmeyer added for the existing full-length safety side configuration Data from Stiegelmeyer added for the existing split safety side configuration with at least the safety sides at the head end raised (if completely raised at head and foot ends, this corresponds to a one- piece safety side;...
-
Page 96: Replacement Parts
Instruction Manual for Libra Care Bed 6.3 R EPLACEMENT PARTS In order to maintain operational safety and the right to claim under warranty, only original Stiegelmeyer replacement parts may be used! For quick and easy ordering of replacement parts, we require the following information from you: •... -
Page 97: Replacement Of Electrical Components
• Any work and/or repairs to the electrical equipment may only be carried out by the Stiegelmeyer service engineers, the drive manufacturer or qualified and authorised electricians in compliance with all the relevant VDE and safety regulations! •... - Page 98 Instruction Manual for Libra Care Bed Assignment of the “HB” socket: Depending on the existing additional electrical equipment, the following items can be connected here: • Handset only; handset with under bed light • Through junction box MJB5: additional handset for setting Trendelenburg/reverse-Trendelenburg position Additional components mentioned above can be connected to any socket.
-
Page 99: Replacing The Handset
Instruction Manual for Libra Care Bed 6.5.2 Replacing the handset • If possible, raise the mattress height to the maximum level to facilitate work • Unplug the switch mode power supply from the mains socket. • Track the handset cable to the connecting point on the bed: •... -
Page 100: Connecting A Reading Lamp At A Later Date (Optional)
Instruction Manual for Libra Care Bed 6.5.3 Connecting a reading lamp at a later date (optional) The reading lamp is mounted as follows and then connected to an external 230-volt socket using the plug-in power supply provided. Please read and observe the separate instruction manual enclosed. -
Page 101: Connect A Battery At A Later Date (Optional Equipment)
Instruction Manual for Libra Care Bed 6.5.4 Connect a battery at a later date (optional equipment) The bed can optionally be equipped subsequently with a rechargeable battery. The following components are supplied: Component Description Quantity Battery BA 18xxx Mounting plate... - Page 102 Instruction Manual for Libra Care Bed 6.5.4.1 Installing the battery Proceed as follows to install the rechargeable battery on the cross tube on the mattress base frame at the head end: 1. Insert four expanding nuts into the holes in the battery mounting plate A .
- Page 103 Instruction Manual for Libra Care Bed 6.5.4.2 Connecting the battery to the control unit Connect the battery cable to the control unit as shown and push it in as far as it will The connection socket on the control unit is sealed with a stopper. First remove the stopper so that the battery cable can be connected.
-
Page 104: Replace The Control Unit
Instruction Manual for Libra Care Bed 6.5.5 Replace the control unit • Unplug the switch mode power supply from the mains socket. • Release the catches of the plug cover (on both sides). • Mark the plug positions to avoid mixing them up when they are re-assembled (see chapter 6.5.1 ). - Page 105 Instruction Manual for Libra Care Bed How should this be done? A: Using standard handset Step Buttons Action • Press and hold both of the marked keys simultaneously (a rapid intermittent signal sounds) until after approximately 5 seconds a slow intermittent signal sounds (=RESET/ manual mode) •...
-
Page 106: Reset The Control Unit
• To prevent the motor bolts from working loose and causing potentially hazardous sudden changes in the position of the bed, always ensure that you fit new safety washers (“Starlock”; available from Stiegelmeyer service department) and do not refit the old safety caps that you removed. -
Page 107: Decommissioning
Instruction Manual for Libra Care Bed 6.5.9 Decommissioning If the bed is not used for an extended period, please follow the instructions below for taking the bed out of service safely and ensuring ideal conditions for its re-use: • Clean and disinfect the bed see chapter 4.6 and cover it to protect it against new contamination. -
Page 108: Troubleshooting
Instruction Manual for Libra Care Bed 7 Troubleshooting The following table provides a guide for rectifying common malfunctions. Should a malfunction occur that is not included in the table, inform your operator. Problem Possible causes Solution • The switch mode power supply is •... - Page 109 Instruction Manual for Libra Care Bed Problem Possible causes Solution • Control unit has shut down due • Observe max. duty cycle: Operation is not possible despite to overheating After 2 min ON/18 min OFF; • The control unit has detected a functioning power replace the control unit.
-
Page 110: Accessories
Otherwise, the fixing points could be overloaded. Up-to-date lists of accessories can be obtained from Stiegelmeyer and their sales partners. Please quote the bed model. Here are some examples of accessories:... -
Page 111: Technical Data
Instruction Manual for Libra Care Bed 9 Technical data All the indicated dimensions and weights in this manual are approximate. 9.1 D IMENSIONS AND WEIGHTS 200 x 90 cm (standard) Mattress base (LxW) 200 x 100 cm (optional) (optional: 220 x 90 cm) with bed extension... - Page 112 Instruction Manual for Libra Care Bed Control unit with internal switch mode power supply (optional): ® Type LINAK CB06 OpenBus AC 120 – 240V ± 10 %, 50/60 Hz Input voltage Max. current input AC 2.0 A Internal device fuse 2-fold electronic, automatic-resetting overload protection;...
- Page 113 Instruction Manual for Libra Care Bed Electric motors for mattress base height Type Linak LA 27 Force/installation 6000 N/ 470mm/ 250 mm dimension/lift Path feedback Digital Hall Input voltage Max. DC 34 V Duty cycle Intermittent duty: 2 min ON / 18 min OFF...
-
Page 114: Ambient Conditions
Instruction Manual for Libra Care Bed 9.3 A MBIENT CONDITIONS The following ambient conditions must be maintained: For storage/transport Minimum Maximum Storage temperature: - 10 °C + 50°C Relative humidity: 80 % (non-condensing) 1060 hPa (at altitude of ≤ Air pressure:... -
Page 115: Type Plate - Electrical Data
Instruction Manual for Libra Care Bed – 9.4 T YPE PLATE ELECTRICAL DATA The following type plate with bed-specific electrical data and other symbols is attached to the bed. Illustration: example of type plate Model Name of product Item number... -
Page 116: Other Labelling On The Product
Instruction Manual for Libra Care Bed 9.5 O THER LABELLING ON THE PRODUCT Symbol Meaning Conformity mark according to Medical Devices REGULATION (EU) 2017/745 (MDR) Safe working load (= max. permissible weight of patients, mattress and all accessories attached) Maximum weight of occupant (= max. permissible weight of occupant;... -
Page 117: Information On Electromagnetic Compatibility (Emc)
Instruction Manual for Libra Care Bed 9.6 I (EMC) NFORMATION ON ELECTROMAGNETIC COMPATIBILITY To ensure electromagnetically interference-free operation, only use cables and accessories that are approved by the manufacturer (see also chapter “Replacement Parts” 6.3 and chapter “Accessories” 8) as replacement parts. - Page 118 Instruction Manual for Libra Care Bed This device is compliant with the following EMC standards regarding interference emissions and immunity: Phenomenon Home healthcare environment Conducted and radiated interference emissions CISPR 11 Harmonic distortions See IEC 61000-3-2 Voltage fluctuations and flicker...
- Page 119 Instruction Manual for Libra Care Bed Ports for signal input/signal output parts Phenomenon EMC basic Immunity level (test + compliance) standard Home healthcare environment Electrostatic discharge (ESD) IEC 61000-4-2 +/- 8 kV; contact +/- 2 kV, +/- 4 kV ¸ +/- 8 kV, +/- 15 kV, +/- 25kV air...
-
Page 120: Classification
Instruction Manual for Libra Care Bed 9.7 C LASSIFICATION • This bed fulfils all the requirements of the Medical Device REGULATION (EU) 2017/745 (MDR) and is considered a Class I medical device in accordance with the classification rules. • UMDNS code: 10-347; Bed (electrically adjustable) •... -
Page 121: Disposal Instructions
- The operator of this bed is legally obliged to send the electrical components directly to the manufacturer and not to dispose of them at municipal waste collection points. STIEGELMEYER and its service and sales partners will take these components back. -
Page 122: Declaration Of Conformity
Instruction Manual for Libra Care Bed 11 Declaration of conformity Page 122... - Page 123 Instruction Manual for Libra Care Bed Page 123...
Need help?
Do you have a question about the Libra and is the answer not in the manual?
Questions and answers