Advertisement
Quick Links
Advertisement

Related Manuals for Pacific Image Electronics Glite T8


Summary of Contents for Pacific Image Electronics Glite T8
- Page 1 User Manual Glite T8 Pacific Image Electronics...
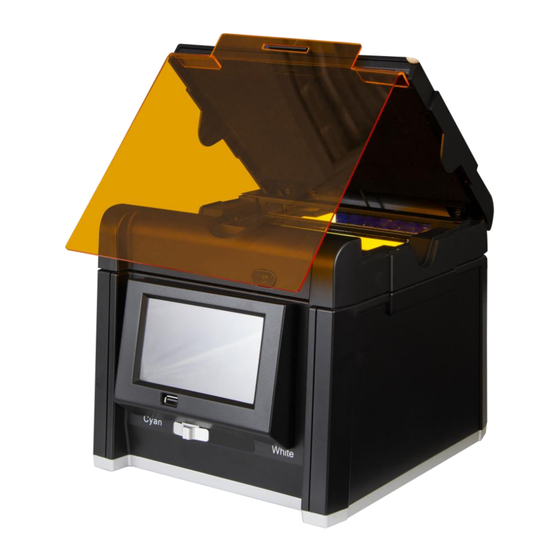
- Page 2 Product Content » Glite T8 » User manual » A/C Power Transformers(12V, 4.1A, DC) » Amber Filter (in box) Upper lid Black shading plate » (in box) Power switch Glite T8 LCD Screen Front » Upper lid USB 2.0 » USB 2.0 »...
- Page 3 Amber Filter Gel shooting area Upper lid sensor Interior » Gel shooting area » Upper lid sensor Back » DC power jack » USB 2.0 » HDMI DC power jack USB 2.0 HDMI...
- Page 4 Install & use 1. Remove all fixing tape. 2. Place the Glite T8 on a flat table. 3. Connect the power supply. 4. Press the power switch. 5. Insert the USB flash drive into the USB2.0 port on the front.
-
Page 5: Interface Description
Interface description... -
Page 6: Main Screen
Main screen ① Capture ② Exposure ③ B/G & WL epi, WL back ④ Continuous Capture ⑤ Setting ⑥ Image Viewer... - Page 7 ① Capture ① ① Capture is the button that allows you to take photos and capture the gel imaging screen.
- Page 8 ① Capture Click Capture, and after loading ends, you will be redirected to the setting screen after shooting. Rename – Can be renamed Negative – Can be adjusted to invert effect Delete – Delete this result Save – Save this result Delete all –...
- Page 9 ② Exposure ② Exposure allows users to adjust the ② exposure level. Range: -10 to +10...
- Page 10 ③ B/G & WL epi, WL back ③ B/G is to adjusted to Cyan's light source using the switch on the front of the device. WL epi, WL back is to adjusted to White by the switch on the front of the ③...
- Page 11 ④ Continuous Capture ④ Continuous Capture is the exposure value that can continuously shoot screens from -10 to +10. After clicking, the following screen will appear ④...
- Page 12 ⑤ Setting ⑤ Setting contains a variety of different settings (see next page) ⑤...
- Page 13 ⑤ Setting Update S/W – Plug in the USB to update the software Sleep – Sleep time can be set (as shown below)
- Page 14 ⑤ Setting Date/Time – Set the date and time (as shown below) Mouse – You can connect a mouse to the USB port for operation...
- Page 15 ⑤ Setting Save Format – Optional storage image format (as shown below)
- Page 16 ⑤ Setting Color Type – Choose Color or Gray (as shown below)
- Page 17 ⑤ Setting Language – English or Chinese...
- Page 18 ⑥ Image Viewer ⑥ Image Viewer allows you to browse the previously analyzed images, please refer to the explanation on p8 for the screen. ⑥...
- Page 19 Cyan Dye Gel Black shading plate 1. Lift up the upper lid. White backlight 2. Slide the black shading plate (with the flannel side outward) into the rail to cover the white backlight plate of the upper cover. 3. Close the upper lid (if you need to open the cover to cut gel, observe or adjust the position, please use the amber filter, as shown in the right picture, see p23).
- Page 20 Use a white light source to shoot WESTERN BLOT/ and color gel film: 1. Shooting HRP/DAP WESTERN BLOT with WL epi 1. Slide the black shading plate (with the flannel side outward) into the rail to cover the white backlight plate of the upper cover. 2.
- Page 21 Use amber filter Amber filter Glite T8 has an amber filter to facilitate the user to observe and cut blue or blue-green light excited gel 1. When you open the top lid, the blue or blue and green lights on both sides will automatically turn off 2.
- Page 22 3. Connect the other end of the HDMI cable to the HDMI port on the back of the Glite T8 4. The operation screen of Glite T8 will be projected to the connected TV or screen or projector.
- Page 23 Product Specification I. Instrument VI. Interface Image component CMOS Screen 2.7” Touch TFT LCD Image resolution 9M Pixels Internal storage SD Card Exposure time range 0.2~ 2 sec (11 levels) Image storage 1. USB 2.0 x2 Gel shooting area 16 x 10.5cm (Fixed lens) Output 2.
-
Page 24: Contact Information
Contact Information For more information or any question, please contact : PACIFIC IMAGE ELECTRONICS CO., LTD 7F, No. 239, SEC. 1, DATONG RD., XIZHI DIST., NEW TAIPEI CITY 221, TAIWAN TEL: +886 2 8692 1800 FAX: +886 2 8692 1860 sales@scanace.com.tw...
Need help?
Do you have a question about the Glite T8 and is the answer not in the manual?
Questions and answers