Advertisement
Quick Links
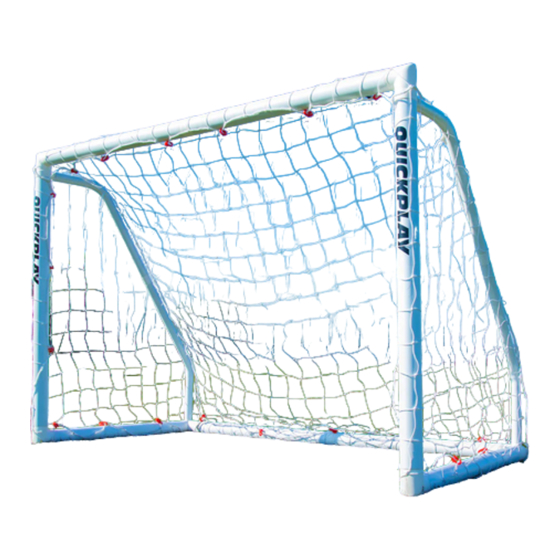
Q-MATCH 8x5FT
MATCH STANDARD SOCCER GOAL, ALL WEATHER UPVC
MF-5
MF8-4
MF-3
MF8-5
MF8-1
MF-7
MF8-1
MF-2
MF8-1
MF-1
M8-2
MF-1
M8-3
MF-2
MF8-5
MF-1
MF8-1
MF8-1
MF-2
MF8-4
MF-3
MF8-1
MF-7
MF-1
MF-2
MF-3
MF-5
M4
M8-2
MF-5
MF-1
MF-6
MF-7
M8-3
PB-1
MF-2
PLEASE REGISTER WARRANTY @ WWW.QUICKPLAYSPORT.COM
Item No.
Quantity
UPVC TUBES
MF8-1
6
MF8-2
2
2
MF8-3
MF8-4
2
2
MF8-5
CONNECTORS
4
MF-1
MF-2
4
2
MF-3
24
MF-4
2
MF-5
21
MF-6
2
MF-7
8
PB-1
1
NET
GROUND
STAKES
Ground
4
stakes
Advertisement

Subscribe to Our Youtube Channel
Related Manuals for Quickplay Q-MATCH


Summary of Contents for Quickplay Q-MATCH
- Page 1 Q-MATCH 8x5FT Item No. Quantity UPVC TUBES MF-1 MF8-1 MATCH STANDARD SOCCER GOAL, ALL WEATHER UPVC MF8-2 MF-2 MF8-3 MF8-1 MF-1 MF8-4 MF-2 MF8-1 MF-5 MF8-5 MF-2 CONNECTORS MF-3 M8-2 MF8-4 MF-1 MF-5 MF-2 MF-1 MF-3 M8-2 MF-3 MF8-4 MF-5...
- Page 2 STEP A ADD METAL SPRING CLIPS Insert part PB-1 into connectors MF-5, MF-3 & MF-7 PB-1 PB-1 MF-3 MF-7 MF-5 PB-1 PB-1 WARNINGS 1. Must be assembled by an adult. 2. To be used on a flat surface. 3. Check the frame is fully assembled and secured to the net before use. 4.
- Page 3 STEP B ADD PLASTIC PUSH BUTTONS Insert all MF-6 parts into connectors MF-1, MF-2 & MF-7 MF-2 MF-7 MF-6 MF-1...
- Page 4 STEP C CROSSBAR Assemble the CROSSBAR , Attaching tubes MF8-1 to MF-1,MF-2 & MF-5 connectors. MF-2 MF-2 MF-5 MF-5 DETAIL VIEW DETAIL VIEW MF-2 MF8-1 MF-2 MF-1 MF8-1 MF-5 MF-5...
- Page 5 STEP D POSTS TO CROSSBAR Attach tube MF8-2, MF8-3 to the MF-2 connectors MF-2 MF-2 MF8-2 MF8-2 MF-1 MF-1 MF8-3 MF8-3...
- Page 6 STEP E BACK BASEBAR Assemble the BACK BASEBAR , Attaching tubes MF8-1 to MF-1 & MF-7 connectors DETAIL VIEW DETAIL VIEW MF-7 MF-7 MF8-1 MF8-1 MF8-1 MF-1 MF-7 MF-7 MF8-1...
- Page 7 STEP F BASE POSTS TO BASEBAR Connect tube s MF8-1 to the MF- 7 connectors. MF8-1 MF8-1 MF8-1 MF8-1 MF-7 DETAIL VIEW MF-7 MF-7...
- Page 8 STEP G CROSSBAR TO BASE FRAME Attach the CROSSBAR & POSTS to the BASE FRAME using the MF-2 connectors. MF8-3 MF-2 MF8-3 MF8-1 MF8-3 DETAIL VIEW MF-2 MF8-1 MF-2 MF8-1...
- Page 9 STEP H CONNECTING DIAGONAL BRACE Attach tubes MF8-4 & MF8-5 to the parts MF-3 DETAIL VIEW MF-3 MF8-4 MF8-5...
- Page 10 STEP I BRACE TO GOAL FRAME Connect tubes MF8-4 & MF8-5 to parts MF-5 & MF-7 DETAIL VIEW MF-5 MF-5 MF8-4 MF8-4 MF8-4 MF-5 MF8-5 MF8-5 DETAIL VIEW MF8-5 MF-7 MF-7 MF-7...
- Page 11 STEP J ATTACHING NET Wrap net around frame using the label in the TOP LEFT CORNER as a starting point. Use the M4 net clips to further secure the net as shown. ATTACH NET...
-
Page 12: Warranty And Service
Tämä tuote on purettava käytön jälkeen ja se on säilytettävä kuivassa paikassa. Muussa tapauksessa takuu mitätöityy. HERE TO HELP! - The QuickPlay Team Dette er et lett produkt.; vi har designet det slik at du raskt Det här är en portabel produkt. Vi har utformat den så att og enkelt kan sette det opp og ta det ned.
Need help?
Do you have a question about the Q-MATCH and is the answer not in the manual?
Questions and answers