Table of Contents
Advertisement
Quick Links
NEXSAN
UNITY NV10000 Storage System
Quick Start Guide
This document provides installation steps for racking, cabling, and setting up the Nexsan UNITY NV10000
Storage System, and cabling all Nexsan storage components for power and data/host connectivity. For additional
documentation please visit
Taking delivery
Your Unity shipment includes the UNITY NV10000,
and one or more Unity Storage Expansions,
depending on your configuration. Check to ensure no
damage has been sustained to the packaging in
transit. If anything appears to be damaged, you
should file a damage claim with your reseller.
Item
Name
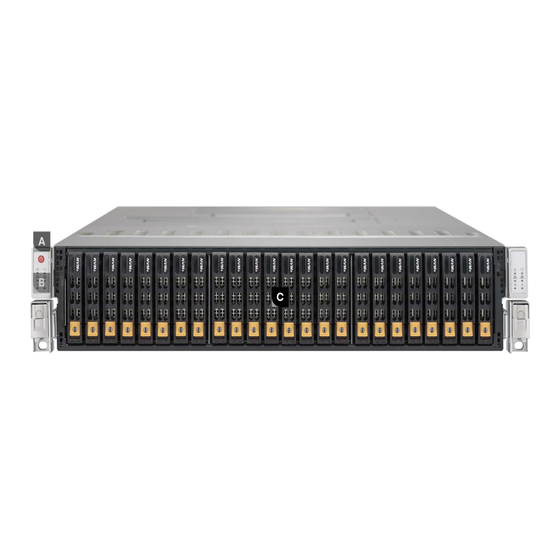
A
Power button
B
Status LEDs
C
Drive bays
1
Fan assembly
2
Power supply unit
3
Dedicated IPMI LAN port
4
USB 3.0 ports (2)
5
VGA port
6
Storage connectivity
7
Internal cooling fan vents (2)
8
Serial port
9
Dual RJ45 10GbE LAN Ports
10
PCIE 3.0x16 slots (2),
Optional host connectivity
http://helper.nexsansupport.com/unt_support.html
Front view (bezel removed)
Description
See page 6 of this guide for LED indication descriptions.
Twenty-four 2.5" Hot-swappable NVMe drive bays.
Five 8-cm mid-mounted cooling fans and four 4-cm exhaust fans.
2,000W Titanium level power supply (redundant in device).
Intelligent Platform Management Interface, for remote access,
monitoring, and management.
Can support USB-enabled devices such as keyboard, mouse,
USB/SATA DVD drive, or flash drive.
For VGA display or monitor.
Quad-port SAS-3 controller with HD Mini-SAS connectors.
Positioned over rear chassis for optimal cooling.
For configuration, diagnostics, and emergency maintenance
access.
Can be used to support the following Network Interface Card (NIC)
and Fibre Channel (FC) connections:
1 — UNITY NV10000 Quick Start Guide
Hardware overview
The main components of the UNITY NV10000 are
shown in these diagrams:
Rear view
Left port: Management Interface (nx99)
Right port: Primary data network interface (nx0)
(If additional NIC HBA is available, both interfaces are nx99)
Dual port 16G/32G FC
Dual port 40G NIC
Single and Dual port 100G NIC
Firmware Version 7.0
Advertisement
Table of Contents

Related Manuals for Nexsan UNITY NV10000


Summary of Contents for Nexsan UNITY NV10000
- Page 1 UNITY NV10000 Storage System Quick Start Guide Firmware Version 7.0 This document provides installation steps for racking, cabling, and setting up the Nexsan UNITY NV10000 Storage System, and cabling all Nexsan storage components for power and data/host connectivity. For additional documentation please visit http://helper.nexsansupport.com/unt_support.html...
-
Page 2: Prepare For Installation
Remove all the components from the packaging. Reach under the chassis to pull it free from the foam insert. Do NOT lift the UNITY NV10000 chassis from its packaging using the controller handles or attached rails. Place the components on an anti-static surface until you are ready to use them. - Page 3 Repeat steps A-D for the other inner rail. Tighten the thumbscrews that hold the front of the UNITY NV10000 to the rack. Step 3: Install the UNITY NV10000 on the rack Lift the UNITY NV10000 chassis from each side—...
-
Page 4: Install The Unity Storage Expansion
Expansions Cross-connect from the Add-on SAS OUT ports The UNITY NV10000 can connect to one direct Unity on each storage system controller to the SAS IN Storage Expansion, or with multiple expansions ports on the first expansion controllers, as shown... -
Page 5: Power On Unity Components
Power on your Unity Storage Expansion. power LED lights up. Power on the UNITY NV10000. Step 2: Power on the UNITY NV10000 If a drive carrier activity LED does not IMPORTANT: light up, check to make sure the corresponding drive Press and hold the power button located on is properly seated in the chassis. -
Page 6: Monitor The Unity Storage System
This LED should be off when the If all LEDs indicate normal operation status, system is operating normally. reattach the front bezel to the UNITY NV10000 main unit: Fan fail Remove the bezel from its packaging. When flashing, this LED indicates a Hook the left end of the bezel onto the chassis. - Page 7 Open Google Chrome. The Default Gateway address should be in NOTE: In the address bar, type the UNITY NV10000 the same domain as the Primary Data Network Management Virtual IP address in the browser (nx0). address bar and press ENTER.
-
Page 8: Safety Notices
By Web: http://helper.nexsansupport.com/unt_support.html Copyright © 2010-2022 Nexsan Technologies, Inc. All Rights Reserved. Nexsan®, UNITY NV10000™, U2G460,™, and the Nexsan logo are trademarks or registered trademarks of Nexsan. All other trademarks and registered trademarks are the property of their respective owners. Nexsan 1289 Anvilwood Avenue., Sunnyvale, CA 94089 USA |...
Need help?
Do you have a question about the UNITY NV10000 and is the answer not in the manual?
Questions and answers