Table of Contents
Advertisement
Available languages
Available languages
Quick Links
Mobile Air Condition
Mobile Air Condition
Mobile Klimatisierung
Mobilní klimatizace
Mobilná klimatizácia
EN
Translation of the operating instructions from the original language.
DE
Übersetzung der Bedienungsanleitung aus der Originalsprache.
CZ
Návod k použití v originálním jazyce.
SK
Preklad návodu na použitie z originálneho jazyka.
HU
A használati utasítás fordítása eredeti nyelvről.
FR
Traduction du mode d'emploi à partir de la langue d'origine.
IT
Traduzione delle istruzioni per l'uso dalla lingua originale.
RO
Traducerea instrucțiunilor de utilizare din limba originală.
SGR-AC-C180W
SGR-AC-F180W
SGR-AC-H180W
Mobil klímaberendezések
Climatiseur mobile
Condizionatore mobile
Aer condiționat mobil
Advertisement
Table of Contents

Related Manuals for SIGURO SGR-AC-C180W


Summary of Contents for SIGURO SGR-AC-C180W
- Page 1 Translation of the operating instructions from the original language. Übersetzung der Bedienungsanleitung aus der Originalsprache. Návod k použití v originálním jazyce. Preklad návodu na použitie z originálneho jazyka. A használati utasítás fordítása eredeti nyelvről. Traduction du mode d‘emploi à partir de la langue d‘origine. Traduzione delle istruzioni per l‘uso dalla lingua originale. Traducerea instrucțiunilor de utilizare din limba originală. SGR-AC-C180W SGR-AC-F180W SGR-AC-H180W...
-
Page 2: Table Of Contents
ENGLISH Safety information Service instructions Technical parameters Installation Control via control panel Control via remote control Control via the application Other functions Cleaning and maintenance Troubleshooting DEUTSCH Sicherheitshinweise Dienstanweisungen Technische parameter Installation Steuerung über das bedienfeld Bedienung über die fernbedienung Bedienung über die app Weitere funktionen Reinigung und wartung... - Page 3 MAGYAR Biztonsági információk Javítási útmutató Műszaki paraméterek Telepítés Működtetés a működtető panelről Működtetés a távirányító segítségével Működtetés mobil alkalmazásból Egyéb funkciók Tisztítás és karbantartás Problémamegoldás FRANÇAIS Informations relatives à la sécurité Instructions de fonctionnement Paramètres techniques Installation Contrôle par panneau de commande Contrôle par panneau de commande Contrôle via l’application Autres fonctions...
- Page 4 Android Scan the QR code to download the app. Scannen Sie diesen QR-Code, um die App herunterzuladen. Pro stažení aplikace si naskenujte tento QR kód. Na stiahnutie aplikácie si naskenujte tento QR kód. Az alkalmazás letöltéséhez olvassa be ezt a QR kódot. Scannez ce code QR pour télécharger l’application. Scansionare questo QR code per scaricare l’app. Scanați acest cod QR pentru a descărca aplicația. Cool Speed Swing Timer Sleep C/ F...
- Page 5 Timer Sleep C/ F TIMER SPEED SWING SLEEP MODE POWER Cool Speed Swing Timer Sleep C/ F...
-
Page 8: English
If you need help with extensive maintenance or repair of the product, which requires intervention in its internal parts, our authorized service is available at the email address siguro@alza.cz or operators at the seller's info line. For your convenience in solving any problems with the product, we have unified these contact points and the above contacts can be used in the event of any complaints or post-warranty service. - Page 9 4. This appliance is intended for use by experts or trained personnel in shops, light industry and agriculture, or for commercial use by lay persons. If the power cord is damaged, it must be replaced by the manufacturer, its service agent or similarly qualified persons in order to avoid a dangerous situation.
- Page 10 26. Do not unplug the power cord from the outlet while the appliance is operating. 27. Always switch off the appliance and disconnect the plug from the electrical outlet if you are not going to use the appliance, if you want to move it, if you are going to clean it, if it is to be serviced, if you are assembling or disassembling it, etc.
-
Page 11: Service Instructions
16. Do not allow people to return to the room until a qualified service technician arrives and the technician confirms that it is possible to return to the room safely. 17. It is forbidden to use open flames, cigarettes or other sources of ignition in the vicinity of the appliance. - Page 12 1.5 Presence of fire extinguisher If any work is to be carried out on the refrigeration equipment or associated parts in warm area, a suitable fire extinguishing system must be available. The fire extinguisher must be powder or CO2 in the vicinity of the filling area. 1.6 No sources of ignition No person performing work on the refrigeration system that involves exposing any piping that contains or has contained flammable refrigerant shall use any sources of...
- Page 13 2. Repairs of sealed components 2.1 During the repair of sealed components, all electrical supply must be disconnected from the equipment being worked on before the sealed covers are removed, etc. If it is absolutely necessary to have the equipment switched on during service, then a continuously operating leak detector has to be placed in the most critical location to warn of a potentially dangerous situation.
- Page 14 from the system or separated (by closing the valves) in the part of the system remote from the leak. The system must then be purged with oxygen-free nitrogen (OFN), both before and after the brazing process. 7. Removal and pumping Conventional procedures must be used if the cooling circuit is disturbed due to repairs - or for any other reason.
- Page 15 required; ‐ all personal protective equipment was available and used correctly; ‐ the removal procedure was constantly under the supervision of a competent person; ‐ collection devices and cylinders complied with the relevant standards. • Drain the cooling system if possible. •...
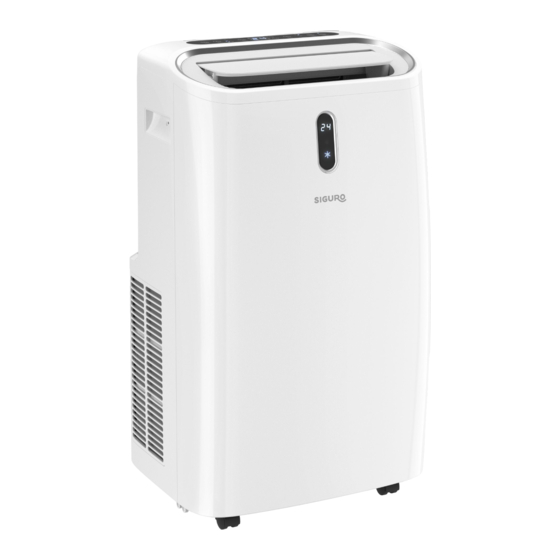
- Page 16 Description of the appliance Control panel Outlet opening with adjustable slats Front cover Inlet filter grille guard Air filter Upper drain opening Flexible hose connection opening Bottom drain opening Handles (located on both sides) 10 Castors Flexible hose 12 Hose inlet adapter 13 Hose outlet adapter 14 Remote control 15 Drain hose...
-
Page 17: Technical Parameters
TECHNICAL PARAMETERS Parameters/Model SGR-AC-C180W SGR-AC-F180W SGR-AC-H180W Cooling capacity 9 kBtu / hr 12 kBtu / hr 14 kBtu / hr Rated voltage 220–240 V ~ 220–240 V ~ 220–240 V ~ Rated frequency 50 Hz 50 Hz 50 Hz Cooling power... -
Page 18: Installation
INSTALLATION Unpacking portable air conditioner Remove the portable air conditioner and all its accessories from the package. Before disposing of the packaging, be sure to remove all components. Check if the portable airconditioner and accessories for damage. Placing the portable air conditioner If the air conditioner was transported inclined at an angle greater than 45 °, leave it free standing in an upright position for at least 24 hours after unpacking. -
Page 19: Control Via Control Panel
4. Make sure there is no gap between the window and seal where the air could escape. The window attachment kit is designed to be suitable for installation in most types of windows (both horizontal and vertical - see Figure 1 F). 5. -
Page 20: Control Via Remote Control
TROL". Oscillation function Press SWING to start movement of the slats up and down. Press again to cancel the function. CONTROL VIA REMOTE CONTROL The remote control is supplied with inserted batteries from the manufacturer. To use the remote control, remove the protective foil from the battery compartment. This protects the batteries from discharge and damage during transport. - Page 21 Use the v/V buttons to set the required temperature. You can set the temperature from 16 °C to 32 °C. Press repeatedly the button SPEED to set the required speed of the fan: low – medium – high. Press the button SWING to turn on the slats movement. Note: The portable air conditioner automatically shuts off when the room temperature drops below the set temperature.
-
Page 22: Control Via The Application
When the set time has elapsed, the portable air conditioner automatically switches on in the setting in which it was previously switched off. Note: If you need to cancel the timer function, press the v/V buttons repeatedly until "00" appears on the display. When you press the button , you can also cancel the timer function. - Page 23 ° C, the defrost function will turn on automatically to defrost the icing on the evapora- tor and the portable air conditioner will not be damaged. When the automatic defrost function is activated, the power light flashes. The original operation of the portable air conditioner will resume automatically after the compressor has remained idle for 10 minutes or if the evaporator coil temperature has risen to 7 °...
-
Page 24: Cleaning And Maintenance
CLEANING AND MAINTENANCE Always switch off the appliance, wait 2 to 3 minutes and then disconnect the plug from the power outlet before cleaning or any maintenance. Warning: Never immerse the appliance, the power cord or the plug in water or any other liquid. Do not use plastic or metal scrapers, harsh cleaners, chemicals, petrol, solvents or other similar substances to clean any parts of the appliance. -
Page 25: Troubleshooting
and leave the drain hose plugged in until the drain hose inside is dry inside. 6. Keep portable air conditioner in a well-ventilated place, out of reach of children or pets. Do not place any objects on the portable air conditioner. The portable air conditioner must be stored in an upright position. - Page 26 Problem Cause Solution Portable air conditioner Place the portable air con- is not placed on a flat ditioner on a flat, solid and surface. stable surface. Portable air conditioner Some part of the outer Check and secure the makes excessive noise. casing is loose.
- Page 27 Condensate tank is full. "DRAINING CONDEN- SATE" section. Hereby, Alza.cz, a. S. declares that the types of radio equipment SGR-AC-C180W, SGR- AC-F180W and SGR-AC-H180W are in compliance with Directive 2014/53 / EU. EN - 27...
-
Page 28: Deutsch
Vielen Dank, dass Sie sich für ein Gerät von SIGURO entschieden haben. Wir sind dankbar für Ihr Vertrauen und freuen uns, Ihnen das Gerät auf den folgenden Seiten vorzustellen und Sie mit all seinen Funktionen und Verwendungszwecken vertraut zu ma- chen. - Page 29 Installationsvorschriften installiert werden. WARNUNG: Das Gerät muss in einem Raum mit einer Bodenfläche von mehr als 10 m für das Modell SGR-AC-C180W mit 9000 BTU, 12 m für das Modell SGR-AC-F180W mit 12000 BTU und 13 m für das Modell SGR-AC- H180W mit 14000 BTU aufgestellt, betrieben und gelagert werden.
- Page 30 20. Um einen Stromschlag zu vermeiden, dürfen Sie das Gerät, das Netzkabel oder den Netzstecker nicht in Wasser oder andere Flüssigkeiten tauchen. 21. Lassen Sie das Gerät nicht unbeaufsichtigt, während es in Betrieb ist. Kippen Sie das Gerät nicht und fassen Sie es nicht an, während es in Betrieb ist.
-
Page 31: Dienstanweisungen
Beachten Sie, dass das Kältemittel geruchlos sein kann. Das Gerät muss in einem Raum mit einer Bodenfläche von mehr als 12 aufgestellt, betrieben und gelagert werden. Das Gerät muss in Übereinstimmung mit den nationalen Installationsvorschriften installiert werden. 8. Das Kältemittel befindet sich in einem geschlossenen Kreislauf. Die Wartung darf nur von einem qualifizierten Techniker durchgeführt werden! Lassen Sie das Kältemittel nicht in die Atmosphäre entkommen. - Page 32 1. Informationen über den Service Bitte beachten Sie die folgenden Warnhinweise, wenn Sie ein Gerät mit dem Kältemit- tel R290 warten. 1.1 Raumkontrolle Vor Arbeiten an einem System, das entflammbare Kältemittel enthält, sind Sicher- heitsprüfungen erforderlich, um sicherzustellen, dass das Risiko einer Entzündung minimiert wird.
- Page 33 Bei Anlagen, die brennbare Kältemittel enthalten, müssen folgende Kontrollen durch- geführt werden: • Die Größe der Füllung muss sich nach der Größe des Raumes richten, in dem die kältemittelhaltigen Teile installiert sind; • Die Lüftungsanlagen und -auslässe arbeiten mit voller Leistung und sind nicht blockiert;...
- Page 34 3. Reparatur von eigensicheren Komponenten Es dürfen keine dauerhaften induktiven oder kapazitiven Lasten in den Stromkreis eingespeist werden, ohne dass sichergestellt ist, dass die zulässige Spannung und der zulässige Strom für das verwendete Gerät nicht überschritten werden. Eigensichere Bauteile sind die einzigen, an denen in einer entflammbaren Umgebung gearbeitet werden darf, auch wenn sie unter Spannung stehen.
- Page 35 Die Kreislauffüllung muss in die richtigen Abnahme-Zylinder geleitet werden. Das System muss mit OFN (sauerstofffreiem Stickstoff) befüllt werden, um die Einheit sicher zu machen. Der Vorgang muss möglicherweise mehrmals wiederholt werden. Druckluft oder Sauerstoff dürfen für diesen Vorgang nicht verwendet werden. Das Durchfluten kann erreicht werden, indem das Vakuum im System mit Hilfe eines OFN unterbrochen wird und das Füllen fortgesetzt wird, bis der Betriebsdruck erreicht ist, dann Luft abgelassen wird und schließlich auf Vakuum reduziert wird.
- Page 36 • Es ist darauf zu achten, dass der Zylinder vor der Entnahme auf die Waage gestellt wird. • Schalten Sie das Entnahmegerät ein und arbeiten Sie nach den Anweisungen des Herstellers. • Die Zylinder werden nicht überlaufen. (Nicht mehr als 80 % des flüssigen Füllungsinhalts).
- Page 37 Beschreibung des Geräts. Bedienfeld Auslassöffnung mit verstellbaren Lamellen Vordere Abdeckung Schutzgitter am Eingangsfilter Luftfilter Oberes Abflussloch Schlauchanschluss für flexiblen Schlauch Abflussloch am Boden Griffe (auf beiden Seiten) 10 Räder Flexibler Schlauch 12 Schlaucheinlass-Adapter 13 Schlauchauslass-Adapter 14 Fernbedienung 15 Ablassschlauch 16 Fensterbefestigungs-Set (Fensterdichtungsfolie, Klettverschluss) Bedienfeld Taste POWER: Ein- / ausschalten der Klimaanlage.
-
Page 38: Technische Parameter
TECHNISCHE PARAMETER Parameter/Modell SGR-AC-C180W SGR-AC-F180W SGR-AC-H180W Leistung der Kühlung 9 kBtu / Stunde 12 kBtu / Stunde 14 kBtu / Stunde Nennspannung 220–240 V ~ 220–240 V ~ 220–240 V ~ Nennfrequenz 50 Hz 50 Hz 50 Hz Leistungsaufnahme im... -
Page 39: Installation
INSTALLATION Auspacken der mobilen Klimaanlage Nehmen Sie die mobile Klimaanlage und ihr Zubehör aus der Verpackung. Vergewis- sern Sie sich, dass alle Komponenten entfernt wurden, bevor Sie die Verpackung ent- sorgen. Vergewissern Sie sich, dass die mobile Klimaanlage oder sein Zubehör nicht beschädigt sind. -
Page 40: Steuerung Über Das Bedienfeld
Installation des Fensterbefestigungs-Sets Öffnen Sie das Fenster, in dem Sie die Dichtungsfolien anbringen wollen. 2. Entfernen Sie den Streifen vom Klettverschluss und kleben Sie den Klettverschluss auf die Teile des Fensters und des Rahmens, an denen sich die Scharniere nicht befinden –... -
Page 41: Bedienung Über Die Fernbedienung
digkeit aus: niedrig – mittel – hoch. Jedes Mal, wenn Sie die Taste SPEED drücken, leuchtet auch die ausgewählte Geschwindigkeitsanzeige auf. Timer-Funktion Die mobile Klimaanlage verfügt über zwei Timer-Funktionen – automatisches Aus- schalten und automatisches Einschalten. Im automatischen Ausschaltmmodus schal- tet sich die mobile Klimaanlage nach Ablauf der voreingestellten Zeit automatisch aus. - Page 42 Ein- / Ausschalten Nachdem Sie den Stecker des Netzkabels in eine Steckdose gesteckt haben, drücken Sie die Taste , um die mobile Klimaanlage einzuschalten. Das mobile Klimaanlage startet im Standard-Lüftermodus. Wenn Sie die mobile Klimaanlage nicht benutzen möchten, drücken Sie die Taste , um in den Standby-Modus zu wechseln.
-
Page 43: Bedienung Über Die App
schwindigkeit kann nicht geändert werden. Nach einer Stunde Betrieb steigt die Temperatur um 1 °C und nach einer weiteren Stunde Betrieb wieder um 1 °C. Diese Temperatur wird dann 10 Stunden lang auf- rechterhalten. Nach 10 Stunden startet die Klimaanlage wieder im Kühlmodus mit der ursprünglich eingestellten Temperatur. -
Page 44: Weitere Funktionen
Bemerkung: Wenn die mobile Klimaanlage nicht innerhalb von 3 Minuten mit der App gekoppelt wird, erlischt die Wi-Fi-Anzeige. Wenn Sie die mobile Klimaanlage erneut mit der App koppeln möchten, halten Sie die Taste TIMER 5 Sekunden lang gedrückt, die Wi-Fi-Anzeige blinkt langsam. 4. -
Page 45: Reinigung Und Wartung
ab. Auf dem Display wird „Ft“ (Full tank - voller Behälter) angezeigt. Ziehen Sie in diesem Fall den Stecker und bringen Sie die mobile Klimaanlage vorsichtig an einen Ort, an dem das Kondensat abfließen kann. 2. Stellen Sie einen Behälter unter die untere Ablauföffnung, in den das Kondensat fließt. - Page 46 Chemikalien, Benzin, Lösungsmittel oder ähnliche Stoffe, um Teile des Geräts zu reini- gen. Es könnte zu ernsthaften Schäden an der Oberfläche kommen. Reinigung des Luftfilters Der Luftfilter fängt Schmutz und Staub aus der Ansaugluft auf. Daher ist es wichtig, den Luftfilter etwa alle zwei Wochen zu reinigen, wenn Sie Ihre mobile Klimaanlage regelmäßig benutzen.
-
Page 47: Problemlösung
die Lüfterdrehzahl auf die niedrigste Stufe stellen und den Abflussschlauch eingesteckt lassen, bis der Abflussschlauch im Inneren trocken ist. 6. Bewahren Sie die mobile Klimaanlage an einem trockenen und gut belüfteten Ort außerhalb der Reichweite von Kindern und Haustieren auf. Stellen Sie keine Gegenstände auf die mobile Klimaanlage. - Page 48 Problem Ursache Lösung Das mobile Klimaanlage Stellen Sie die mobile Kli- wird nicht auf einer ebe- maanlage auf eine ebene, nen Fläche aufgestellt. feste und stabile Fläche. Die mobile Klimaanlage Ein Teil des Außenmantels Überprüfen Sie das lose macht übermäßigen ist lose.
- Page 49 Fehlermeldungen Problem Ursache Lösung Es ist notwendig, die Ver- Kommunikationsfehler kabelung auf Schäden zu zwischen der Hauptplati- überprüfen. Wenden Sie ne und dem Display. sich an eine autorisierte Kundendienststelle. Der Umgebungstempera- tursensor muss überprüft Fehler des Umge- und ggf. ausgetauscht bungstemperatursensors.
-
Page 50: Česky
Pokud potřebujete pomoci s rozsáhlou údržbou nebo opravou výrobku, která vyžaduje zásah do jeho vnitřních částí, je vám k dispozici náš autorizovaný servis na emailové adrese siguro@alza.cz nebo operátoři na infolince prodej- ce. Pro vaše pohodlí při řešení jakýchkoliv problémů s výrobkem jsme tato kontaktní... - Page 51 Děti si se spotřebičem nesmějí hrát. 4. Tento spotřebič je určen pro používání experty nebo proškolenými osobami v obchodech, lehkém průmyslu a v zemědělství, nebo pro komerční používání laickými osobami. Jestliže je napájecí přívod poškozen, musí být nahrazen výrobcem, jeho servisním technikem nebo podobně...
- Page 52 25. Nepoužívejte spotřebič, pokud spadl, je poškozený nebo vykazuje známky poškození. 26. Zatímco je spotřebič provozu, neodpojujte vidlici napájecího kabelu od síťové zásuvky. 27. Spotřebič vždy vypněte a odpojte vidlici napájecího kabelu od síťové zásuvky, pokud nebudete spotřebič používat, pokud jej chcete přemístit, pokud jej budete čistit, pokud má...
-
Page 53: Servisní Návod
zajistěte dostatečnou ventilaci a informujte místní hasičskou jednotku o místě úniku propanového plynu. 16. Nedovolte, aby se do místnosti vraceli osoby, dokud nedorazí kvalifikovaný servisní technik a tento techniky nepotvrdí, že je možné se do místnosti bezpečně vrátit. 17. V blízkosti spotřebič je zakázáno používat otevřený oheň, cigarety nebo jiné... - Page 54 nejiskřící, příslušně utěsněné nebo ze své podstaty bezpečné. 1.5. Přítomnost hasicího přístroje Jestliže se má provádět na chladicím zařízení nebo přidružených částech jakákoliv práce za tepla, musí být po ruce vhodné hasicí zařízení. V sousedství plnicího prostoru musí být hasicí přístroj práškový nebo CO2. 1.6.
- Page 55 2. Opravy utěsněných součástek 2.1. Během oprav utěsněných součástek musí být odpojeno veškeré elektrické napájení od zařízení, na kterém se pracuje, dříve než se odejmou utěsněná víka, atd. Jestliže je absolutně nutné mít během servisu na zařízení elektrické zapnuté, pak se musí do nejkritičtějšího bodu umístit trvale pracující zařízení detekující únik, aby varovalo před potenciálně...
- Page 56 před, tak po procesu pájení natvrdo. 7. Odstranění a odčerpání Při narušení chladicího obvodu kvůli opravám – nebo z jakéhokoliv jiného důvodu – se musí použít konvenční postupy. Je však důležité, přidržet se té nejlepší metody z důvo- du hořlavosti. Je nutno se řídit následujícím postupem: •...
- Page 57 ‐ odebírací zařízení a válce vyhovovaly příslušným normám. • Vyčerpat chladicí systém, je-li to možné. • Jestliže dosažení vakua není možné, vyrobí se sběrné potrubí, aby se mohlo chladivo odebírat z různých částí systému. • Je nutné zajistit, aby válec byl uložen na vahách před tím, než se uskuteční odebírání.
- Page 58 Popis přístroje Ovládací panel Výstupní otvor s nastavitelnými lamelami Přední kryt Ochranná mřížka vstupního filtru Vzduchový filtr Horní vypouštěcí otvor Otvor pro připojení flexibilní hadice Spodní vypouštěcí otvor Rukojeti (umístěny po obou stranách) 10 Pojezdová kolečka Flexibilní hadice 12 Vstupní adaptér hadice 13 Výstupní...
-
Page 59: Technické Parametry
TECHNICKÉ PARAMETRY Parametry/Model SGR-AC-C180W SGR-AC-F180W SGR-AC-H180W Výkon chlazení 9 kBtu / hod 12 kBtu / hod 14 kBtu / hod Jmenovité napětí 220–240 V ~ 220–240 V ~ 220–240 V ~ Jmenovitá frekvence 50 Hz 50 Hz 50 Hz Příkon chlazení... -
Page 60: Instalace
INSTALACE Vybalení mobilní klimatizace Vyjměte mobilní klimatizaci a veškeré její příslušenství z obalu. Před likvidací obalu se ujistěte, že jste vyjmuli všechny komponenty. Zkontrolujte, zdali nejsou mobilní klimati- zace nebo příslušenství poškozeny. Umístění mobilní klimatizace Pokud byla klimatizace převážena nakloněná v úhlu větším než 45 °, nechte ji po vyba- lení... -
Page 61: Ovládání Prostřednictvím Ovládacího Panelu
do kterého se bude vkládat flexibilní hadice – viz obrázek 1 E. 4. Ujistěte se, že mezi okenním rámem a těsněním není žádná mezera, kudy by mohl vzduchu unikat. Sada pro připevnění do okna je navržena tak, aby byla vhodná k instalaci do většiny typů... -
Page 62: Ovládání Prostřednictvím Dálkového Ovládání
tlačítky v/V nastavte dobu, po jejímž uplynutí se mobilní klimatizace zapne. Dobu časovače můžete nastavit v rozmezí od 1 do 24 hodin. Funkce spánku Stiskněte tlačítko SLEEP pro zapnutí funkce spánku. Opětovným stisknutím funkci zrušíte. Více informací o funkci spánku naleznete v části „OVLÁDÁNÍ PROSTŘEDNICTVÍM DÁL- KOVÉHO OVLÁDÁNÍ“. - Page 63 Výběr provozního režimu K výběru provozního režimu slouží tlačítka COOL, FAN, DRY a SLEEP. Provozní režim chlazení Tento režim je vhodný, pokud potřebujete snížit teplotu v místnosti. Stiskněte tlačítko COOL pro zapnutí provozního režimu chlazení. Na displeji se rozsvítí ikona chlazení. Tlačítky v/V nastavte požadovanou teplotu.
-
Page 64: Ovládání Prostřednictvím Aplikace
do pohotovostního režimu. Automatické zapnutí V režimu automatického zapnutí se mobilní klimatizace automaticky zapne po uply- nutí nastavené doby časovače. Zatímco je mobilní klimatizace pohotovostním režimu, stiskněte tlačítko TIMER a tlačítky v/V nastavte dobu, po jejímž uplynutí se mobilní klimatizace zapne. Dobu časovače můžete nastavit v rozmezí... -
Page 65: Další Funkce
DALŠÍ FUNKCE Automatické rozmrazování Pokud je mobilní klimatizace provozována v místnosti, kde je teplota velmi nízká, může se na výparníku tvořit námraza. Pokud je mobilní klimatizace zapnuta v režimu chlazení nebo vysoušení a senzor okolní teploty zaznamená, že teplota cívky výparníku klesla pod -1 °C, dojde k automa- tickému zapnutí... -
Page 66: Čištění A Údržba
předměty – viz obrázek 2 B. 4. Druhý konec vypouštěcí hadice vložte do prázdné nádoby nebo do odpadu. Je důležité, aby druhý konec vypouštěcí hadice byl umístěn o níž (20 ° a více), než je horní vypouštěcí otvor. Varování: V žádném případě neponořujte konec vypouštěcí hadice do vody. Mohlo by dojít ke zpětnému nasávání... -
Page 67: Řešení Problémů
ujistit se, že jsou její komponenty suché. Vypněte klimatizaci a odpojte vidlici napájecího kabelu od síťové zásuvky. 2. Odpojte flexibilní hadici a těsnicí fólie do okna. 3. Vypusťte kondenzát. Postupujte podle instrukcí v části „VYPOUŠTĚNÍ KONDENZÁTU“. 4. Vyčistěte vzduchový filtr. Postupujte podle instrukcí v části „Čištění vzduchového filtru“. - Page 68 Problém Příčina Řešení Během přemístění došlo Vyprázdněte zásobník na k přetečení zásobníku na kondenzát před přemís- Z mobilní klimatizace kondenzát. těním. vytéká voda. Vypouštěcí hadice je Narovnejte vypouštěcí zkroucená nebo ohnutá. hadici. Mobilní klimatizace není Umístěte mobilní klima- umístěna na rovném tizaci na rovný, pevný...
- Page 69 Obraťte se na autorizovaný servis. Vyprázdněte zásobník Zásobník na kondenzát je podle instrukcí v části plný. „VYPOUŠTĚNÍ KONDEN- ZÁTU“. Tímto společnost Alza.cz, a. s. prohlašuje že typy rádiových zařízení SGR-AC-C180W, SGR-AC-F180W a SGR-AC-H180W jsou v souladu se směrnicí 2014/53/EU. CZ - 69...
-
Page 70: Slovensky
Ak potrebujete pomôcť s rozsiahlou údržbou alebo opravou výrobku, ktorá vyžaduje zásah do jeho vnútorných častí, je vám k dispozícii náš autorizovaný servis na e-mailovej adrese siguro@alza.cz alebo operátori na infolinke pre- dajcu. Pre vaše pohodlie pri riešení akýchkoľvek problémov s výrobkom sme tieto kontaktné... - Page 71 VÝSTRAHA: Spotrebič sa musí inštalovať, prevádzkovať, skladovať v miestnosti s podlahovou plochou väčšou než: 10 m pre 9000 BTU model SGR-AC-C180W; 12 m pre 12000 BTU model SGR-AC-F180W; a 13 m 14000 BTU model SGR-AC-H180W. 8. Zatiaľ čo je spotrebič v prevádzke, zaistite okolo neho dostatočný voľný...
- Page 72 nešplhajte. 24. Do vstupných a výstupných otvorov nevkladajte prsty ani iné predmety. 25. Nepoužívajte spotrebič, ak spadol, je poškodený alebo vykazuje známky poškodenia. 26. Zatiaľ čo je spotrebič v prevádzke, neodpájajte vidlicu napájacieho kábla od sieťovej zásuvky. 27. Spotrebič vždy vypnite a odpojte vidlicu napájacieho kábla od sieťovej zásuvky, ak nebudete spotrebič...
-
Page 73: Servisný Návod
13. Chladivo používané v spotrebiči je bez zápachu. 14. To, že chladivo je bez zápachu, neznamená, že nemohlo dôjsť k úniku. 15. Ak dôjde k úniku, bezodkladne evakuujte všetky osoby z miestnosti, zaistite dostatočnú ventiláciu a informujte miestnu hasičskú jednotku o mieste úniku propánového plynu. - Page 74 1.4 Kontrola prítomnosti chladiva Priestor sa musí skontrolovať pomocou príslušného detektora chladiva pred a počas práce, aby sa zaistilo, že technici vedia o potenciálne horľavej atmosfére. Musí sa zaistiť, aby použitie zariadenia na detekciu úniku bolo vhodné na použitie na horľavé chladivá, t.
- Page 75 zabránilo možnosti iskrenia; • Že žiadne elektrické súčiastky a vedenie nie sú odkryté pri plnení, obnovovaní a čistení systému; • Že uzemnenie nie je prerušené. 2. Opravy utesnených súčiastok 2.1 Počas opráv utesnených súčiastok musí byť odpojené kompletné elektrické napájanie od zariadenia, na ktorom sa pracuje, skôr než sa odoberú utesnené veká atď.
- Page 76 Kvapaliny na detekciu úniku sú vhodné na použitie pri väčšine chladív, ale musí sa vylúčiť použitie detergentov obsahujúcich chlór, pretože chlór môže reagovať s chladi- vom a korodovať medené potrubie. Ak je podozrenie na únik, musia sa odstrániť/uhasiť všetky otvorené ohne. Ak sa nájde unikanie chladiva, čo vyžaduje spájkovanie natvrdo, musí...
- Page 77 • Oboznámenie sa so zariadením a jeho činnosťou. • Elektrické odpojenie systému. • Pred začatím postupu je nutné zaistiť, aby: ‐ bolo k dispozícii, ak sa požaduje, mechanické zariadenie na manipuláciu s valcami s chladivom; ‐ všetky osobné ochranné zariadenia boli k dispozícii a používali sa správne; ‐...
- Page 78 Opis prístroja Ovládací panel Výstupný otvor s nastaviteľnými lamelami Predný kryt Ochranná mriežka vstupného filtra Vzduchový filter Horný vypúšťací otvor Otvor na pripojenie flexibilnej hadice Spodný vypúšťací otvor Rukoväti (umiestnené po oboch stranách) 10 Pojazdové kolieska Flexibilná hadica 12 Vstupný adaptér hadice 13 Výstupný...
-
Page 79: Technické Parametre
TECHNICKÉ PARAMETRE Parametre/Model SGR-AC-C180W SGR-AC-F180W SGR-AC-H180W Výkon chladenia 9 kBtu/hod. 12 kBtu/hod. 14 kBtu/hod. Menovité napätie 220 – 240 V ~ 220 – 240 V ~ 220 – 240 V ~ Menovitá frekvencia 50 Hz 50 Hz 50 Hz Príkon chladenia... -
Page 80: Inštalácia
INŠTALÁCIA Vybalenie mobilnej klimatizácie Vyberte mobilnú klimatizáciu a všetky jej príslušenstvá z obalu. Pred likvidáciou obalu sa uistite, že ste vybrali všetky komponenty. Skontrolujte, či nie sú mobilná klimatizácia alebo príslušenstvo poškodené. Umiestnenie mobilnej klimatizácie Ak sa klimatizácia prevážala naklonená v uhle väčšom než 45°, nechajte ju po vybalení voľne stáť... -
Page 81: Ovládanie Prostredníctvom Ovládacieho Panelu
zips, do ktorého sa bude vkladať flexibilná hadica – pozrite obrázok 1 E. 4. Uistite sa, že medzi okenným rámom a tesnením nie je žiadna medzera, kadiaľ by mohol vzduchu unikať. Súprava na pripevnenie do okna je navrhnutá tak, aby bola vhodná... -
Page 82: Ovládanie Prostredníctvom Diaľkového Ovládania
nastavte čas, po ktorého uplynutí sa mobilná klimatizácia vypne. Čas časovača môžete nastaviť v rozmedzí od 1 do 24 hodín. Zatiaľ čo je mobilná klimatizácia v pohotovostnom režime, stlačte tlačidlo TIMER a tlačidlami v/V nastavte čas, po ktorého uplynutí sa mobilná klimatizácia zapne. Čas časovača môžete nastaviť... - Page 83 Poznámka: Pred opätovným zapnutím klimatizácie vyčkajte 2 – 3 minúty. Tým zabráni- te možnému poškodeniu klimatizácie. Výber prevádzkového režimu Na výber prevádzkového režimu slúžia tlačidlá COOL, FAN, DRY a SLEEP. Prevádzkový režim chladenia Tento režim je vhodný, ak potrebujete znížiť teplotu v miestnosti. Stlačte tlačidlo COOL na zapnutie prevádzkového režimu chladenia.
-
Page 84: Ovládanie Prostredníctvom Aplikácie
Zatiaľ čo je mobilná klimatizácia v prevádzke, stlačte tlačidlo TIMER a tlačidlami v/V nastavte čas, po ktorého uplynutí sa mobilná klimatizácia vypne. Čas časovača môžete nastaviť v rozmedzí od 1 do 24 hodín. Hneď ako uplynie nastavený čas, mobilná klimatizácia sa automaticky vypne a prepne do pohotovostného režimu. -
Page 85: Ďalšie Funkcie
ĎALŠIE FUNKCIE Automatické rozmrazovanie Ak sa mobilná klimatizácia prevádzkuje v miestnosti, kde je teplota veľmi nízka, môže sa na výparníku tvoriť námraza. Ak je mobilná klimatizácia zapnutá v režime chladenia alebo vysušovania a senzor oko- litej teploty zaznamená, že teplota cievky výparníka klesla pod -1 °C, dôjde k automatic- kému zapnutiu funkcie rozmrazovania, aby došlo k rozmrazeniu vytvorenej námrazy na výparníku a nedošlo k poškodeniu mobilnej klimatizácie. -
Page 86: Čistenie A Údržba
je správne vložená, nie je zamotaná, prehnutá ani na hadicu neklaďte žiadne predmety – pozrite obrázok 2 B. 4. Druhý koniec vypúšťacej hadice vložte do prázdnej nádoby alebo do odpadu. Je dôležité, aby druhý koniec vypúšťacej hadice bol umiestnený nižšie (20° a viac), než je horný... -
Page 87: Riešenie Problémov
Uloženie Ak nebudete mobilnú klimatizáciu dlhší čas používať, je potrebné ju riadne vyčistiť a uistiť sa, že sú jej komponenty suché. Vypnite klimatizáciu a odpojte vidlicu napájacieho kábla od sieťovej zásuvky. 2. Odpojte flexibilnú hadicu a tesniace fólie od okna. 3. - Page 88 Problém Príčina Riešenie Vyčistite vzduchový filter Vzduchový filter je znečis- podľa inštrukcií v časti tený. „Čistenie vzduchového filtra“. Prívod vzduchu je bloko- Odstráňte prekážku v vaný. prívode vzduchu. Mobilná klimatizácia Dvere alebo okno sú funguje, ale len na znížený Zavrite dvere alebo okno. otvorené.
- Page 89 Obráťte sa na autorizo- vaný servis. Vyprázdnite zásobník Nádrž na kondenzát je podľa inštrukcií v časti „VY- plná. PÚŠŤANIE KONDENZÁTU“. Týmto spoločnosť Alza.cz, a. s., vyhlasuje že typy rádiových zariadení SGR-AC-C180W, SGR-AC-F180W a SGR-AC-H180W sú v súlade so smernicou 2014/53/EÚ. SK - 89...
-
Page 90: Magyar
Amennyiben a készüléken olyan karbantartást vagy javítást kíván végrehaj- tani, amelyhez a készüléket meg kell bontani, akkor forduljon a márkaszer- vizhez siguro@alza.cz, vagy hívja fel a vevőszolgálatunkat. A kényelmesebb ügyintézés érdekében egybevontuk a kapcsolati helyeinket, így a fenti kap- csolatokat nem csak a javítások és karbantartások megrendeléséhez, hanem a reklamációk benyújtásához vagy a garancia utáni szervizeléshez is fel lehet... - Page 91 és előírások szerint kell az elektromos hálózathoz csatlakoztatni. FIGYELMEZTETÉS! A készüléket olyan helyiségben kell telepíteni, üzemeltetni és tárolni, amelynek alapterülete nagyobb, mint: 10 m 9000 BTU-s SGR-AC-C180W modell esetében; 12 m a 12000 BTU-s SGR- AC-F180W modell esetében; 13 m a 14000 BTU-s SGR-AC-H180W modell esetében.
- Page 92 rá. 24. A készülék szívó- és kifúvó nyílásaiba sem a kezét, sem más tárgyakat ne dugjon be. 25. Amennyiben a készülék felborult vagy leesett, vagy más módon megsérült, akkor a készüléket használni tilos. 26. Amikor a készülék működik, a hálózati csatlakozódugót ne húzza ki. 27.
-
Page 93: Javítási Útmutató
levegőjébe keverheti. 12. Ha a hűtőközeg kiszivárgott, akkor a készüléket csak megfelelően felkészült szakember javíthatja meg. Laikus személy nem nyúlhat a készülékhez. 13. A készülékben használt hűtőgáz szagtalan. 14. A szagtalan gáz kiszivárgását nem lehet szaglással észlelni. 15. Amennyiben a hűtőgáz véletlenül kiszivárgott, akkor mindenki azonnal hagyja el a helyiséget, a helyiséget alaposan szellőztessék ki és értesítsék a tűzoltóságot arról, hogy propán-bután gáz szivárgott ki. - Page 94 elválasztva a többi munkahelytől. A munkahelyen biztosítani kell azokat a feltételeket, amelyek a gyúlékony anyag felletti ellenőrzéshez szükségesek. 1.4. Hűtőközeg szivárgás ellenőrzése A munka folyamán, a munkahelyen biztosítani kell az esetleges hűtőközeg szivárgás folyamatos mérését (megfelelő érzékelő készülékkel). A készülék a szivárgást figyel- meztető...
- Page 95 szakember hajthat végre javításokat és karbantartásokat. Amennyiben a hűtőrend- szerben valamely elektromos alkatrész meghibásodott, akkor a hűtőrendszert nem szabad az elektromos tápfeszültséghez csatlakoztatni. Amennyiben a hiba nem szüntethető meg rövid időn belül, de a hűtőberendezést működtetni kell, akkor csak biztonságos ideiglenes megoldást lehet alkalmazni. Az ilyen pót-megoldásról a hűtő- berendezés tulajdonosát tájékoztatni kell.
- Page 96 lehet felhasználni. A gyúlékony hűtőközegek szivárgásának a felderítéséhez használjon megfelelő érzé- kenységű elektronikus szenzorral szerelt érzékelőket, ha szükséges, akkor ezeket előtte kalibrálja. A kalibrálást olyan környezetben kell végrehajtani, ahol nyomokban sincs hűtőközeg. Győződjön meg arról, hogy az érzékelő nem képez szikrát és nem tudja begyújtani a kiszivárgó...
- Page 97 A hűtőrendszer feltöltése előtt OFN gázzal nyomáspróbát kell végrehajtani a rend- szeren. A töltés megkezdése előtt a szivárgásokat meg kell szüntetni. A munkahely elhagyása előtt le kell ellenőrizni, hogy nincs-e valahol hűtőközeg szivárgás. 9. Leselejtezés A megsemmisítési munkák megkezdése előtt ismerkedjen meg a készülék felépíté- sével és a berendezés használatával.
- Page 98 a fémes részek földelését (meg kell előzni a szikraképződést), a berendezésen végre kell hajtani a szükséges karbantartásokat. Bármilyen kérdésével forduljon a gyártó műszaki tanácsadó szolgálatához. A kiszivattyúzott hűtőközeget ilyen gázok feldolgozásával foglalkozó cégnek kell átadni, a palackon fel kell a tartalom jellegét (pl. „Hulladék gáz”). A különböző típusú közegeket ne keverje össze a berendezésben és a palackokban sem.
- Page 99 A készülék részei Működtető panel Kimeneti nyílás, állítható lamellákkal Első fedél Bemeneti szűrő védőrács Levegőszűrő Felső leeresztő nyílás Tömlő csatlakoztató nyílás Alsó leeresztő nyílás Fogantyú (a készülék mindkét oldalán) 10 Kerekek Hajlékony tömlő 12 Tömlő bemeneti adapter 13 Tömlő kimeneti adapter 14 Távirányító...
-
Page 100: Műszaki Paraméterek
MŰSZAKI PARAMÉTEREK Paraméter / Típus SGR-AC-C180W SGR-AC-F180W SGR-AC-H180W Hűtőteljesítmény 9 kBtu/óra 12 kBtu/óra 14 kBtu/óra Névleges feszültség 220–240 V ~ 220–240 V ~ 220–240 V ~ Névleges frekvencia 50 Hz 50 Hz 50 Hz Hűtés teljesítményfelvé- 1003 W 1337 W... -
Page 101: Telepítés
TELEPÍTÉS A mobil klímaberendezés kicsomagolása A mobil klímaberendezést és tartozékait vegye ki a csomagolásból. A csomagolóanyag megsemmisítése előtt ellenőrizze le, hogy abból kivett-e minden tartozékot. Ellenőriz- ze le a készüléket és tartozékait, illetve azok sérülésmentességét. A mobil klímaberendezés elhelyezése Ha a klímaberendezés a szállítás közben 45°-nál nagyobb szögben meg volt döntve, akkor a készüléket 24 órán keresztül hagyja függőleges helyzetben pihenni. -
Page 102: Működtetés A Működtető Panelről
ragassza fel, hogy az ablakot be lehessen zárni. 3. A tömítő fóliát rögzítse úgy a tépőzárhoz, hogy a hajlékony tömlőt rögzíteni lehessen a tömítő fóliában (1E. ábra). 4. A tömítő fóliát úgy rögzítse, hogy ne maradjon nyílás, ahol a levegő szabadon áramolhat ki és be. -
Page 103: Működtetés A Távirányító Segítségével
Amikor a klímaberendezés működik, nyomja meg a TIMER gombot, majd a v/V gom- bokkal állítsa be a klímaberendezés automatikus kikapcsolásának az időtartamát. A kikapcsolási időt 1 óra és 24 óra között lehet beállítani. Amikor a klímaberendezés készenléti állapotban van, nyomja meg a TIMER gombot, majd a v/V gombokkal állítsa be a klímaberendezés automatikus bekapcsolásának az időtartamát. - Page 104 Megjegyzés a készülék újabb bekapcsolása előtt várjon legalább 2-3 percet. Ezzel megelőzheti a klímaberendezés meghibásodását. Az üzemmódok kiválasztása Az üzemmódok kiválasztásához használja a COOL, FAN, DRY és SLEEP gombokat. Hűtés üzemmód Amennyiben a helyiség levegőjét szeretné lehűteni, akkor ezt az üzemmódot kapcsolja A hűtés üzemmód bekapcsolásához nyomja meg a COOL gombot.
-
Page 105: Működtetés Mobil Alkalmazásból
Automatikus kikapcsolás Az automatikus kikapcsolás üzemmódban a működő klímaberendezés a beállított idő eltelte után lekapcsol. Amikor a klímaberendezés működik, nyomja meg a TIMER gombot, majd a v/V gom- bokkal állítsa be a klímaberendezés automatikus kikapcsolásának az időtartamát. A kikapcsolási időt 1 óra és 24 óra között lehet beállítani. A beállított idő... -
Page 106: Egyéb Funkciók
csatlakoztatásra” (Go to Connect) gombra, hogy csatlakozzon a „SmartLife-XXXX” nevű Wi-Fi hálózathoz. 5. A mobil klímaberendezés sikeres felvétele után a Wi-Fi dióda folyamatosan világít. Ettől kezdődően a mobil klímaberendezést a mobiltelefonra telepített alkalmazásból is működtetni lehet. 6. Ha a mobil klímaberendezést szeretné leválasztani az alkalmazásról, akkor 5 másodpercig tartsa benyomva a TIMER gombot. -
Page 107: Tisztítás És Karbantartás
Figyelmeztetés! A készüléket ne kapcsolja be, ha a dugó nincs szabályszerűen a nyílásba dugva. Ellenkező esetben a kondenzvíz a padlóra folyik ki (sérülést okozhat a padlóban). A kondenzátum folyamatos elvezetése A kondenzátum folyamatos elvezetéséhez a következőket tegye. Kapcsolja le a klímaberendezést és a hálózati csatlakozót húzza ki a fali aljzatból. 2. -
Page 108: Problémamegoldás
4. Csak teljesen száraz bemeneti szűrőt szereljen vissza a készülékbe. 5. A száraz szűrőt tegye vissza a készülékbe, majd tegye fel a védőrácsot is. A külső felület tisztítása A készülék külső felületeit mosogatószeres meleg vízbe mártott ruhával törölje meg. Majd törölje szárazra. Tárolás Ha a mobil klímaberendezést hosszabb ideig nem kívánja használni, akkor azt tisztítsa meg, és minden alkatrészét szárítsa meg. - Page 109 Probléma Megoldás Kapcsolja le a készüléket és a szűrót „A légszűrő A levegő szűrő eltömődött. tisztítása” fejezetben leír- tak szerint tisztítsa meg. A levegő beszívó nyílás Szüntesse meg a blokko- blokkolva van (pl. függöny- lás okát. nyel). A mobil klímaberendezés A helyiség ablaka vagy Zárja be az ablakot vagy működik, de kicsi a telje-...
- Page 110 Wi-Fi problémák megoldása Probléma Megoldás Ellenőrizze le, hogy a „SmartLife-XXXX” hálózatot jelölte-e meg. Kapcsolja le a klímaberendezést és a hálózati vezetéket is húzza ki a fali aljzat- Hálózati csatlakozás időtúllépés. ból. Várjál körülbelül 10 másodpercet. A hálózati csatlakozódugót ismét csatla- koztassa a fali aljzathoz, majd a klímabe- rendezést kapcsolja be.
- Page 111 Az Alza.cz, a.s. cég kijelenti, hogy a SGR-AC-C180W, SGR-AC-F180W a SGR-AC-H180W készülékbe épített rádió egység megfelel a 2014/53/EU irányelv követelményeinek. HU - 111...
-
Page 112: Français
Nous vous remercions de l’achat d’un appareil SIGURO. Nous vous remercions de votre confiance et nous sommes contents de vous présenter ici cet appareil dans les pages suivantes, ainsi que l’en- semble de ses fonctionnalités et modes d’usage. Nous misons sur la clarté et la responsabilité, par conséquent, nous coopé- rons exclusivement avec des fournisseurs qui respectent nos critères stricts... - Page 113 de l’appareil et comprenant les dangers potentiels Les tâches de nettoyage et d’entretien ne doivent pas être effectuées par des enfants sans surveillance. Les enfants ne doivent pas jouer avec l’appareil. 4. Cet équipement est destiné à être utilisé par des experts ou un personnel formé...
- Page 114 en fonctionnement. 22. Veillez à ce que l’équipement soit installé, utilisé et stocké à une distance suffisante des sources de flamme, ainsi que des substances inflammables et explosives. 23. Ne placez aucun objet sur l’équipement, ne vous asseyez pas et ne montez pas dessus.
-
Page 115: Instructions De Fonctionnement
Ne laissez pas le réfrigérant s’échapper dans l’air. 10. Le réfrigérant R290 est inflammable et plus dense que l’air. 11. Il tend à s’accumuler près du sol, mais des ventilateurs peuvent l’absorber et le faire circuler. 12. Si le réfrigérant fuit ou en cas de doute, l’analyse du problème ne doit pas être effectuée par des personnes non qualifiées. - Page 116 1.3 Espace de travail global Tous les membres de l’équipe de maintenance et les autres personnes présentes doivent être informés sur la nature du travail effectué. Le travail dans un lieu clos est à éviter. L’espace autour de la zone de travail doit être séparée en sections. La sécurité du local doit être assurée quant à...
- Page 117 La réparation et la maintenance des composants électriques doit inclure des contrôles et inspections de sécurité. En cas de défaillance pouvant affecter la sécurité, aucune source d’alimentation ne doit être branchée au circuit tant que le défaut n’est pas réparé. Si une réparation immédiate est impossible, le fonctionnement doit continuer et une solution temporaire doit être utilisée.
- Page 118 Les méthodes de détection des fuites suivantes sont considérées comme adaptées pour les systèmes contenant des réfrigérants inflammables. Des détecteurs de fuites électroniques doivent être utilisées pour la détection des réfrigérants inflammables, mais leur sensibilité peut être inadaptée ou nécessiter un recalibrage.
- Page 119 • Il faut faire particulièrement attention à éviter un remplissage excessif du système de réfrigération. Un test sous pression au gaz de traçage OFN doit être effectué avant un nouveau remplissage. Il faut vérifier l’absence de fuites après le remplissage et avant la mise en fonctionnement.
- Page 120 frigérant évacué et doivent être marquées de manière adéquate (bouteilles spéciales de stockage de réfrigérant). Les bouteilles doivent être équipées d'une soupape de sécurité et d’une vanne de fermeture en bon état. Les bouteilles de collecte vides sont drainées et, si possible, refroidies avant la vidange. L’équipement de collecte doit être en bon état de fonctionnement avec un ensemble d’instructions pour l’équipement qui doit être disponible, et doit être adapté...
- Page 121 Description de l’équipement Panneau de commande Ouverture de sortie avec lames réglables Cache avant Grille de protection filtre d’entrée Filtre à air Ouverture de drainage supérieure Tuyau flexible de raccord d’ouverture Ouverture de drainage inférieure Poignées (situées des deux côtés) 10 Roues Tuyau flexible 12 Adaptateur d’entrée tuyau...
-
Page 122: Paramètres Techniques
PARAMÈTRES TECHNIQUES Paramètres / Modèle SGR-AC-C180W SGR-AC-F180W SGR-AC-H180W Capacité de refroidisse- 9 kBtu / hr 12 kBtu / hr 14 kBtu / hr ment Tension nominale 220–240 V ~ 220–240 V ~ 220–240 V ~ Fréquence nominale 50 Hz 50 Hz... -
Page 123: Installation
INSTALLATION Déballage du climatiseur portable Retirez le climatiseur portable et tous ses accessoires de l’emballage. Retirez tous les éléments avant de jeter l’emballage. Vérifiez l’absence d’endommagement du climati- seur portable et de ses accessoires. Mise en place du climatiseur portable Si le climatiseur portable a été... -
Page 124: Contrôle Par Panneau De Commande
est fixé soit facile d’accès - voir Figure 1 E. 4. Veillez à ce qu’il n’y ait pas d’espace entre la fenêtre et le scellage pour éviter les fuites d’air. Le kit de fixation fenêtre est prévu pour être utilisé sur la plupart des types de fenêtre (horizontales et verticales - voir Figure 1 F). -
Page 125: Contrôle Par Panneau De Commande
Lorsque le climatiseur portable est en mode veille, appuyez sur la touche TIMER et uti- lisez les touches v/V pour régler le temps au bout duquel le climatiseur va démarrer. Le temps du minuteur peut être réglé entre 1 et 24 heures. Fonction sommeil Appuyez sur la touche SLEEP pour activer la fonction sommeil. - Page 126 Sélection du mode de fonctionnement Les touches COOL, FAN permettent de sélectionner le mode de fonctionnement DRY (sec) et SLEEP (sommeil). Mode de fonctionnement refroidissement Ce mode permet de réduire la température de la pièce. Pressez la touche COOL pour activer le mode de refroidissement. L’écran affiche l’icône de refroidissement.
-
Page 127: Contrôle Via L'application
et utilisez les touches v/V pour régler le temps au bout duquel le climatiseur va s’arrê- ter. Le temps du minuteur peut être réglé entre 1 et 24 heures. Lorsque le temps réglé est écoulé, l’appareil s’arrête automatiquement et passe en mode veille. -
Page 128: Autres Fonctions
dans l’application, le voyant Wifi s’allume. Vous pouvez désormais contrôler le climatiseur portable par le biais de l’application. 6. Pour déconnecter le climatiseur portable de l’application, appuyez et maintenez la touche TIMER pendant 5 secondes. Le voyant Wifi s’éteint. AUTRES FONCTIONS Dégivrage automatique Si le climatiseur portable est utilisé... -
Page 129: Nettoyage Et Entretien
Avertissement : N’utilisez jamais le climatiseur portable si l’orifice de drainage n’est pas correctement fermé. Le condensat pourrait sinon fuir et endommager le sol. Drainage continu du condensat Pour assurer un drainage en continu, procédez comme suit : Arrêtez le climatiseur portable et débranchez-le du secteur. 2. -
Page 130: Problèmes Et Solutions
4. Avant de le remettre en place, vérifiez que le filtre à air est propre et complètement sec. 5. Remettez en place le filtre à air dans le climatiseur portable et replacez la grille de protection. Nettoyage du boîtier externe Essuyez le boîtier externe du climatiseur portable avec une éponge molle imbibée d’eau tiède avec une faible quantité... - Page 131 Problème Cause Solution Nettoyez le filtre à air selon les instructions de Le filtre à air est encrassé. la section « Nettoyage du filtre à air ». L’entrée d’air est obstruée. Retirez l’obstacle. Le climatiseur fonctionne La porte ou la fenêtre est Fermez la porte ou la avec une puissance ré- ouverte.
- Page 132 Videz le bac selon la Le bac à condensat est section « DRAINAGE DU plein. CONDENSAT ». Par la présente, Alza.cz, a. S. déclare que les types d’équipement radio SGR-AC-C180W, SGR-AC-F180W et SGR-AC-H180W sont en conformité avec la Directive 2014/53 / EU. FR - 132...
-
Page 133: Italiano
è disponibile all’indirizzo e-mail siguro@alza.cz oppure tramite gli operatori all’infoline del fornitore. Per co- modità nella risoluzione di eventuali problemi con il prodotto, abbiamo unifi- cato questi punti di contatto e i contatti di cui sopra possono essere utilizzati in caso di reclami o assistenza post-garanzia. - Page 134 ATTENZIONE: L’apparecchio deve essere installato, messo in funzione e conservato in un locale con una superficie superiore a: 10 m per il modello SGR-AC-C180W da 9000 BTU; 12 m per il modello SGR-AC- F180W da 12000 BTU; 13 m per il modello SGR-AC-H180W da 14000 BTU.
- Page 135 esplosive. 23. Non appoggiare oggetti sull'apparecchio, non sedersi o arrampicarsi su di esso. 24. Non inserire dita o altri oggetti nelle aperture in ingresso e in uscita. 25. Non utilizzare l’apparecchio se è caduto, danneggiato o mostra segni visibili di danni. 26.
-
Page 136: Istruzioni Di Manutenzione
metterlo in circolazione. 12. Se il refrigerante viene liberato o si sospetta una perdita, personale non appositamente formato non deve essere autorizzato a cercare la causa. 13. Il refrigerante utilizzato nell'apparecchio è inodore. 14. Il fatto che il refrigerante sia inodore non significa che non ci possano essere perdite. - Page 137 1.3 Spazio di lavoro totale L'intera squadra di manutenzione e gli altri che lavorano in loco devono essere istruiti sulla natura del lavoro svolto. Devono essere evitati i lavori in spazi ristretti. Lo spazio intorno al posto di lavoro deve essere suddiviso in sezioni. È necessario garantire che le condizioni interne siano sicure ispezionando i materiali infiammabili.
- Page 138 Le riparazioni e la manutenzione dei componenti elettrici devono includere controlli di sicurezza e ispezioni dei componenti. Se si verifica un malfunzionamento che potreb- be compromettere la sicurezza, non è necessario collegare l'alimentazione al circuito fino a quando il guasto non è stato risolto in modo soddisfacente. Se il malfunziona- mento non può...
- Page 139 rilevare perdite di refrigerante. Il bruciatore alogeno (o qualsiasi altro rilevatore a fiam- ma libera) non deve essere utilizzato. 6. Metodi di rilevamento delle perdite I seguenti metodi di rilevamento delle perdite sono considerati accettabili per gli im- pianti contenenti refrigeranti infiammabili. Rilevatori di perdite elettronici devono essere utilizzati per rilevare i refrigeranti infiam- mabili, ma la loro sensibilità...
- Page 140 contenuto. • Le bombole devono essere tenute verticalmente. • È necessario assicurarsi che l’impianto di raffreddamento sia collegato a terra prima di riempirlo con refrigerante. • Quando il riempimento è completo, l’impianto deve essere etichettato (se non dispone già di un'etichetta). •...
- Page 141 11. Rimozione Quando il refrigerante viene rimosso dall’impianto, sia per la manutenzione che per lo smantellamento, le buone prassi consigliano di rimuovere tutto il refrigerante in modo sicuro. Quando si trasferisce il refrigerante alle bombole, assicurarsi che vengano utilizzate solo bombole appropriate per le rimozione del refrigerante. È necessario assicurarsi che sia disponibile il numero corretto di bombole per contenere il riempimento totale dell'impianto.
- Page 142 Descrizione dell'apparecchio Pannello di controllo Apertura di uscita con alette regolabili Carter anteriore Protezione della griglia del filtro di aspirazione Filtro dell’aria Apertura di scarico superiore Apertura di collegamento del tubo flessibile Apertura di scarico inferiore Maniglie (situate su entrambi i lati) 10 Ruote Tubo flessibile 12 Adattatore in ingresso del tubo flessibile...
-
Page 143: Parametri Tecnici
PARAMETRI TECNICI Parametri/Modello SGR-AC-C180W SGR-AC-F180W SGR-AC-H180W Capacità di raffresca- 9 kBtu / hr 12 kBtu / hr 14 kBtu / hr mento Tensione nominale 220–240 V ~ 220–240 V ~ 220–240 V ~ Frequenza nominale 50 Hz 50 Hz 50 Hz Potenza di raffresca- 1003 W... -
Page 144: Installazione
INSTALLAZIONE Disimballaggio del condizionatore d'aria portatile Estrarre dalla confezione il condizionatore portatile e tutti i suoi accessori. Prima di smaltire l'imballaggio, assicurarsi di rimuovere tutti i componenti. Controllare se il con- dizionatore d'aria portatile e gli accessori presentano danni. Posizionamento del condizionatore d’aria portatile Se il condizionatore è... -
Page 145: Controllo Tramite Pannello Di Controllo
la finestra possa essere facilmente chiusa anche dopo che il velcro è stato incollato. 3. Attaccare la pellicola sigillante al velcro in modo che l'apertura in cui verrà inserito il tubo flessibile sia facilmente accessibile - vedere la Figura 1 E. 4. -
Page 146: Controllo Tramite Telecomando
Mentre il condizionatore portatile è in funzione, premere il tasto TIMER e, utilizzando i tasti v/V impostare l'orario di spegnimento dopo il quale il condizionatore portatile si spegne. È possibile impostare il timer da 1 a 24 ore. Mentre il condizionatore portatile è in modalità standby, premere il tasto TIMER e, utilizzando i tasti v/V impostare l'orario dopo il quale il condizionatore portatile si ac- cende. - Page 147 danni al condizionatore d'aria. Selezione della modalità operativa Il tasti COOL e FAN sono usati per selezionare la m odalità operativa DRY e SLEEP. Modalità operativa raffrescamento Questa modalità è adatta se è necessario ridurre la temperatura ambiente. Premere il tasto COOL per attivare la modalità operativa raffrescamento. Sul display è visualizzata l’icona raffrescamento.
-
Page 148: Controllo Tramite L'applicazione
Mentre il condizionatore portatile è in funzione, premere il tasto TIMER e, utilizzando i tasti v/V impostare l'orario di spegnimento dopo il quale il condizionatore portatile si spegne. È possibile impostare il timer da 1 a 24 ore. Trascorso il tempo impostato, il condizionatore d’aria portatile si spegne automatica- mente e passa in modalità... -
Page 149: Altre Funzioni
premuto il tasto TIMER per 5 secondi. La spia Wi-Fi si spegne. ALTRE FUNZIONI Sbrinamento automatico Se il condizionatore d’aria portatile viene utilizzato in un locale in cui la temperatura è molto bassa, si potrebbe formare del ghiaccio sull'evaporatore. Se il condizionatore d’aria portatile viene acceso in modalità raffrescamento o deu- midificazione e il sensore di temperatura ambiente rileva che la temperatura della batteria dell'evaporatore è... -
Page 150: Pulizia E Manutenzione
mento e danneggiarlo. Scarico permanente della condensa Se è necessario garantire un drenaggio costante della condensa, procedere nel modo seguente: Spegnere il condizionatore portatile e scollegare la spina di alimentazione. 2. Rimuovere il tappo dal foro di scarico superiore. 3. Inserire l'estremità del tubo di scarico nel foro di scarico superiore. Assicurarsi che il tubo sia inserito correttamente, non sia attorcigliato o piegato e non appoggiare oggetti sul tubo - vedere la Figura 2 B. -
Page 151: Risoluzione Dei Problemi
bagnato o umido. Non asciugare il filtro dell'aria nell'asciugatrice né utilizzare altri apparecchi (ad es. asciugacapelli, ecc.) per accelerare l'asciugatura. 4. Prima di reinstallarlo, assicurarsi che il filtro dell'aria sia pulito e completamente asciutto. 5. Reinserire il filtro dell'aria nel condizionatore d’aria portatile e applicare la griglia di protezione. - Page 152 Problema Causa Soluzione Pulire il filtro dell'aria se- guendo le istruzioni nella Il filtro dell'aria è sporco. sezione "Pulizia del filtro dell'aria". L'ingresso dell'aria è bloc- Rimuovere l'ostacolo nella cato. presa d'aria. Il condizionatore d’aria La porta o la finestra è Chiudere la porta o la portatile funziona, ma solo aperta.
- Page 153 Risoluzione dei problemi del WiFi. Problema Soluzione Assicurarsi di aver selezionato il nome di rete "SmartLife-XXXX". Spegnere il condizionatore d’aria por- tatile e scollegare il cavo di alimenta- Timeout della connessione di rete. zione dalla presa elettrica. Aspettare 10 secondi. Ricollegare la spina e accendere il condizionatore d’aria portatile.
- Page 154 Con la presente, Alza.cz, a. S. dichiara che le tipologie di apparecchiature radio SGR-AC- C180W, SGR-AC-F180W e SGR-AC-H180W sono conformi alal Direttiva 2014/53 / EU. IT - 154...
-
Page 155: Română
Dacă aveți nevoie de ajutor pentru întreținerea sau repararea extensivă a produsului, care necesită intervenție la părțile sale interne, service-ul nostru autorizat este disponibil la adresa de e-mail siguro@alza.cz, sau apelați ope- ratorii la linia de informații a vânzătorului. Pentru comoditatea dumneavoas- tră... - Page 156 siguranță a aparatului și să fi înțeles potențialele pericole. Curățarea și întreținerea nu trebuie să fie efectuate de către copii fără a fi supravegheați. Copiii nu trebuie să se joace cu aparatul. 4. Acest aparat este destinat utilizării de către experți sau de către personal instruit în magazine, industrie ușoară...
- Page 157 suficientă de surse de incendiu, substanțe inflamabile sau explozive. 23. Nu așezați obiecte pe aparat, nu vă așezați pe el și nu vă urcați pe el. 24. Nu introduceți degetele sau alte obiecte în orificiile de admisie și de evacuare. 25.
-
Page 158: Instrucțiuni De Service
îl pot pune în circulație. 12. Dacă agentul frigorific este eliberat sau se suspectează că acesta s-a scurs, personalului neinstruit nu trebuie lăsat să încerce să găsească cauza. 13. Agentul frigorific utilizat în aparat este inodor (nu are miros). 14. Faptul că agentul frigorific este inodor nu înseamnă că nu ar putea exista scurgeri. - Page 159 1.3 Spațiul de lucru total Întregul echipaj de întreținere și celelalte persoane care lucrează la locație trebuie să beneficieze de instruire cu privire la natura lucrărilor efectuate. Trebuie evitată munca în spații închise. Spațiul din jurul locului de muncă trebuie împărțit în secțiuni. Trebuie să...
- Page 160 împotriva coroziunii. 1.9 Inspectarea componentelor electrice Repararea și întreținerea componentelor electrice trebuie să includă verificări de siguranță și inspecții ale componentelor. Dacă apare o defecțiune care ar putea com- promite siguranța, nicio sursă de alimentare nu trebuie conectată la circuit până când defecțiunea a fost rezolvată...
- Page 161 5. Detectarea agenților frigorifici inflamabili În niciun caz nu pot fi utilizate surse potențiale de aprindere pentru a căuta sau de- tecta scurgeri de agent frigorific. Nu trebuie utilizat arzătorul cu halogen (sau orice alt detector care utilizează flacără deschisă). 6.
- Page 162 diverșii agenți frigorifici. Furtunurile sau conductele trebuie să fie cât mai scurte posibil pentru a minimiza cantitatea de agent frigorific conținută în acestea. • Cilindrii trebuie ținuți în poziție verticală. • Trebuie să vă asigurați că sistemul de răcire este împământat înainte de a umple sistemul cu agent frigorific.
- Page 163 11. Îndepărtarea: Când agentul frigorific este îndepărtat din sistem, fie pentru service, fie pentru scoa- terea din funcțiune, bunele practici recomandă îndepărtarea în siguranță a tuturor agenților frigorifici. Când transferați agentul frigorific în cilindri, asigurați-vă că utilizați numai cilindrii de îndepărtare a agentului frigorific corespunzător.
- Page 164 Descrierea aparatului Panou de control Deschidere de evacuare cu lamele reglabile Capac frontal Apărătoarea grilei filtrului de admisie Filtru de aer Deschidere superioară pentru scurgere Deschidere pentru conectarea furtunului flexibil Deschidere inferioară pentru scurgere Mânere (amplasate pe ambele părți) Rotițe Furtun flexibil Adaptor de admisie pentru furtun Adaptor de evacuare pentru furtun...
-
Page 165: Parametri Tehnici
PARAMETRI TEHNICI Parametri/Model SGR-AC-C180W SGR-AC-F180W SGR-AC-H180W Capacitate de răcire 9 kBtu / oră 12 kBtu / oră 14 kBtu / oră Tensiune nominală 220–240 V c.a. 220–240 V c.a. 220–240 V c.a. Frecvență nominală 50 Hz 50 Hz 50 Hz Putere de răcire... -
Page 166: Instalare
INSTALARE Despachetarea aparatului portabil de aer condiționat Scoateți din ambalaj aparatul de aer condiționat portabil și toate accesoriile acestuia. Înainte de a arunca ambalajul, asigurați-vă că scoateți toate componentele. Verificați aparatul portabil de aer condiționat și accesoriile pentru a depista posibile deteriorări. Amplasarea aparatului portabil de aer condiționat Dacă... -
Page 167: Controlul Prin Intermediul Panoului De Control
și ale cadrului unde nu există balamale - consultați Figura 1 D. Asigurați-vă că fereastra poate fi închisă cu ușurință chiar și după ce Velcro este lipit. 3. Atașați folia de etanșare la Velcro, astfel încât deschiderea în care va fi introdus furtunul flexibil să... -
Page 168: Controlul Prin Intermediul Telecomenzii
modul Pornire automată, aparatul portabil de aer condiționat pornește automat după expirarea timpului de cronometrare. În timp ce aparatul portabil de aer condiționat funcționează, apăsați butonul TIMER și, utilizând butoanele v/V, setați timpul de cronometrare după care aparatul portabil de aer condiționat trebuie să... - Page 169 stinge. Scoateți fișa din priza electrică pentru a opri complet aparatul de aer condițio- nat. Avertizare: Nu scoateți niciodată fișa cablului de alimentare din priza electrică în timp ce aparatul portabil de aer condiționat este în funcțiune. Notă: Așteptați 2-3 minute înainte de a porni aparatul de aer condiționat. Acest lucru previne posibila deteriorare a aparatului de aer condiționat.
-
Page 170: Controlul Prin Intermediul Aplicației
Funcția de cronometrare Aparatul portabil de aer condiționat are două moduri ale funcției de cronometrare - oprire automată și pornire automată. Oprirea automată În modul Oprire automată, aparatul portabil de aer condiționat se oprește automat după expirarea timpului de cronometrare. În timp ce aparatul portabil de aer condiționat funcționează, apăsați butonul TIMER și, utilizând butoanele v/V, setați timpul de cronometrare după... -
Page 171: Alte Funcții
device” (Adăugați un dispozitiv) sau pe „+” în colțul din dreapta sus al aplicației. Sunt afișate categoriile și lista cu posibilele dispozitive care pot fi conectate. Selectați categoria „Large Home Appliances” (Electrocasnice mari) și apoi faceți clic pe „Portable Air Conditioner (WiFi) (Aparat de aer condiționat portabil (WiFi))”. Urmați instrucțiunile din aplicație. -
Page 172: Curățare Și Întreținere
Notă: Pe măsură ce condensul se scurge, puteți înclina ușor aparatul portabil de aer condiționat pentru a goli complet rezervorul pentru condens. 4. Dacă recipientul în care curge condensul este plin, introduceți dopul în orificiul de scurgere pentru a opri scurgerea condensului. Goliți recipientul și apoi puneți-l la loc sub deschidere. - Page 173 Avertizare: Nu utilizați niciodată un aparat portabil de aer condiționat cu un filtru de aer deteriorat sau fără filtru. Asigurați-vă că aparatul portabil de aer condiționat este oprit și că fișa cablului de alimentare este deconectată. 2. Îndepărtați grila de protecție și scoateți filtrul de aer. 3.
-
Page 174: Depanare
DEPANARE Problemă Cauză Soluție Fișa cablului de alimen- Conectați în mod cores- tare nu este conectată în punzător fișa cablului de mod corespunzător. alimentare. Goliți rezervorul conform Aparatul portabil de aer Rezervorul pentru con- instrucțiunilor din secțiu- condiționat nu funcțio- dens este plin. - Page 175 Problemă Cauză Soluție Așezați aparatul portabil Aparatul portabil de aer de aer condiționat pe o condiționat nu este așezat suprafață plană, solidă și pe o suprafață plană. stabilă. Aparatul portabil de aer condiționat generează un O parte a carcasei exteri- Verificați și fixați partea zgomot excesiv.
- Page 176 Goliți rezervorul conform Rezervorul pentru con- instrucțiunilor din secțiu- dens este plin. nea „DRENAREA CON- DENSULUI”. Prin prezenta, Alza.cz, a. S. declara ca tipurile de echipamente radio SGR-AC-C180W, SGR-AC-F180W și SGR-AC-H180W sunt conforme cu Directiva 2014/53/UE. RO - 176...
- Page 178 ENGLISH nebo obchodu, kde jste produkt zakoupili. Tento výrobek splňuje veškeré základní The use of the WEEE Symbol indicates požadavky směrnic EU. EU prohlášení that this product should not be treated o shodě je k dispozici na www.alzashop. as household waste. By ensuring this com/doc.
- Page 179 exigences des normes européennes corre‑ L’utilizzo del simbolo RAEE indica che spondantes. La déclaration de conformité questo prodotto non dev’essere tratta‑ européenne est disponible sur le site to come un normale rifiuto domestico. www.alzashop.com/DoC. Assicurandosi che questo prodotto venga Ce produit, vendu en Union européenne, smaltito correttamente, si contribuisce a est conforme aux exigences de la Directive proteggere l’ambiente.
- Page 180 20220120 Alza.cz, a. s., Jankovcova 1522/53, 170 00 Prague 7, Czech Republic © 2022 Alza.cz, a. s. All Rights Reserved. www.siguro.net...
Need help?
Do you have a question about the SGR-AC-C180W and is the answer not in the manual?
Questions and answers