Advertisement
Quick Links
Model:
Length:
27in (685mm)
Wingspan:
47ft (1200mm)
Wing area:
31in² (2.04dm²)
Weight:
8.8oz (250g)
Motor:
45g Brushless
Outrunner
Materials needed:
6mm Depron
3mm Depron
3mm Balsa
3mm diameter plastic tubing (Balsa can be used also)
Pushrod material (Balsa)
Music wire for servo-pushrods connection
2 Wheels 1.5in (45mm) diameter
1.5mm music wire for the gear
Thread for rigging
Screws and nuts for wing mount
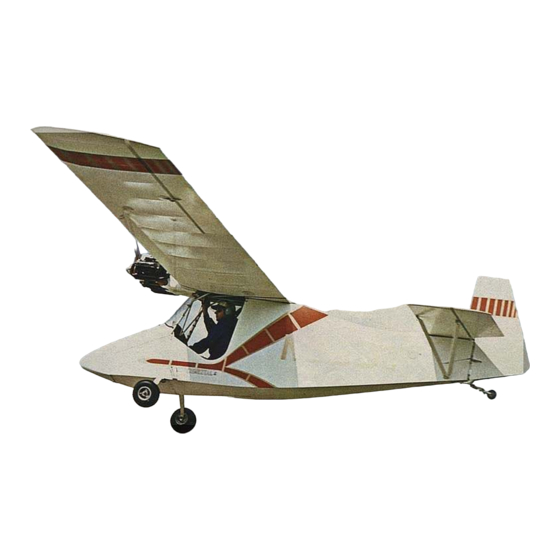
Flaglor Sky Scooter
The Build Guide
Full Size:
Length:
15ft (4.78m)
Wingspan:
28ft (8.64m)
Wing area:
115ft² (10.7m²)
Weight:
650lb (300kg)
Engine:
Volkswagen
engine, 40hp
Advertisement

Summary of Contents for RC GROUP Flaglor Sky Scooter
- Page 1 Flaglor Sky Scooter The Build Guide Full Size: Length: 15ft (4.78m) Wingspan: 28ft (8.64m) Wing area: 115ft² (10.7m²) Weight: 650lb (300kg) Engine: Volkswagen engine, 40hp Model: Length: 27in (685mm) Wingspan: 47ft (1200mm) Wing area: 31in² (2.04dm²) Weight: 8.8oz (250g) Motor:...
- Page 2 5min Epoxy Contact glue CA-Glue Soldering iron X-Acto knife RC- and Power System-Components needed: 3 Micro Servos 4ch Receiver Brushless Motor 30-50g (should be able to make 250g of thrust) LiPo battery 2S/3S 500-1200mAh ESC matching your motor and battery Ok, all the other tiny parts I forgot every scratchbuilder has at home☺...
- Page 3 Print out the plans, tape the pages together and cut out the templates. Cut out the parts.
- Page 4 Make notches as indicated on the plans. Use the soldering iron. Don’t cut all the way through! Just enough that the parts can be slightly bent. Glue the bulkheads to one side of the fuselage. Add the other side. Use contact glue.
- Page 5 Attach the ceiling. Notice the mid bulkhead folded forward. Add the fuselage bottom. The fuselage has to get the shape of a seaplane.
- Page 6 Glue the front top of the fuselage on. This part is made from 3mm depron. You can use 6mm but make sure your noseblock is big enough! Make the cabin struts out of plastic tubing, balsa can be used also. Make the nose. Laminate 11 layers of depron together.
- Page 7 Glue the motor mount stick onto the ceiling. Use Epoxy. Add the two “wing supports”. Prepare wing and tail parts. The elevator halves are cut out with a soldering iron. Again don’t cut all the way through! Leave a bit depron for the hinge. The elevator halves are joined with a piece of balsa.
- Page 8 Just add a few more degrees of dihedral if you’re flying just with rudder and elevator. The ailerons are cut out the same way as the elevator. Make a motor mount that fits your motor. Add a square stick for the common stick mount.
- Page 9 Make the tail linkages for rudder and elevator. The rudder is hinged with two small strips of thin plastic to the end of the fuselage. You have to cut a notch in the rudder for the elevator joiner. Make the aileron linkages. It’s optional! Also make a wing mount. I used 2 screws going through the wing into nuts in the motor mount plate.
- Page 10 Bend the 1.5mm music wire to the shape of the gear and epoxy it on the bulkhead. Add the wheels. Cut the windshield out of thin plastic sheeting and glue it on the ceiling, the 2 struts and the front top of the fuselage. Use contact glue.
- Page 11 You’re done! Happy flying!
Need help?
Do you have a question about the Flaglor Sky Scooter and is the answer not in the manual?
Questions and answers