Table of Contents
Advertisement
Advertisement
Table of Contents

Related Manuals for Cyrusher K5242 LCD


Summary of Contents for Cyrusher K5242 LCD
- Page 1 USERS GUIDE K5242 LCD...
-
Page 2: Table Of Contents
CONTENT Preface · · · · · · · · · · · · · · · · · · · · · · · · · · · · · · · · · · · · · · · · · · · · · · · · · · · · · · · · · · · · · · · · · · · · · · · · · · · · · · · · · · · · · · · · · · · - 1 - 1. - Page 3 6.7 About Interface · · · · · · · · · · · · · · · · · · · · · · · · · · · · · · · · · · · · · · · · · · · · · · · · · · · · · · · · · · · · · · · · · · · · · · · · · · · · · · · · · · · · · · · · · · · · · · · · · · · · · · · · · · · · · · · · · · · · · · · · · · · · - 12 - 7.
-
Page 4: Preface
Preface Dear user, to ensure better performance of your e-bike, please read through the K5242 product introduction carefully before using. We will use the most concise words to inform you of all the details (including the hardware installation, setting and normal operation use of the display) when using our display. -
Page 5: Appearance And Dimensions
1. Appearance and Dimensions 1.1 Material and Color K5242 products are made of black and white PC. Under the temperature of -20 to 60℃, the shell material can ensure normal usage and good mechanical performance. Dimension(unit:mm) K5242 is equipped with special button. N3 button can be installed on the left side of the handlebar or on the right side of the handlebar. -
Page 6: Function And Button Definition
2. Function and Button Definition 2.1 Function description K5242 provides you with a variety of function modes, to meet your riding needs. Its functions are as follows: ◆Battery power indication ◆Motor power indication ◆Speed indication ◆Distance (including single trip distance and ODO display) ◆Single riding time indication ◆Walk assist indication ◆Cruise Mode... -
Page 7: Note For Users
3. Note for Users Be care of the safety use. Don’t attempt to release the connector when battery is on power. Try to avoid hitting. Don’t split the waterproof sticker to avoid affecting the waterproof performance. Don’t modify system parameters to avoid parameters disorder. Make the display repaired when error code appears. -
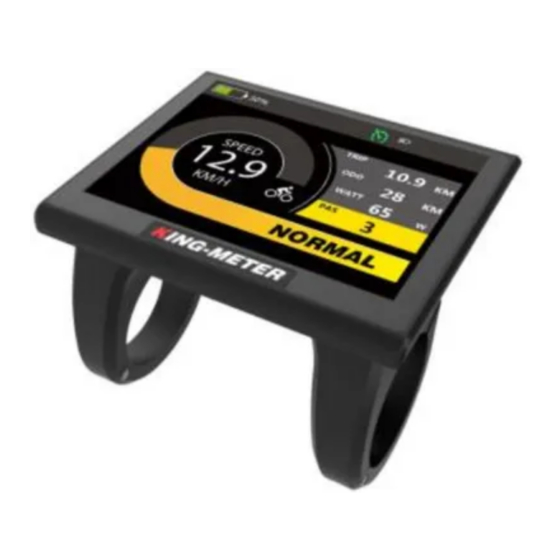
Page 8: User Interface
5.2 User interface There are two display interfaces, including normal display interface and data statistics interface. Long press “UP” + “MODE” button to switch from normal display interface to data statistics interface; long press “MODE” button to switch back from data statistics interface to normal display interface. Normal display interface Data statistics interface 5.3 Normal display interface... -
Page 9: Walk Assist Mode (Cruise Mode)
normal display interface automatically. Note: the maximum statistical time range of linear statistical chart is three hours, and the timing will re-start again after three hours. Data statistics interface 5.5 Walk Assist Mode (Cruise Mode) When there is no speed, press and hold “DOWN” button for 3 seconds to enter the Walk assist mode. The E-bike will travel at a constant speed of 6km/h. -
Page 10: Pas Level Selection
the headlight. Headlight indicator 5.7 PAS Level Selection Short press the "UP" or “DOWN” button to switch the PAS level, the motor output power will be changed accordingly by the PAS level of E-bike. The default range of PAS level is 0-5 levels. Level 1 is the lowest output level, and the level 5 is the highest output power level of the motor. -
Page 11: Error Code
Output Power Indicator 5.10 Error Code When the e-bike electronic control system fails, the display will automatically indicate the error code. For the definition of detailed error codes, see appendix 1. Error Code indicator The fault can only be exited when the fault is eliminated, and the E-bike cannot continue to drive after a fault occurs. -
Page 12: Wheel Size Setting
Setting list interface 6.1 Wheel Size Setting Short press “MODE” button to enter the setting option. The settable values are: 16, 18, 20, 22, 24, 26, 700C, 27.5, 28 and 29 inch. Select the corresponding wheel diameter of the E-bike through “UP” and “DOWN”... -
Page 13: Backlight Brightness Setting
Speed limit setting interface 6.3 Backlight Brightness Setting Short press “MODE” button to enter the setting option. The setting options: 1, 2 and 3 indicates the backlight brightness, 1 is the darkest, 2 is standard brightness, 3 is the brightest. The default value is 3. Long press “MODE”... -
Page 14: Auto Off Time Setting
Display unit setting interface 6.5 Auto Off Time Setting Short press “MODE” button to enter the setting option. Press the “UP” and “DOWN” button to adjust the auto off time. The optional range is from 5min to 60min, Default setting is 10min. long press “MODE” button to return to the setting list interface. -
Page 15: About Interface
Battery Display Mode setting interface 6.7 About Interface Short press “MODE” button to enter the “About” interface, this interface shows manufacturer’s name, software and hardware version number and other information, which is usable for later display maintenance. 7. Advanced Settings When there is no speed in the power on state, press and hold the “UP”... -
Page 16: Pas Range Setting
Advanced Display Setting 7.1 Pas Range Setting Short press “MODE” button to enter the setting interface, there are 3 modes in the PAS level selection: 0-3 , 0-5, 0-9,. Switch by pressing “UP” or “DOWN” button, short press “MODE” button to confirm, Long press “MODE”... -
Page 17: Zero Start Setting
Speed Sensor Magnetic setting interface 7.3 Zero Start Setting Short press “MODE” button to enter the setting interface. Press “UP/DOWN”to select Yes or No, Yes means motor can be started at 0 speed with throttle, No means the throttle function can be used only at an initial speed. -
Page 18: Start Strength Setting
PAS Power Sensitivity setting interface 7.5 Start Strength Setting Short press “MODE” button to enter the setting interface. The setting range is 1 to 5. 5 is the highest start strength, 1 is the lowest, Press “UP/DOWN” button to select start strength value, Default setting is 3. -
Page 19: Current Limit Setting
PAS Magnetic Number setting interface 7.7 Current Limit Setting Short press “MODE” button to enter the setting option. The current limit can be set in the range of 1.0- 22.0A. Press “UP/DOWN” button to change the maximum current value of the controller. Default setting is 22A. -
Page 20: Speed Duty Setting (Pwm)
Factory Data Reset interface 7.9 Speed Duty Setting (PWM) Short press “MODE” button to enter the setting option. The setting options can be set in the range of 0%-100%. Press “UP/DOWN” button to change the value of the Speed duty percentage. Long press “MODE”... -
Page 21: Preparation Before Startup
Driver Mode Setting interface 8. Preparation Before Startup Please read the instruction carefully before using the display. 9. FAQ Q: Why can’t turn on the display? A: Please check whether the battery is turned on or the leakage lead wire is broken Q: How to deal with the error code display? A: Contact the e-bike maintenance station in time. -
Page 22: Version
4, Lead wire of display scratch or break. 5, The fault or damage is caused by the force majeure (such as fire, earthquake, etc.) or natural disasters (such as lighting, flooding, etc.) 6, Product exceeded warranty period. 11. Version The instruction manual of this display is the operation manual of the general software version (version 1.0) of Tianjin King-Meter Technology Co., Ltd. -
Page 23: Appendix 1: Error Code Definition
Appendix 1: Error Code Definition Error Code Definition 0x04 Throttle abnormal 0x06 Under voltage protection 0x08 Motor Hall abnormal 0x09 Motor phase cable failure Controller high temperature 0x10 protection Motor high temperature 0x11 protection 0x12 Current sensor failure 0x13 Battery temperature failure Motor temperature sensor 0x14 failure... - Page 24 - 21 -...
Need help?
Do you have a question about the K5242 LCD and is the answer not in the manual?
Questions and answers