MobileODT EVA System User Manual
Hide thumbs
Also See for EVA System:
- Instructions for use manual (23 pages) ,
- Instructions for use manual (23 pages)
Table of Contents
Advertisement
Quick Links
ECO/
Rev.
CAPA/
no.
SWC
01
CAPA 20005
Unify the following user manuals into one document: AUM001
ECO 334,
(Becomes obsolete), PUM001 (Becomes obsolete), 10LB004
ECO 335,
(becomes controlled reference document).
SWC 336
Update to features according to ECO's/SWC's.
Add VisualCheck
02
NA
Update User Guide Name, rephrase section 1 intro (General)
03
Following sections were updated:
Update VisualCheck flow – section 15.5
Handwave settings screenshots Section 11.21
"About" section (replaced "Settings") – Sections 11.20, 11.4.6,
11.7.4
High contrast filter on portal Section 10.9.10
Search bar on app – Sections 11.19
Quality frame screenshot Section 11.25
04
SWC 338
Add SANE Bluetooth foot pedal section 13.3.3
Limited capture images for demo account – section 11.9.11
Limitation of active logins 11.4, 10.6
reCaptcha section 10.5 , 11.3
05
SWC 339+3
6 digit PIN code policy – Updated sections and screenshots 11.1.8,
40
11.1.10, 11.5, 11.6.1
Reenter password screenshot 10.4
Change sign in screens – 11.7.3, 11.1.5, 11.1..6
Updated screenshot – 10.8.1
Change "Sign in" to "Log in" + screenshots – 11.2, 11.7.1, 10.1,
10.3
Added message on sign in screens – updated screenshots 11.7.3
Stronger password policy – 11.7.4, 10.2.8, 10.4.4
Rolling Stand Updated section 2.1.1.5
Hardware
Figures numbering organizing – sections 2.1.3, 2.2, 3.1, 4.1, 4.2,
section
4.3, 7.2.2, 7.3.2, 7.4.2
EVA System User Manual
EVA System User Manual
Change Description
Name
Revision History
Approval Matrix
Position
Page 1 of 86
Doc ID: 4baaf484d7f5f01d2b8e5dc0fedc637256236abe
No. 10LB038
Rev.04
Date
26/Nov/2020
10/Jan/2021
24/Jan/2021
22/Feb/2021
22/Apr/2021
08/Aug/2021
13/Oct/2021
Signature
Date
Advertisement
Table of Contents
Troubleshooting

Related Manuals for MobileODT EVA System


Summary of Contents for MobileODT EVA System
- Page 1 No. 10LB038 EVA System User Manual Rev.04 EVA System User Manual Revision History ECO/ Rev. CAPA/ Change Description Date no. SWC 01 CAPA 20005 Unify the following user manuals into one document: AUM001 26/Nov/2020 ECO 334, (Becomes obsolete), PUM001 (Becomes obsolete), 10LB004 ECO 335, (becomes controlled reference document). SWC 336 Update to features according to ECO’s/SWC’s. Add VisualCheck 02 NA Update User Guide Name, rephrase section 1 intro (General) 10/Jan/2021 03 Following sections were updated: Update VisualCheck flow – section 15.5 24/Jan/2021 Handwave settings screenshots Section 11.21 ...
- Page 2 No. 10LB038 EVA System User Manual Rev.04 Written by Almog Avivi Product Manager 13/Oct/2021 Reviewed by Yana Katsman QA/RA Manager 13/Oct/2021 Reviewed by Lior Shwarzwald Head of Product 13/Oct/2021 Approved by Leon Boston CEO 13/Oct/2021 Page 2 of 86 Doc ID: 4baaf484d7f5f01d2b8e5dc0fedc637256236abe...
- Page 3 No. 10LB038 EVA System User Manual Rev.04 EVA (Enhanced Visual Assessment) System User Manual ...
-
Page 4: Table Of Contents
No. 10LB038 EVA System User Manual Rev.04 Table of Contents Hardware .................................. 8 1. General .................................. 9 1.1. Indications for Use ............................ 10 1.2. Contraindications ............................ 10 1.3. Risks and Benefits ............................ 10 1.4. How to Read These Operating Instructions .................... 10 1.5. Symbols and Markings ............................ 10 1.6. Important Notes on Safety .......................... 11 1.7. List of Warnings............................... 11 1.8. List of Precautions ............................ 12 1.9. Product Overview............................ 12 1.10. Components .............................. 12 1.11. Primary Function ............................ 13 2. ... - Page 5 No. 10LB038 EVA System User Manual Rev.04 7.2. Positioning ............................... 27 7.3. Illumination .............................. 28 7.4. Focus ................................ 28 8. Specifications ................................ 30 8.1. Electromagnetic compatibility manufacturer declaration................ 31 8.2. Electromagnetic emissions .......................... 31 8.3. Recommended separation distances ...................... 33 9. Replacement parts and technical service ....................... 35 Software .................................. 35 10. EVA Portal ................................ 36 10.1. Welcome screen ............................ 36 10.2. Setting up a user ............................ 36 10.3. Signing in .............................. 37 10.4. Forgot password ............................ 38 10.5. ...
- Page 6 No. 10LB038 EVA System User Manual Rev.04 11.14. Exporting the exam ............................. 62 11.15. Back up exams on a local drive: ........................ 64 11.16. Limited storage preventing export ...................... 65 11.17. Reviewing exams on the app ........................ 65 11.18. Deleting an exam ............................ 68 11.19. Exam Drafts .............................. 69 11.20. About ................................ 69 11.21. Handwave feature ............................ 70 11.22. Camera mode .............................. 70 11.23. Quality frame .............................. 70 11.24. Support ................................ 71 11.25. Learn................................ 71 11.26. Log out ................................ 71 Appendices .................................. 72 12. ...
- Page 7 No. 10LB038 EVA System User Manual Rev.04 17. Appendix 6: Teleconsultation (Zoom Telehealth) .................... 86 17.1. Installing the Zoom Application ........................ 86 17.2. Initiating a teleconsultation connection ..................... 86 Page 7 of 86 Doc ID: 4baaf484d7f5f01d2b8e5dc0fedc637256236abe...
-
Page 8: Hardware
No. 10LB038 EVA System User Manual Rev.04 Hardware Page 8 of 86 Doc ID: 4baaf484d7f5f01d2b8e5dc0fedc637256236abe... -
Page 9: General
General Thank you for purchasing the EVA System by MobileODT. Please read the instructions contained in this user guide thoroughly before using your new visualization solution. This user guide can be found online at help.mobileodt.com. This user guide will help all users including those utilizing one of our clinical scenarios (please see appendices COPLO, SANE and VIA) and on all of our device models including: EVA 3 Plus, EVA WELL and EVA 3.0*. *For those users on EVA 3.0 please contact support for additional information on hardware maintenance and support) For further support, please contact us: MobileODT, LTD. Ben Avigdor 8, Tel Aviv, Israel 6721832 Email: support@mobileodt.com Tel.: +1 (617) 4544687 Website: www.mobileodt.com The following is the contact information for the European Authorized Representative used for this device: FULL TRAINING FOR USE OF THE EVA SYSTEM CAN BE FOUND AT: HTTP://LEARN.MOBILEODT.COM HTTP://HELP.MOBILEODT.COM Page 9 of 86 Doc ID: 4baaf484d7f5f01d2b8e5dc0fedc637256236abe... -
Page 10: Indications For Use
No. 10LB038 EVA System User Manual Rev.04 Indications for Use 1.1. The EVA System is intended to provide magnified viewing of the vagina, cervix, and external genitalia in order to aid in diagnosing abnormalities and selecting areas for biopsy. The solution is intended for use in hospitals, doctors’ offices, and remote and rural clinics. Contraindications 1.2. There are no contraindications for use of the EVA System. Risks and Benefits 1.3. The EVA System should not touch the patient. There are minimal risks to the patient. The system has been tested according to specific medical standards. How to Read These Operating Instructions 1.4. These instructions are structured around the operation of the EVA System, from assembly to clinical use. Basic troubleshooting information is also provided. The following content contains instructions for the assembly and use of the EVA System colposcope. Instructions for the integrated mobile application and cloudconnected online portal are referenced in the manual. Symbols and Markings 1.5. General warning sign Stand by symbol Press this button to turn on the LED light. Press the button a second time to turn it off. Symbol Description Serial Number Catalog Number Refer to instruction manual/booklet Prescription use only ... -
Page 11: Important Notes On Safety
1.6. Before you begin using the EVA System, please become familiar with the following safety regulations and keep these in mind while using the device. Users of the EVA System should be thoroughly trained in the appropriate medical procedures. All users need to read and understand these instructions before performing any procedure. List of Warnings 1.7. The warning statements in this manual describe serious adverse reactions and potential safety hazards, limitations in use imposed by them, and steps that should be taken if they do occur. Local and/or other applicable laws may restrict the sale of this device to, or to the order of, a physician 1.7.1. or other appropriately licensed medical professional. The EVA System may not be used unless you or your organization meet the requirements and/or obligations under such laws and you assume full responsibility for any illegal purchase and/or use of the device. The EVA System should only be used by a trained and licensed operator, whose accreditation is valid in the country and/or region in which the procedures are being conducted. All service to the EVA System must be performed by MobileODT or an authorized repair center. 1.7.2. There are no user serviceable parts in this unit or in its accessories (other than the mobile device). Any attempt to disassemble and/or repair this unit will result in voiding of the warranty. Capture images only within the EVA application. 1.7.3. The attached lens should not be removed from the unit it was sent with, without written approval 1.7.4. from the manufacturer. The LED light is extremely bright and should be the only illumination used as a light source during an 1.7.5. examination. Do not stare directly into the light when it is in operation. The system, both optical unit and mobile device, should not be used while being charged. Users are 1.7.6. requested to take care to charge the system before use. Only the dedicated mobile device that comes with this optical unit and complies with relevant safety 1.7.7. standards can be used with the EVA System. When transmitting data from the EVA application over a WiFi network, only use a password 1.7.8. -
Page 12: List Of Precautions
No modification of this equipment is recommended. 1.8.9. Product Overview 1.9. Before use of your colposcope, check for damage on the outside of the transport packaging, the optical unit, mobile device, and any accessories. The following chapters provide stepbystep instructions for the testing, installation, operation, and security references. Components 1.10. Before initial setup of the EVA System, check that you have received all the following components: • Optical unit body and lens • Samsung J530 mobile device* • Syncwire 2 Ports 30W/6A Dual Port MicroUSB Charger • Spare parts kit including: 1 charging cable, 2 technician screws and an Allen key • Neck strap • Lens cleaning cloth • User guide If any parts are missing, please notify MobileODT. * Please refer to the Samsung J530 user manual to find specifications regarding the WiFi, how the mobile device should be configured and operated including the quality of service, operating distances and ranges, security requirements, and how to deal with any risks and problems that may arise. Page 12 of 86 Doc ID: 4baaf484d7f5f01d2b8e5dc0fedc637256236abe... -
Page 13: Primary Function
No. 10LB038 EVA System User Manual Rev.04 Primary Function 1.11. To avoid doubt, the primary function of the EVA System is for mobile colposcopy, the magnified viewing of the tissues of the vagina, cervix, and external genitalia for the purpose of conducting colposcopy. Use of the colposcope and its primary function of visualization is not dependent upon constant WiFi or mobile connection. If interference from other WiFi devices affects the WiFi connection or if the WiFi connection is interrupted or lost due to any other reason, the colposcope can still function as intended and images will be synced and accessible on the online portal when a connection is restored. Page 13 of 86 Doc ID: 4baaf484d7f5f01d2b8e5dc0fedc637256236abe... -
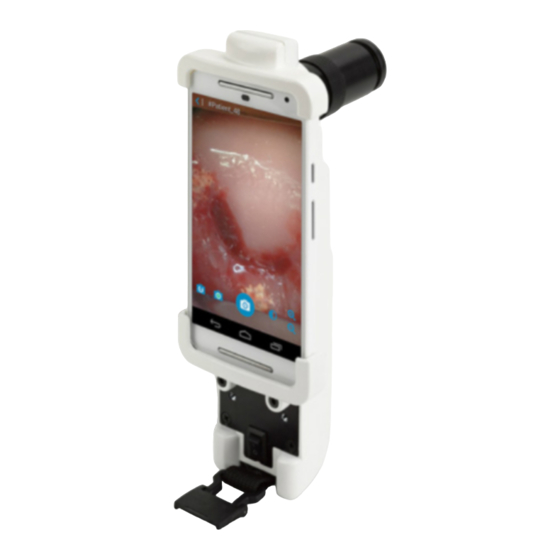
Page 14: Eva System Device
No. 10LB038 EVA System User Manual Rev.04 EVA System device Back View (figure 1) Page 14 of 86 Doc ID: 4baaf484d7f5f01d2b8e5dc0fedc637256236abe... - Page 15 No. 10LB038 EVA System User Manual Rev.04 Front View (figure 2) Page 15 of 86 Doc ID: 4baaf484d7f5f01d2b8e5dc0fedc637256236abe...
-
Page 16: Connecting To The Eva Stand Or A Neck Strap
No. 10LB038 EVA System User Manual Rev.04 Left View (figure 3) Right view (figure 4) Connecting to the EVA stand or a neck strap 2.1. Together with your EVA System, MobileODT provides a device stand for stabilizing the colposcope while capturing an image. There are two types of stands: a wheeled stand and a portable stand. Below are basic instructions on connecting the colposcope to both models. See the detailed assembly instructions that came with the stand itself for further explanations. Wheeled Stand 2.1.1. 2.1.1.1. The wheeled stand enables handsfree examination and allows you to move freely within your clinic while keeping the EVA System connected to the stand at all times. 2.1.1.2. The wheeled stand arrives in two distinct parts: the base and the pole. During the exam, the stand wheels should be locked manually to improve stability and limit motion blur. 2.1.1.3. In addition, the 360° ball head can be adjusted during the example to improve the ability to visualize the cervix at the necessary angle. 2.1.1.4. To assemble the stand, use the provided key to screw the pipe with the ballhead to the base with help of M6 selflocking nut, M6 washer and spring washer included in the shipment. Refer to the ... - Page 17 No. 10LB038 EVA System User Manual Rev.04 2.1.1.5. There are two stand models that are assembled according to the assembly instructions that are provided with the stand. The stand model is provided according to stock available. 2.1.1.5.1. A 3legs stand: 2.1.1.5.2. A 4legs stand: Page 17 of 86 Doc ID: 4baaf484d7f5f01d2b8e5dc0fedc637256236abe...
- Page 18 No. 10LB038 EVA System User Manual Rev.04 Portable Stand 2.1.2. The portable stand also enables a handsfree examination. This stand can be carried from location to location, can be folded for portability between exam rooms, or put into the accompanied carrying case to move between clinical sites. Connecting the Neck Strap 2.1.3. The colposcope can be connected to a neck strap for carrying the unit more comfortably around your clinic. Please follow the steps below to connect the neck strap to the colposcope securely: 2.1.3.1. To attach the strap to the device, first flatten the strap and slide it under one corner of the strap attachment slot. Page 18 of 86 Doc ID: 4baaf484d7f5f01d2b8e5dc0fedc637256236abe...
-
Page 19: Turning On The Led Light
No. 10LB038 EVA System User Manual Rev.04 (figure 5 ) (figure 6) 2.1.3.2. Slide the strap under the second corner and pull through. (figure 7) (figure 8) Turning on the LED light 2.2. Turn on the LED light by pressing the on/off button. (figure 9) ... -
Page 20: Charging
No. 10LB038 EVA System User Manual Rev.04 Charging The EVA System includes two components: the optical unit and mobile device. Each needs to be charged separately. 2 Ports 30W/6A A charger appropriate for over 150 countries is provided, in order to allow for charging in different countries. Power: 30W Input: 100240V Output: 3A*2 Technology: iSmart Weight: 100g Dimensions: 50mm*43mm*42mm Certification: CE/FCC/UL/LVD Charging the Optical Unit 3.1. To charge the optical unit, connect the MicroUSB charger to the unit’s right side charging port. Connect 3.1.1. the cable to a wall socket with the proper USBelectrical port adapter. (figure 11) The charger included has two slots for USBs to allow charging in a single electrical outlet. 3.1.2. The Charge Indicator Lights can be found above the charging port on the front of the optical unit. When 3.1.3. connected to the charger, the lights will turn on and turn green while charging. Please Note: The colposcope cannot be used while charging, as the LED light will not be able to be switched on. Charge indicator lights – operation mode 3.1.4. Page 20 of 86 ... -
Page 21: Charging The Mobile Device
No. 10LB038 EVA System User Manual Rev.04 Charge indicator lights charging mode 3.1.5. Charging the Mobile Device 3.2. To charge the mobile device when it is fitted within the optical unit, connect the Micro USB cable to 3.2.1. the charging port builtin to the unit. To access the port, raise the charging port cover located above the LED light on/off switch. 3.2.2. Connect the cable to a wall socket with the proper USBelectrical port adapter. 3.2.3. The mobile device should be charged whenever the colposcope is not in use to ensure proper 3.2.4. functionality during the examination. (figure 12) Page 21 of 86 Doc ID: 4baaf484d7f5f01d2b8e5dc0fedc637256236abe... -
Page 22: Taking The Mobile Device Out Of The Optical Unit
No. 10LB038 EVA System User Manual Rev.04 Taking the Mobile Device out of the Optical Unit For users of the SANE or EVA WELL (general gynecology) models the mobile device should be taken out of the optical unit when capturing full body images in Camera mode. For more information about Camera mode see appendix To remove the mobile device from the optical unit (figure 14): 4.1. Slide the Phone Release Slider at the top of the device to the right. 4.1.1. Push the top bracket up. 4.1.2. Detach the top bracket from the optical device and remove the mobile device. 4.1.3. If a technical screw was manually added to secure the device, remove the technical screw with the 4.1.4. provided allen key before removing the top bracket. Please note: When the mobile device is removed from the optical unit the image will look inverted. To change it to a regular camera view, you must click on the settings icon at the top of the image capture screen and switch the ‘capture mode’ setting to ‘camera mode. This will allow normal, uninverted imaging through the EVA application. To insert the mobile device into the optical unit (figure 13): 4.2. Place the mobile device back into the optical unit. 4.2.1. Push the connectors of the top bracket into the slots of the optical unit, and then pull down to fully 4.2.2. engage the top bracket with the optical unit. OPTIONAL: To secure the phone into the EVA System device, preventing users from removing the phone from 4.3. the optical device (figure 14): Take 1 technical screw and the allen key from the spare parts kits included in your shipment. 4.3.1. Slide the Phone Release Slider at the top of the device to the right. 4.3.2. - Page 23 No. 10LB038 EVA System User Manual Rev.04 (figure 14) To secure the phone into the EVA System device, preventing users from removing the phone from the optical device (figure 15) Page 23 of 86 Doc ID: 4baaf484d7f5f01d2b8e5dc0fedc637256236abe...
-
Page 24: Care And Maintenance
No. 10LB038 EVA System User Manual Rev.04 Care and Maintenance Storage 5.1. We recommend leaving the colposcope in its provided case for protection and to minimize dust 5.1.1. contamination when not in use. Always follow the cleaning process outlined below prior to returning the unit to its case to avoid contamination. Lens Care 5.2. The optical unit lens should be kept free from loose debris or dust particles that may block the field of 5.2.1. view. In the event of dirt or smudges on the lens surface, clean the lens with a soft cloth or lens wipe. We recommend using the cloth provided in your care kit. Never use towels. Body/Base 5.3. The optical unit needs to be cleaned between each and every use due to the colposcope accumulating 5.3.1. dirt over time, and the possibility of crosscontamination. Cleaning Instructions 5.4. Cleaning the base of the optical unit should only be done with disinfectant towelettes, such as CaviWipes or their equivalent. Use 35 towelettes, at minimum, to wipe the optical unit body from the handle, both down the internal 5.4.1. side facing the user and the external side facing the patient, making your way to the top of the unit. This should be done in a scrubbing motion, covering both sides of the plastic body. 5.4.2. Be sure to cover all areas and crevices so that the entire surface body of the unit is wiped down. 5.4.3. Don’t clean the unit when the rubber cover over the charging port is open to avoid damage to the 5.4.4. charging port. ... -
Page 25: Troubleshooting & Support
No. 10LB038 EVA System User Manual Rev.04 Troubleshooting & Support Mobile Unit Troubleshooting 6.1. Low Battery 6.1.1. The user should charge the battery when the low or depleted indicator lights turn orange. Also check if the LED light can be switched on and, if not, charge the battery. Battery Disconnection 6.1.2. Contact customer service if the battery becomes partially or fully disconnected. If your optical unit is fully charged but the LED light does not turn on, or turns on and off, this may indicate a battery disconnection. Overheating of Internal Board 6.1.3. If you feel unusual heat while holding the device, please discontinue use and contact customer service as soon as possible. Defective LED Light 6.1.4. If the LED light won't turn on, make sure that: The optical unit is fully charged. Charge the device with the USB cable provided when the bottom indicator light is orange, the device battery is low or the LED light will not turn on. If the cable is not working and the optical unit is not charging, try charging the unit with an alternative USB cable. If the LED light still does not turn on after charging, contact customer service. Burned out LED Light 6.1.5. If the LED light is burned out and provides no or low illumination, the user should check to make sure it is switched on. If the battery is charged, and the LED light still does not turn on or provides low light, contact service. Charge Indicator Lights 6.1.6. -
Page 26: Mobile Device Troubleshooting
No. 10LB038 EVA System User Manual Rev.04 Dirt on Lens 6.2.2. If dirt on the lens causes artifacts or lowresolution images, the user should clean the lens. If these does not help, contact service to replace the lens. Mobile Device Troubleshooting 6.3. Low Battery 6.3.1. If the mobile device battery is low, which may cause the mobile device to shut off during a procedure, the user should charge the mobile device and not continue use until it is sufficiently charged. The mobile device should be charged before the procedure or while the device is not in use as it cannot be used when charging. If the mobile device is charged and continues to turn off, the user should contact customer service. Overheating 6.3.2. If the mobile device overheats, refer to the Samsung J530 user manual and follow the appropriate instructions, and contact customer service if needed. Insufficient Memory 6.3.3. Make sure there is enough memory available before starting an exam through the EVA Application, and delete unnecessary files if you need to free up storage space. To learn how to check available memory, refer to the Samsung J530 User Manual. The EVA Application will warn users of low memory and offer to archive patient cases to the Online Portal. If the user does not want to sync information with the EVA Online Portal, the user should transfer patient cases to localized storage and then manually delete cases from the EVA Application. If the warning persists when there are few or no patient cases, the user should contact customer service. Cracked Mobile Device Screen 6.3.4. If the mobile device screen is cracked or has been compromised due to a fall or other form of damage, contact customer service. ... -
Page 27: How To Capture A Clinically Useful Image
No. 10LB038 EVA System User Manual Rev.04 How to Capture a Clinically Useful Image `Clinically useful images are critical for remote consultation, patient documentation, and quality assurance purposes. There are several factors to consider to ensure high quality images. Stability 7.1. The colposcope should be in a stable position while capturing an image. The unit can be stabilized by: Using a stand: The colposcope can be attached to a provided stand. The height of the stand should be 7.1.1. the same as the height of the examination table (standard medical table height is 80110 cm/31.543.5 inch). Using the neck strap: if you need to take the colposcope off the stand, please be sure to use the neck 7.1.2. strap for stability. When holding the unit by hand with a neck strap, please confirm that the neck strap is extended completely. The length of the neck strap can be adjusted for user comfort. Handwave feature: Images can be captured without touching the screen, through the handwave 7.1.3. feature. This enables the user to wave their hand in front of the proximity sensor above the visualization screen in order to capture an image. Positioning 7.2. Distance: The device should be positioned at a distance of 2540 cm / 1015.7 inches from the patient’s 7.2.1. cervix. Important: the colposcope should never come into physical contact with the patient. Angle: The entire face of the cervix should be captured in the image, without any obstruction by the 7.2.2. speculum. The colposcope lens should be aimed directly at the patient's cervix. (figure 16) ... -
Page 28: Illumination
No. 10LB038 EVA System User Manual Rev.04 Illumination 7.3. The cervix should be fully illuminated and without glare. The LED light is powered by a rechargeable battery contained within the optical unit. The battery has charge capacity sufficient for approximately 10 hours of continual use. The colposcope reduces glare with a polarizer, however glare from the speculum reflection is still 7.3.1. possible. If this is the case, reposition the colposcope and/or the speculum until there is less glare. When holding the colposcope, make sure not to block the LED light with your finger. 7.3.2. (figure 17) (figure 18) Focus 7.4. There are two ways to adjust the colposcope focus. The first is to adjust the distance between the colposcope and the patient. Once you have achieved 7.4.1. adequate focus, as you zoom in and out digitally you can use the fine focus wheel at the tip of the lens to readjust your focus. The recommended default setting for the fine focus wheel is to be fully extended. If working at a 7.4.2. distance which normally yields the clearest images doesn’t work, you can try adjusting the fine focus wheel so that the lens moves in and out until the correct focus is found. Page 28 of 86 Doc ID: 4baaf484d7f5f01d2b8e5dc0fedc637256236abe... - Page 29 No. 10LB038 EVA System User Manual Rev.04 Fine focus wheel (figure 19) After you have captured images, it is important to review the images to verify they are clinically useful. Page 29 of 86 Doc ID: 4baaf484d7f5f01d2b8e5dc0fedc637256236abe...
-
Page 30: Specifications
No. 10LB038 EVA System User Manual Rev.04 Specifications Item Specification Technical Data Power requirements Charger Input Voltage 100240 AC As rated by dual port MicroUSB charger 50/60 HZ, as rated by dual port Frequency MicroUSB charger 5.2V DC Output Dimensions Optical Unit (HxWxD) 24.39 cm x 8.1cm x 10.41 cm (w/lens) 24.39cm x 8.1cm x 6.63cm (w/o ... -
Page 31: Electromagnetic Compatibility Manufacturer Declaration
range 400700mm Use life Unit battery 10 years Electromagnetic compatibility manufacturer declaration 8.1. The EVA System requires special precautions in regard to electromagnetic compatibility. 8.1.1. It must be installed and prepared for use as described in the Operation section of this User Manual. 8.1.2. The separation distances recommended in this paragraph must therefore be complied with. 8.1.3. The EVA System must not be used near or on top of another electronic device. If this cannot be avoided, 8.1.4. it is necessary – before clinical use – to check the equipment for correct operation under the conditions of use. The use of accessories other than those specified or sold by MobileODT as replacement parts may have 8.1.5. the consequence of increasing the emissions or decreasing the immunity of the unit. Electromagnetic emissions 8.2. The EVA System is intended for use in the electromagnetic environment specified in the following tables 8.2.1. 1, 2, 4 and 6 below. The user and/or installer of the unit must ensure that it is used in such an environment. 8.2.2. Table 1 Guidance and manufacturer's declaration – electromagnetic emissions – EVA System The EVA System is intended for use in the electromagnetic environment specified below; The customer or the user of the EVA System ... - Page 32 No. 10LB038 EVA System User Manual Rev.04 Electrostati Floors should be wood, concrete or 8 kV contact 8 kV contact c discharge ceramic tile. If floors are covered with (ESD) IEC synthetic material, the relative humidity 15kV air 15 kV air 6100042 should be at least 30 %. ...
-
Page 33: Recommended Separation Distances
No. 10LB038 EVA System User Manual Rev.04 NOTE 1 At 80 MHz and 800 MHz, the higher frequency range applies. NOTE 2 These guidelines may not apply in all situations. Electromagnetic propagation is affected by absorption and reflection from structures, objects, and people. a. Field strengths from fixed transmitters, such as base stations for radio (cellular/cordless) telephones and land mobile radios, amateur radio, AM and FM radio broadcast, and TV broadcast cannot be predicted theoretically with accuracy. To assess the electromagnetic environment due to fixed RF transmitters, an electromagnetic site survey should be considered. If the measured field strength in the location in which the EVA System is used exceeds the applicable RF compliance level above, the EVA System should be observed to verify normal operation. If abnormal performance is observed, additional measures may be necessary, such as re orienting or relocating the EVA System. b. Over the frequency range 150 kHz to 80 MHz, field strengths should be less than 3 V/m. Recommended separation distances 8.3. The EVA System is intended for use in an electromagnetic environment in which radiated radio frequency disturbances are controlled. The user and/or installer of the unit can help prevent electromagnetic interference by maintaining a minimum distance between portable and mobile radiofrequency communications equipment (emitters) and the EVA System, according to the maximum output power of the equipment, as recommended in the table below. Table 6 ... - Page 34 No. 10LB038 EVA System User Manual Rev.04 For transmitters rated at a maximum output power not listed above, the recommended separation distance d in meters (m) can be estimated using the equation applicable to the frequency of the transmitter, where P is the maximum output power rating of the transmitter in watts (W) according to the transmitter manufacturer. NOTE 1 At 80 MHz and 800 MHz, the separation distance for the higher frequency range applies. NOTE 2 These guidelines may not apply in all situations. Electromagnetic propagation is affected by absorption and reflection from structures, objects, and people. Page 34 of 86 Doc ID: 4baaf484d7f5f01d2b8e5dc0fedc637256236abe...
-
Page 35: Replacement Parts And Technical Service
No. 10LB038 EVA System User Manual Rev.04 Replacement parts and technical service Technical service When contacting our Service and Repair department, you will need to provide the following information: Details on the defect that has occurred and the corresponding serial number of the EVA System colposcope. These can be found on the label located on the back of your unit. For further support, please contact support@mobileodt.com. MobileODT, LTD. Ben Avigdor 8, Tel Aviv, Israel support@mobileodt.com +16174544687 www.mobileodt.com Entering the portal Enter the EVA Portal by entering the following link in your browser: www.eva.mobileodt.com The supported browsers are the latest versions of: Chrome, Firefox, Safari and Edge Software Page 35 of 86 Doc ID: 4baaf484d7f5f01d2b8e5dc0fedc637256236abe... -
Page 36: Eva Portal
No. 10LB038 EVA System User Manual Rev.04 EVA Portal Welcome screen 10.1. You will be presented with the Welcome screen. Here you can: • Set up for new users (refer to section 3) • Log in for existing users (refer to section 4), • Reset your password by pressing “Forgot password?” (refer to section 5) • Contact MobileODT(refer to section 8). • Review our terms and conditions, as well as our privacy policy. Setting up a user 10.2. If you are new to the EVA System and did not set the password on an EVA device or on the portal click 10.2.1. on “Set up.” Enter the email associated with your EVA user account. 10.2.2. ... - Page 37 No. 10LB038 EVA System User Manual Rev.04 Click on ‘Send activation code.’ 10.2.3. An email will be sent with a code that needs to be entered in the next screen. 10.2.4. Enter the activation code you received. 10.2.5. If you did not receive an email check your spam and trash folders. 10.2.6. After entering the activation code you will be requested to select a password. 10.2.7. The password requires a minimum of eight characters including a capital letter, a lowercase letter, one 10.2.8. number and one special character. This password will be used to access your EVA account, both on the portal and on EVA devices. Logging in 10.3. If you have already set up your EVA user and have chosen a password in the system press ‘Log in’. ...
-
Page 38: Forgot Password
No. 10LB038 EVA System User Manual Rev.04 Enter the email and password for the EVA System (the same used in the EVA device to create your EVA 10.3.2. account). Forgot password 10.4. Click “Forgot password?” on the welcome screen 10.4.1. Enter the email address associated with your EVA account 10.4.2. An email will be sent to the email entered with a temporary password 10.4.3. Enter the temporary password and create a new one, then enter it once again 10.4.4. Page 38 of 86 Doc ID: 4baaf484d7f5f01d2b8e5dc0fedc637256236abe... -
Page 39: Viewing Patient Records
No. 10LB038 EVA System User Manual Rev.04 ReCaptcha after failed login attempts on EVA Portal 10.5. If a user has made 5 failed attempts to login, then on the sixth attempt they must complete a reCapture 10.5.1. form to verify that they are not a robot. Once the reCapture is successful, they can then proceed to log in as normal. 10.5.2. Limitation of active logins 10.6. There is a limit of 10 active connections to the EVA System (either to multiple EVA devices or to the EVA Portal from multiple locations) that can be maintained by one user. Viewing patient records 10.7. Upon successful login, you can view a list of all the cases you have performed with the EVA System with exam notes. To review a patient’s exam note click on the name of the patient in the list. 10.7.1. Page 39 of 86 Doc ID: 4baaf484d7f5f01d2b8e5dc0fedc637256236abe... -
Page 40: Searching For Patient Records
No. 10LB038 EVA System User Manual Rev.04 Deleting a patient record: hover the cursor over a patient name, and a delete button is displayed in the 10.7.2. right column. When the deletion is confirmed all the data related to the patient is permanently deleted from the system. Searching for patient records 10.8. To search for a patient, enter the patient name or medical record number by typing in the search field 10.8.1. at the top of the screen and tapping enter. The relevant results will be presented on the screen. Reviewing and editing patient examination records 10.9. In the patient examination record, all the information collected about the patient during current and 10.9.1. past examinations is displayed: patient details, documentation of the exam, images, annotations and history of present illness If multiple examinations of the same patient have been collected, they will be shown on the top of the 10.9.2. patient examination record. The user can choose to view the specific examination by clicking on the date of the examination. An option to delete an exam is displayed next to exam details. Once it’s confirmed all the exam’s data is 10.9.3. permanently deleted from the system. Editing the Exam 10.10. In the patient examination record, the user can edit the documentation section and the history of 10.10.1. present illness by pressing the edit icon. Page 40 of 86 Doc ID: 4baaf484d7f5f01d2b8e5dc0fedc637256236abe... -
Page 41: Viewing Images And Annotations
No. 10LB038 EVA System User Manual Rev.04 When the user on the edit icon in the patient record, a modal with all the relevant information appears 10.10.2. and the user can change the field. To save the changes, the user needs to press on “Save”. Viewing images and annotations 10.11. Viewing images: in the patient examination record, the user can open a large size version of any image 10.11.1. by clicking on the thumbnail of that image. Page 41 of 86 Doc ID: 4baaf484d7f5f01d2b8e5dc0fedc637256236abe... - Page 42 No. 10LB038 EVA System User Manual Rev.04 Deleting images: in the patient examination record, the user can select several images to delete. After 10.11.2. selecting the images click on the “Delete” icon at the top right and confirm to delete the images. Once it’s confirmed all the selected images are permanently deleted from the system. In the image gallery view, the user can delete the specific image by pressing the ‘Delete’ button in the 10.11.3. left bottom corner. Once it’s confirmed the image is permanently deleted from the system. In order to switch between images, the user can either press on the thumbnails below the large image 10.11.4. to jump directly to that particular image, or use the arrows on both sides of the screen to navigate through the images Download image – the user can download an image by pressing the ‘download’ button. 10.11.5. Show/Hide Annotations By clicking on the annotation button on the top left of the screen, users can 10.11.6. view or hide any annotations that were made on that particular image. Annotation description/notes are displayed on the righthand side of the screen. Locations of annotations are shown on the image. Add annotation – by pressing ‘Add annotation’, the user can add annotation to every image in the 10.11.7. exam. The following fields are needed to be filled: annotation position, biopsy taken, diagnosis and additional notes. Edit/Delete annotation – when the user’s mouse is on a specific annotation, the delete and edit buttons ...
-
Page 43: Adding Notes
It can be configured on the camera settings menu. 10.11.10.3. Whenever it is turned on, it can be found on the capture screen instead of the green filter button. To close the large size image, the user should press the X button on the top right corner. 10.11.11. Adding notes 10.12. The user can enter free notes and view them in the examination record. 10.12.1. To enter a new note, the user needs to click on “Add note” button and a pop up is displayed where the 10.12.2. user enters free text and press Save. The new note will appear in the notes section. Help 10.13. The help button allows you to send a support request to the MobileODT support team. Enter all the 10.13.1. details requested on the support form that opens. Page 43 of 86 Doc ID: 4baaf484d7f5f01d2b8e5dc0fedc637256236abe... -
Page 44: Export & Download
No. 10LB038 EVA System User Manual Rev.04 Export & Download 10.14. Export to PDF 10.14.1. 10.14.1.1. In the exam page the options to export or download a pdf is available 10.14.1.2. A 6 digit PIN code is requested to ensure the PDF file of the examination will remain secure. The PIN cannot be sequential, and an individual digit cannot be repeated more than 3 times. 10.14.1.3. After setting the pin, the PDF will be sent to the user’s email or downloaded to the computer. 10.14.1.4. In order to view the exam PDF file, the user will need to enter the code he had previously selected. • Option 1 Export exam to email: ... - Page 45 No. 10LB038 EVA System User Manual Rev.04 • Option 2 Download exam: Upon choosing this option, the user will be able to choose to download only the exam’s report as PDF, or the PDF along with the exam’s media files Add logo to PDF 10.14.2. Clinical admins can add a personalized logo to exported pdf exam report. 10.14.2.1. When viewing the patient details, select ‘Add pdf’ from the settings menu 10.14.2.2. Then either drag and drop, or browse the local computer for your selected file and upload to the EVA Portal. Click ‘add logo’ to attach the selected logo to the pdf for export. 10.14.2.3. Image files must be no more than 4MB and in jpg or png format. 10.14.2.4. Click confirm to have this logo automatically added to any future pdf reports Download all exams (Bulk Download) 10.14.3. 10.14.3.1. At the top right of the patient menu there is an option to bulk download all exams created by you. Page 45 of 86 Doc ID: 4baaf484d7f5f01d2b8e5dc0fedc637256236abe...
- Page 46 No. 10LB038 EVA System User Manual Rev.04 This will enable you to download all exam data that exists within your entire EVA System account. 10.14.3.2. The bulk download feature will send a request to MobileODT’s servers to export all of your data in encrypted files. Processing the request may take between several minutes to hours. 10.14.3.3. Once the processing is complete, an email will be sent to your account with a link that includes all the data you have as an encrypted ZIP file. The links are encrypted with a PIN code and will be available for 72 hours. 10.14.3.4. Each Zip file contains a CSV file, which lists all the exported data that exists within the Zip file, and a folder containing each exam as a separate file (PDF report and media files). 10.14.3.5. Along with links to the ZIP files, you will also receive a link to a CSV file with a summary of all downloaded exams. This summary is a content list indicating on which ZIP file each exam exists, and if it was downloaded successfully. If an exam were not downloaded, it is still available to download manually from the portal. 10.14.3.6. Each download request requires a 6digits PIN. You will be promoted to create a PIN for that download. This PIN will be used to open all encrypted ZIP files. 10.14.3.7. Bulk download can be generated once every 24 hour period. Page 46 of 86 Doc ID: 4baaf484d7f5f01d2b8e5dc0fedc637256236abe...
-
Page 47: Eva System Software Application
No. 10LB038 EVA System User Manual Rev.04 EVA System software application Setting Up a New User 11.1. Enter the EVA app 11.1.1. Tap on set up 11.1.2. Enter the email address that was used to create your EVA account. 11.1.3. Tap on ‘ Next ‘ 11.1.4. Page 47 of 86 Doc ID: 4baaf484d7f5f01d2b8e5dc0fedc637256236abe... - Page 48 No. 10LB038 EVA System User Manual Rev.04 An email is sent to that address with an activation code that needs to be entered in the next screen. tap 11.1.5. on ‘Enter code’ Enter the activation code you received in your email and tap on ‘Next’. An example for such an email: 11.1.6. Set a password the password requires a minimum of eight characters including a capital letter, a 11.1.7. lowercase letter and one number. tap on ‘Next’. This password will allow you to access the EVA System including the EVA portal. Page 48 of 86 Doc ID: 4baaf484d7f5f01d2b8e5dc0fedc637256236abe...
- Page 49 No. 10LB038 EVA System User Manual Rev.04 Create 6 digit secure PIN. The PIN will give you secure access to this particular EVA device. tap on ‘Save 11.1.8. PIN’. Read and accept the terms of use before using the app. Click on ‘ I Agree ‘ 11.1.9. You will be directed to the login page. Enter your PIN to enter the application. 11.1.10. Page 49 of 86 Doc ID: 4baaf484d7f5f01d2b8e5dc0fedc637256236abe...
-
Page 50: Log In (Existing User)
No. 10LB038 EVA System User Manual Rev.04 Log in (existing user) 11.2. Tap ‘Log in’. 11.2.1. Enter email and password for the EVA System. tap on ‘Next’. 11.2.2. Log in with PIN/Password while online or offline 11.2.3. reCaptcha after failed login attempts on EVA device 11.3. If If a user has made 5 failed attempts to login, then on the sixth attempt they must complete a 11.3.1. reCapture form to verify that they are not a robot Once the reCapture is successful, they can then proceed to log in as normal. 11.3.2. Global sign out 11.4. There is a limit to the number of active connections to the EVA System (either to multiple EVA devices 11.4.1. or to the EVA Portal from multiple locations) that can be maintained by one user. Page 50 of 86 Doc ID: 4baaf484d7f5f01d2b8e5dc0fedc637256236abe... -
Page 51: Reset Pin
No. 10LB038 EVA System User Manual Rev.04 When a user attempts to initiate a tenth active connection, they are required to log out from all active 11.4.2. sessions (global logout) Having logged out from all active sessions, they can then log back in as normal 11.4.3. Reset PIN 11.5. If the user that is presented is yours, enter the PIN to access the device. You will have 5 attempts to 11.5.1. enter the PIN correctly. If you do not remember the PIN, tap on ‘Forgot PIN?’ and it will redirect you to the ‘signin ‘screen’. On this screen, you will be able to log in using your email and password. Changing the user 11.6. If the user that is presented on the screen is not your user, tap on ‘Change user’. 11.6.1. The app shows all the users that were added to that particular device. If your email is not in the list tap 11.6.2. on 'ADD AN ADDITIONAL USER', and it will redirect you to the signin/set up screen’. Page 51 of 86 Doc ID: 4baaf484d7f5f01d2b8e5dc0fedc637256236abe... -
Page 52: Reset Eva Account Password
No. 10LB038 EVA System User Manual Rev.04 If you wish to remove a user from the device you can press the menu button (three dots) next to the 11.6.3. specific user and then select “Remove user”. Once it’s pressed a confirmation popup is displayed. 11.6.4. Please note: The user in question is only removed from this particular device. All the data that this user had created is available through the EVA Portal. The user will still be present on any other EVA device that they may have logged into. This user can also add his/her account to this device again in the future. Reset EVA account password 11.7. A User’s EVA account password can be reset through initial log in menu: Tap on ‘LogIn’ and then ‘Reset password’. 11.7.1. Page 52 of 86 Doc ID: 4baaf484d7f5f01d2b8e5dc0fedc637256236abe... -
Page 53: Optout Status
No. 10LB038 EVA System User Manual Rev.04 Enter your email address associated with your EVA account and tap on ‘Next’. 11.7.2. A temporary password will be sent to the email (in this example, fzsf@gmail.com). Tap on ‘Next’. 11.7.3. Enter the temporary password in the dedicated field. Enter a new password in the dedicated field. The 11.7.4. password requires a minimum of eight characters including a capital letter, a lowercase letter, and one number and one special character. Reenter the password and Tap on ‘Next’. .]] Optout status 11.8. A user or organization may choose to operate in ‘Optout’ status, meaning that none of their exam data 11.8.1. will be uploaded or synced to the EVA Portal online storage. Page 53 of 86 Doc ID: 4baaf484d7f5f01d2b8e5dc0fedc637256236abe... -
Page 54: Notification Center
No. 10LB038 EVA System User Manual Rev.04 Optout status is managed by MobileODT administration. Users can request that optout status be 11.8.2. applied or removed from their account by contacting support@mobileodt.com While in optout mode the app is not synced with the EVA Portal and cannot link past exams conducted 11.8.3. on a patient with the same MRN. It is advised that exam data be regularly manually exported using USB and backed up on a local 11.8.4. computer (see section 14 for instructions) Notification Center 11.9. Users will be notified through the notification center of important information intended to maintain 11.9.1. smooth running of their EVA System, such as when a software update is available. Users are alerted that they have unread notifications when they open the EVA device, by a red dot 11.9.2. appearing on the Main menu icon on the top left When they enter the Main menu, an alert appears next to the Notification listing. 11.9.3. To read notifications, click on the Notification listing in the main menu. 11.9.4. Page 54 of 86 Doc ID: 4baaf484d7f5f01d2b8e5dc0fedc637256236abe... -
Page 55: Performing An Exam
No. 10LB038 EVA System User Manual Rev.04 Performing an exam 11.10. Enter identifying patient information 11.10.1. For each patient, you can enter the following fields: Medical Record Number (MRN), first name, last name, date of birth (or age if date of birth is unknown,) and a contact phone number. If a medical record number is entered, the subsequent fields can be skipped. 11.10.2. If no medical record number was entered, first name, last name, and date of birth will be mandatory. 11.10.3. Page 55 of 86 Doc ID: 4baaf484d7f5f01d2b8e5dc0fedc637256236abe... - Page 56 No. 10LB038 EVA System User Manual Rev.04 MRN can be entered manually or by scanning the barcode by tap oning ‘Scan patient label’. 11.10.4. Please note that at this stage you need to hold the barcode infront of the top of the screen, and not 11.10.5. the lens. If the MRN or the same combination of first and last names with the same date of birth already exists in 11.10.6. the user’s account, the system will ask the user if the new patient they entered is the same patient that already exists. The user can either click ‘Same patient’ to add the new exam to the existing patient record, or click ‘Re 11.10.7. enter MRN’ or ‘Add as new patient’ if it is not the existing patient. Please contact Customer Support if there appears to be an issue with the details of an existing patient. 11.10.8. Page 56 of 86 Doc ID: 4baaf484d7f5f01d2b8e5dc0fedc637256236abe...
-
Page 57: Capture Images
No. 10LB038 EVA System User Manual Rev.04 A summary of all entered information will be displayed with an option to edit every field. 11.10.9. Capture images 11.11. In the summary (section 6.4) tap on 'Start exam' and the visualization screen will be displayed. 11.11.1. Follow these steps to ensure you are capturing clinicallyuseful and focused images: 11.11.2. • Ensure the device light source is turned on. • Ensure the fine focus wheel found at the tip of the lens is turned all the way out. • Adjust the device at the appropriate working distance from the patient (typically between 2242 cm). • Adjust the fine focus wheel to achieve optimal focus. Pinch in or out with your fingers on the screen to zoom in and out 11.11.3. - Page 58 No. 10LB038 EVA System User Manual Rev.04 After applying acetic acid it is recommended to use the timer. After applying acetic acid to the cervix, 11.11.5. tap on the stopwatch icon at the top of the screen. A countdown of one minute will start. After one minute another countdown of four minutes will start. It is advisable to take and capture images and biopsies within this 4 mins window of time. Capture images by taping the capture button on the bottom middle of the screen 11.11.6. Page 58 of 86 Doc ID: 4baaf484d7f5f01d2b8e5dc0fedc637256236abe...
-
Page 59: Changing Settings During An Exam (Camera Menu)
No. 10LB038 EVA System User Manual Rev.04 You can also capture images without touching the device screen. To do that: move the hand in a hifive 11.11.7. motion towards the MobileODT logo at the top of the device above the screen. You don’t need to touch the device when doing so. When you finish capturing images to your satisfaction, tap on the green arrow button at the top right of 11.11.8. the screen and you will be redirected to the image gallery. Capture videos by tapping the video camera button at the bottom left of the screen. 11.11.9. You can also capture images while recording by pressing the button at the right bottom of the screen. 11.11.10. If you are under a demo or distributor account, you can take only 3 images and 1 video. 11.11.11. Changing settings during an exam (Camera menu) 11.12. The camera’s settings can be managed directly during an exam by accessing the camera menu The camera menu can be opened by clicking the settings button found on the top of the image capture 11.12.1. screen. To switch a feature on or off click on the toggle button to the right of each feature. 11.12.2. Depending on your clinical scenario, a number of settings may be available, 11.12.3. • Capture mode • Green Filter • High contrast filter •... -
Page 60: Review Media Files
No. 10LB038 EVA System User Manual Rev.04 Review media files 11.13. The files that were captured are displayed in the order in which they were taken from first to last. 11.13.1. Swipe with your finger to the left to see the next file and swipe to the right to see the previous file. 11.13.2. Add annotations 11.14. To annotate an image, tap the location on the image you would like to annotate, and follow the 11.14.1. suggested options to record the relevant details. Page 60 of 86 Doc ID: 4baaf484d7f5f01d2b8e5dc0fedc637256236abe... - Page 61 No. 10LB038 EVA System User Manual Rev.04 To edit an annotation, tap on the annotation and tap on edit, following the suggested options to edit 11.14.2. the relevant details. To delete an annotation tap on the annotation and tap on delete. A warning confirming that you want 11.14.3. to delete that annotation is shown. Page 61 of 86 Doc ID: 4baaf484d7f5f01d2b8e5dc0fedc637256236abe...
-
Page 62: Summary
No. 10LB038 EVA System User Manual Rev.04 After all the data is entered tap on the green button at the top right of the screen. 11.14.4. Summary 11.15. All the information entered is displayed on the summary page. You can edit patient's details by pressing the edit button at the top of the screen. 11.15.1. To finalize the documentation, tap on 'Finish exam' when done. The exam will start uploading to the 11.15.2. EVA Portal. The exam will be available for further editing on the device for the next 24 hours. Exporting the exam 11.16. After tapping on ‘Finish exam’, an option to export the exam is available. The user can choose between 11.16.1. exporting to an email or to a folder on the device from which the exams can be exported and backed up manually on a local drive Tap on the button 'Export exam'. 11.16.2. A 6 digit PIN code is requested to ensure the files of the examination will remain secure. The PIN 11.16.3. cannot be sequential and an individual digit cannot be repeated more than 3 times. Page 62 of 86 Doc ID: 4baaf484d7f5f01d2b8e5dc0fedc637256236abe... - Page 63 No. 10LB038 EVA System User Manual Rev.04 After setting the pin, the user will need to choose whether to export to the user’s email or to export to 11.16.4. a folder. Upon choosing ‘Export to my email’, the system will start exporting the examination report as a PDF. 11.16.5. When the upload process to the portal is completed, the exam will be sent to the user’s email. Upon choosing ‘Export to folder’, the system will start exporting the examination report and media as a 11.16.6. ZIP. When the zip is created, the exam will appear on the ‘Exams for export’ page. If you don’t want to export the exam, tap on ‘Done’ and the home screen will be displayed. 11.16.7. Page 63 of 86 Doc ID: 4baaf484d7f5f01d2b8e5dc0fedc637256236abe...
-
Page 64: Back Up Exams On A Local Drive
No. 10LB038 EVA System User Manual Rev.04 Exams can also be selected for export via the Exam list screen on the main menu. See section 15 for 11.16.8. details. Only exams that have been completed can be exported. Back up exams on a local drive: 11.17. The ‘Exams for export’ page can be reached from the main menu and presents a list of all exams that 11.17.1. exist on the device as ZIP files that are ready to be exported manually and backed up. The ‘Instructions for export’ explain what should be done in order to export the exams from the device 11.17.2. using a USB cable In order to clear this list, which will clear up space in the external folder of the device, the user should 11.17.3. click the ‘Clear list’ button Page 64 of 86 Doc ID: 4baaf484d7f5f01d2b8e5dc0fedc637256236abe... -
Page 65: Limited Storage Preventing Export
No. 10LB038 EVA System User Manual Rev.04 Limited storage preventing export 11.18. If the internal EVA Device storage is at maximum capacity, then it will not be possible to export any 11.18.1. more files to ZIP format until the storage is cleared and more space available. In this case, a warning popup will be displayed advising the user to return to either the Exams for export or Exam lists and delete exams. It is advisable to remove exams in ZIP format from the device after they have been manually exported 11.18.2. via USB to a local computer to ensure that there is free space on the EVA device. Reviewing exams on the app 11.19. To view examinations from the past 24 hours or to see the process of uploading examinations to the 11.19.1. EVA Portal, tap on the menu button the top left in the home screen and tap on ‘Exams’. Page 65 of 86 Doc ID: 4baaf484d7f5f01d2b8e5dc0fedc637256236abe... - Page 66 No. 10LB038 EVA System User Manual Rev.04 The Exams list shows exams created in chronological order with the most recent at the top. An icon next 11.19.2. to each exam indicates the sync status (upload to the EVA online portal) One of four options might be shown; draft (if the exam has not yet been completed,) In progress (if the 11.19.3. exam is in the process of being synced,) Uploaded (if sync is completed,) or Optout (if exam was taken while being optout). A USB symbol next to exam (in any state) indicates that an exam has been exported to the ZIP folder 11.19.4. and ready to be exported manually via USB connection. To view any exam on the device, click on any of them and the system will redirect to edit the exam. 11.19.5. Search bar is available on top of the exam list. Exams can be searched by patient’s Name, Last name or 11.19.6. MRN No sync icon will be shown next to exams taken while in Optout mode. An icon at the top of the screen 11.19.7. will indicate that the device is currently in optout mode. An icon will still indicate those exams that are ready for manוal export via USB. Page 66 of 86 Doc ID: 4baaf484d7f5f01d2b8e5dc0fedc637256236abe...
- Page 67 No. 10LB038 EVA System User Manual Rev.04 Exams can be selected for export to ZIP (for manual export via USB) or deletion by clicking on the 11.19.8. ‘Select’ button at the top right of the screen. Individual exams can then be selected for export or deletion from the device. • Any exams that have previously been synced to the EVA Portal will still be saved on the Portal even if they are deleted from that particular device. Any exams captured in Optout mode or that have not been synced, will be permanently deleted from the system and cannot be retrieved. It is advisable to ensure that exams have been backed up either by manually or by syncing to the EVA Portal before deleting from the EVA Device. • Only exams that have been completed can be selected for export to ZIP. Exported exams can be reached via the main menu under “Exams for export.” (see section 14) In the 'Uploaded' tab the examinations that finished uploading are displayed for 24 hours. Afterward, 11.19.9. the exams can be viewed on the EVA portal: https://eva.mobileodt.com. If the device is not connected to WiFi, an option to connect to WiFi is presented. The upload process 11.19.10. only works if the device is connected to the internet. If the device is not connected to WiFi the exams in the device will be available in ‘view mode’ only. 11.19.11. Page 67 of 86 Doc ID: 4baaf484d7f5f01d2b8e5dc0fedc637256236abe...
-
Page 68: Deleting An Exam
No. 10LB038 EVA System User Manual Rev.04 If there is a server error the exams will also be available in ‘viewmode’ only. 11.19.12. Deleting an exam 11.20. Users are able to delete exams and remove them permanently from that particular EVA Device. 11.20.1. Exams can only be deleted if they have either been 11.20.2. • synced to the online EVA Portal (where they are stored permanently unless deleted from the Portal,) • exported as a ZIP file to the device Export internal storage for manual export via USB • were a draft exam that was never completed. If any exams that do not fit these criteria were selected for deletion, then a popup message will alert 11.20.3. users to remove those exams from the deletion list. A confirmation popup is displayed once an exam is selected for deletion. Exams cannot be retrieved 11.20.4. once deleted. Page 68 of 86 Doc ID: 4baaf484d7f5f01d2b8e5dc0fedc637256236abe... -
Page 69: Exam Drafts
No. 10LB038 EVA System User Manual Rev.04 Exam Drafts 11.21. An option to save ‘exam drafts’ is available after entering all the patient details. The exams are saved as 11.21.1. draft and are not synced until the exam is finished. To access all the drafts, see the Exams list via the main menu. 11.21.2. About 11.22. To access “About” section tap on the menu icon the top left icon the home screen. 11.22.1. Page 69 of 86 Doc ID: 4baaf484d7f5f01d2b8e5dc0fedc637256236abe... -
Page 70: Handwave Feature
No. 10LB038 EVA System User Manual Rev.04 Tap on ‘About.’ 11.22.2. In “About” section users can review the version of the app, the release date and device ID and read 11.22.3. MobileODT’s Terms of Use and Privacy Policy. Handwave feature 11.23. The handwave feature allows users to capture images without touching the device. When the handwave feature is turned on, when performing an exam to capture an image, move the hand in a hifive motion towards the MobileODT logo at the top of the device above the screen. This feature is configurable from the camera setting menu. Camera mode 11.24. In ‘Colposcope mode’ the camera allows capturing images utilizing the magnification provided by the 11.24.1. EVA System lens (up to 16x magnification.) In ‘Camera mode’ Users can capture fullbody or wide angle images. This disables the standard 11.24.2. colposcope magnification provided by the EVA System lens, allowing the EVA Device to be used as a standard camera. To attend maximum image quality camera mode, remove the mobile device from the casing, using the 11.24.3. quickrelease button at the top of the EVA device. Quality frame 11.25. Page 70 of 86 Doc ID: 4baaf484d7f5f01d2b8e5dc0fedc637256236abe... -
Page 71: Support
No. 10LB038 EVA System User Manual Rev.04 Support 11.26. To reach out to MobileODT support, tap on the menu icon at the top left of the screen. 11.26.1. In the menu section tap on 'Support.' 11.26.2. The support screen allows the user to connect with the MobileODT support team for further assistance. 11.26.3. Learn 11.27. To access the further training resources tap on the menu icon the top left of the screen. 11.27.1. In the menu section tap on 'Learn'. The learn button opens up MobileODT’s knowledge center which 11.27.2. contains more articles and videos. Log out 11.28. To log out tap on the menu icon the top left of the home screen. 11.28.1. Tap on the 'Log out' button. 11.28.2. Page 71 of 86 Doc ID: 4baaf484d7f5f01d2b8e5dc0fedc637256236abe... -
Page 72: Appendices
No. 10LB038 EVA System User Manual Rev.04 Appendices Page 72 of 86 Doc ID: 4baaf484d7f5f01d2b8e5dc0fedc637256236abe... -
Page 73: Appendix 1: Eva Colpo
No. 10LB038 EVA System User Manual Rev.04 Appendix 1: EVA COLPO About EVA COLPO The EVA COLPO model is designed to be used in the visual inspection of the cervix as part of routine cervical cancer screening, by a trained colposcopist. The software is designed to follow ASCCP guidelines for documenting a colposcopy procedure. Add history of present illness 12.1. In the EVA COLPO clinical application, users can enter details of patient present and past illness once 12.1.1. the basic patient identifying information has been entered by tapping on 'Add history of present illness.' You can enter the following information: 12.1.2. • HPV status, • Date of last Pap/HPV test, • Pap result, • Previous cervical biopsy taken, • Previous cervical biopsy details, • Previous cervical ablative or surgical procedure, • Previous cervical ablative or surgical procedure details. None of the fields are mandatory. Colposcopic impression 12.2. Once you have completed the image capture, you will be prompted to document you colposcopic 12.2.1. impression. To finalize the documentation, tap on 'Add colposcopic impression,' and enter your clinical impression. ... -
Page 74: Optional Features
No. 10LB038 EVA System User Manual Rev.04 • Colposcopic impression, • Notes (this field allows you to record free notes.) Optional features 12.3. For users in some markets, depending on regulatory approval the following extra features may be 12.3.1. available: • VisualCheck • Quality Frame • Zoom Telehealth Page 74 of 86 Doc ID: 4baaf484d7f5f01d2b8e5dc0fedc637256236abe... -
Page 75: Appendix 2: Eva Sane
No. 10LB038 EVA System User Manual Rev.04 Appendix 2: EVA SANE About EVA SANE The EVA SANE model is designed to be used in the recording of visual evidence in the course of a sexual assault forensic exam by a trained practitioner. Add additional details 13.1. When documenting patient injury with the EVA SANE model, users are prompted to add additional case 13.1.1. details prior to capturing images. Optional fields include: 13.1.2. • SANE examiner • Time of patient arrival • Day of Patient arrival • Time of call to SANE • Day of call to SANE • Time of SANE arrival • Day of SANE arrival • Date of assault • Time of assault • Location of assault • Patient was admitted (y/N) •... -
Page 76: Additional Features
No. 10LB038 EVA System User Manual Rev.04 • Kit location • Kit badge number • STI prophylaxis • HIV PEP • Pregnancy prophylaxis • Chief complaint • Interpretation of analgenital findings • Needs further consultation/investigation (Y/N) • Equipment decontaminated • Notes • Initials for signature Additional features 13.3. Camera mode 13.3.1. EVA SANE users are able to utilize the ‘Camera mode’ feature which allows for the optical device to be removed from the casing and full body images to be captured and recorded. For details see section 11.22 High contrast filter 13.3.2. A high contrast filter that highlights areas of vascularity and bruising is available for EVA SANE users. It can be found on the capture screen next to the green filter button. ... - Page 77 No. 10LB038 EVA System User Manual Rev.04 screen you’ll be able to use the Foot Pedal. 13.3.3.2.3. First tap on the left/right foot pedal will connect the foot pedal to the EVA app. Whenever the Bluetooth is connected, a Bluetooth icon will be shown on the camera screen. 13.3.3.2.4. In order to capture an image or start/stop a video, tap the left pedal. 13.3.3.2.5. In order to take zoom in, tap on the right pedal. 13.3.3.2.6. In order to zoom out, tap on the right pedal until you get to the max zoom in. Then, tap again and perform zoom out. Every tap is another zoom step. Page 77 of 86 Doc ID: 4baaf484d7f5f01d2b8e5dc0fedc637256236abe...
-
Page 78: Appendix 3: Eva Via
No. 10LB038 EVA System User Manual Rev.04 Appendix 3: EVA VIA About EVA VIA The EVA VIA model is designed for users performing Visual Inspection with Acetic Acid (VIA) as form of primary cervical cancer screening. The designated clinical application software includes suitable documentation fields for the performance of VIA along WHO guidelines. Add additional details 14.1. Prior to starting image capture, users are prompted to enter additional details about the patient and 14.1.1. their history of illness. Optional fields include: 14.1.2. • Number of children • Number of vaginal deliveries • Town/Village • Date of last Pap • Last Pap result • HPV result • Marital status • Currently pregnant • Screened in the past 5 years (Y/N) • History of hysterectomy • Chief complaint ... -
Page 79: Add Clinical Impression
No. 10LB038 EVA System User Manual Rev.04 Add clinical impression 14.2. After image capture is complete, users have the option to add their clinical impression 14.2.1. Optional fields include: 14.2.2. • VIA result • Cervicitis present • Colposcopic impression • Next steps • Antibiotics prescribed • Notes Optional features 14.3. Additional features that are available in some markets depending on regulatory approval include: 14.3.1. • VisualCheck • Quality Frame • Zoom Telehealth Page 79 of 86 Doc ID: 4baaf484d7f5f01d2b8e5dc0fedc637256236abe... -
Page 80: Intended Use
No. 10LB038 EVA System User Manual Rev.04 Appendix 4: VisualCheck Intended use 15.1. • VisualCheck is an automated visual evaluation of images of the cervix that provides information that may be useful in the characterization of suspected positive findings of colposcopy during image interpretation. VisualCheck is a digital computer aided triage and notification software indicated for use in the analysis of nonenhanced digital images as captured on a digital colposcope. VisualCheck is used by trained clinicians together with additional information to decide on prioritization of cases or the continued care of patients. • VisualCheck is intended to assist hospital networks and clinicians trained in colposcopy and visual inspection of the cervix in workflow triage by flagging and communication of suspected positive findings of colposcopy and must always accompany a thoroughly performed visualization of the cervix. VisualCheck for clinical decision support should be used only after a trained clinician performs a visual examination of the cervix and provides information that can be used by the clinician. VisualCheck is NOT a substitute for a visual examination through a digital colposcope and the clinician must ALWAYS conduct a thorough visual examination prior to using the VisualCheck. • VisualCheck is to be used by a clinician trained in colposcopy and/or visual inspection of the cervix who performs a visualization of the cervix during a cervical cancer screening procedure. Target population 15.2. The target population of this application is women between the ages of 30 to 49. 15.2.1. Warnings and Precautions 15.3. VisualCheck is currently not available in the USA. Please see your distributor to know your local 15.3.1. -
Page 81: Performing Visualcheck Assessment
No. 10LB038 EVA System User Manual Rev.04 Performing VisualCheck assessment 15.4. The VisualCheck assessment of cervical images can be performed from either the patient record view in 15.4.1. the EVA Portal or from the EVA device software application. Only images that meet the quality criteria for assessment will be included 15.4.2. Images acceptable for VisualCheck are images in which: 15.4.3. • The cervix is in focus • All four quadrants of the cervix are visible • All of the cervix is well illuminated • No other artifacts are obstructing the view of the cervix • The cervix is clean from blood, mucus or other obstructions Images must be collected during a cervical evaluation that includes: 15.4.4. • cleaning of the cervix from blood and mucus • application of acetic acid Running the VisualCheck analysis from the EVA device 15.5. In order to run VisualCheck analysis on the EVA device, the following steps should be done: Conduct a cervical examination as per your standard guidelines 15.5.1. Finish the exam and you will be presented with the option to run VisualCheck 15.5.2. ... -
Page 82: Running Visualcheck Analysis From The Eva Portal
No. 10LB038 EVA System User Manual Rev.04 VisualCheck can also be run on past exams through the Exam list menu. To run VisualCheck on a past 15.5.5. exam click on Main menu and then ‘Exam list’ to see a list of your recent exams. When the exam is ready to run VisualCheck, ‘VisualCheck ready’ will show next to the exam entry 15.5.6. Click on the exam entry to open the exam summary 15.5.7. Click on ‘Run VisualCheck’ to start the assessment. 15.5.8. Depending on internet connectivity, results should be returned in approximately 1 minute. One of four 15.5.9. possible results will be returned normal, abnormal, incomplete or inconclusive. (see section 40.3 for details). If images were added/deleted, or if the result on VisualCheck run was Incomplete/Inconclusive, you are 15.5.10. advised to run VisualCheck again, in order to get an updated result. Running VisualCheck analysis from the EVA Portal 15.6. To run the VisualCheck analysis from the EVA Portal, there are 4 steps Log into the EVA Portal, where you will see a list of your recent exams. 15.6.1. Find the exam on which you wish to run VisualCheck. Click on the entry to open the exam summary. ... -
Page 83: Visualcheck Results
No. 10LB038 EVA System User Manual Rev.04 The images assessed by the VisualCheck cloud classifier to give an indication of how an expert 15.6.5. colposcopist would likely assess similar images. One of four possible results will be returned: normal, abnormal, incomplete or inconclusive. (see section 15.6.6. 15.7 for details). It is necessary to maintain WiFi connection throughout the VisualCheck process, on both the EVA Device 15.6.7. or Portal, or an incomplete result will be returned. VisualCheck will automatically assess the 8 most recent images included in that exam entry. If more 15.6.8. images are added and the VisualCheck assessment is repeated, it will provide an analysis of the most recent images. If images are added to or removed from the exam record, then the previous VisualCheck result will no 15.6.9. longer be displayed. You will need to rerun the VisualCheck to receive a new assessment. If an incomplete or inconclusive result is returned, then it is possible to repeat the exam once the issues 15.6.10. impeding the process are resolved. VisualCheck results 15.7. One of four possible results will be returned by the VisualCheck assessment: Abnormal 15.7.1. A n ‘Abnormal’ result indicates suspected positive findings. The images analyzed in this assessment are consistent with those evaluated and determined to be abnormal by expert colposcopists. Normal 15.7.2. - Page 84 No. 10LB038 EVA System User Manual Rev.04 Inconclusive 15.7.3. An ‘Inconclusive’ result indicates that VisualCheck was unable to reach a conclusion based on the current image data. • If VisualCheck results were inconclusive it means that the images captured during the exam were not suitable for the VisualCheck algorithm to analyze. • A number of factors can lead to an inconclusive result (e.g the patient could have moved, there is too much mucus or blood, or the cervix itself was not suitable for the VisualCheck exam (e.g. a type 3 cervix.) It is recommended to repeat the test or perform an alternate form of screening. Incomplete 15.7.4. The results ‘incomplete’ indicates that VisualCheck was not able to complete the assessment for technical reasons. • The most likely cause of an incomplete result is the loss of WiFi connection, although other technical issues, such as server failure, could produce an incomplete result. It is recommended to repeat the test. Page 84 of 86 Doc ID: 4baaf484d7f5f01d2b8e5dc0fedc637256236abe...
-
Page 85: Appendix 5: Quality Frame
No. 10LB038 EVA System User Manual Rev.04 Appendix 5: Quality frame About the Quality frame The Quality frame is an AIbased tool that detects the presence of a cervix within the screen of the EVA device. It then assesses the image to see if the image quality meets the criteria to be designated a suitable image for visual inspection of the cervix. Using the Quality frame 16.1. The quality frame feature guides users to capture high quality cervical images. When turned on this 16.1.1. feature presents a grey or green frame on the screen of the EVA device during visualization/image capture. A green frame indicates that quality (a combination of focus, image quality and positioning of the cervix 16.1.2. in the image) is excellent. A grey frame indicates usable quality for cervical examination. In case no cervix is being identified by the camera, no frame will appear Users can capture images or video at any point regardless of the quality fame indication. 16.1.3. Page 85 of 86 Doc ID: 4baaf484d7f5f01d2b8e5dc0fedc637256236abe... - Page 86 No. 10LB038 EVA System User Manual Rev.04 Appendix 6: Teleconsultation (Zoom Telehealth) About the Teleconsultation feature The teleconsultation feature on the EVA System allows for remote proctorship and consultation among clinicians. Using the third party Zoom application on the EVA device, a clinician in a remote location is able to supervise the clinician at the point of care in realtime. Installing the Zoom Application 17.1. Before the Zoom application can be installed, MobileODT admin need to ‘push’ the app to your device. 17.1.1. To request this feature, please contact MobileODT support on support@mobileodt.com and provide 17.1.2. them with your username and device ID number. To install Zoom on the Smartphone: 17.1.3. If you have the MaaS360 MDM installed on the phone (you know you have it if you see the MobileODT 17.1.4. logo on the EVA device screen): Open EVA device and tap on the MaaS360 application, found on the home screen 17.1.5. Choose App Catalog. 17.1.6. Click Zoom and install 17.1.7. If you don’t see the Zoom Application as an option, please email support@mobileodt.com with your 17.1.8. username and device ID. Initiating a teleconsultation connection 17.2. Once the Zoom application is installed, to share your EVA device screen: Open the Zoom app and Sign Up or Sign In. 17.2.1.
- Page 87 Document ID Audit Trail Date Format YYYY / MM / DD Status Completed 2021 / 10 / 13 Sent for signature to Almog (almogavivi@mobileodt.com), Yana 14:51:47 UTC+3 (yanakatsman@mobileodt.com), Lior (liorshwarzwald@mobileodt.com) and Leon Boston (leonboston@mobileodt.com) from qa@mobileodt.com IP: 84.95.243.78 2021 / 10 / 13 Viewed by Lior (liorshwarzwald@mobileodt.com)
- Page 88 Document ID Audit Trail Date Format YYYY / MM / DD Status Completed 2021 / 10 / 13 Viewed by Leon Boston (leonboston@mobileodt.com) 17:59:42 UTC+3 IP: 82.166.93.77 2021 / 10 / 13 Signed by Leon Boston (leonboston@mobileodt.com) 17:59:57 UTC+3 IP: 82.166.93.77 2021 / 10 / 13 Viewed by Almog (almogavivi@mobileodt.com)
Need help?
Do you have a question about the EVA System and is the answer not in the manual?
Questions and answers