
Related Manuals for MobileODT EVA System


Summary of Contents for MobileODT EVA System
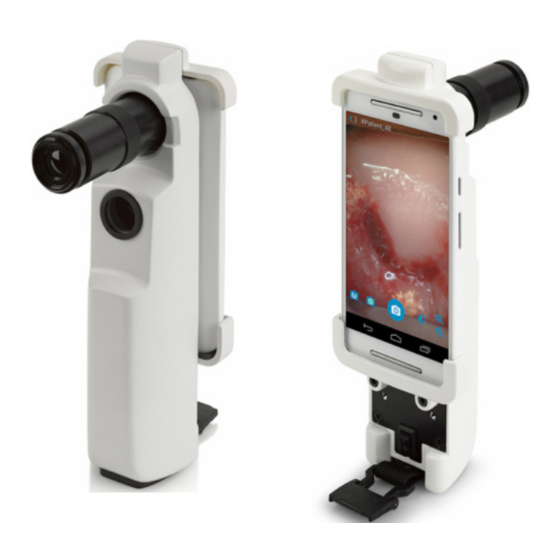
- Page 1 Enhanced Visual Assessment System EVA System – Software Guide In str u ct io n s for Use...
-
Page 2: Table Of Contents
T A B L E OF CONTENTS Preparing the phone for use ............. 3 Step #1: Using the phone for the first time ........3 Step #2: Connecting the phone to the internet: ......4 Step #3: Installing the CervDx app on the phone: ......5 Step #4: Using the CervDX app for the first time ...... -
Page 3: Preparing The Phone For Use
Preparing the phone for use Step #1: Using the phone for the first time 1. Turn on the phone: press firmly 2. Unlock the phone. Unlock the on the power button located on phone by lightly sliding your the top/right corner of the phone. finger upward on the screen. -
Page 4: Step #2: Connecting The Phone To The Internet
Step #2: Connecting the phone to the internet: The information provided in the next two pages are for those who do not have SIM cards with data plans inserted into the phone. 1. Turn on the phone: press firmly 2. Unlock the phone. Unlock the on the power button located on phone by lightly sliding your the top right corner of the phone. - Page 5 5. Locate "wi-fi" and tap on it. 6. Locate your network and tap on it. 7. Enter your password and 8. At the top of your phone a tap "connect". "connected" icon should appear. If not, please contact your mobile network provider.
-
Page 6: Step #3: Installing The Cervdx App On The Phone
Step #3: Installing the CervDx app on the phone: 1. Turn on the phone: press firmly 2. Unlock the phone. Unlock the on the power button located on phone by lightly sliding your the top/right corner of the phone. finger upward on the screen. 4. - Page 7 8. Once installed, the app icon 7. Tap "Download" to should appear on the main screen. download the EVA System If not, it may be found in the app App to your phone. drawer, accessed from the main...
-
Page 8: Step #4: Using The Cervdx App For The First Time
Step #4: Using the CervDX app for the first time 1. Enter the EVA System App: 2. To use the app you must CervDx. The app can be accessed by enter username (1) and tapping on it lightly. password (2), both of which will be sent to you. -
Page 9: Using The Application In A Session
Before you can visualize the cervix, you must first enter information about the patient. Entering accurate patient information is critical for documentation and follow-up. To enter patient information: 1. Enter the EVA System App: 2. After logging in, tap the CervDx. The software can be "Add New Patient"... - Page 10 3. Enter the patient ID (1), name 6. Scroll down to complete other (2), age (3), phone number (4) relevant fields. You can record more and number of children (5). information on the patient by tapping "Add New Note." 7. Enter your note in free text, 8.
-
Page 11: Step #2: Editing Patient Information
Step #2: Editing patient information After you have entered patient information, you can edit it at any stage. 1. Tap on the "Details" tab and 2. Correct the relevant then on the field you would like information. to edit. 3. Once corrected, tap "Save Details"... -
Page 12: Step #3: Visualizing The Cervix And Capturing An Image
Step #3: Visualizing the cervix and capturing an image After you enter the patient details, you can visualize the cervix and capture an image. Capturing an image Swipe up to zoom in on the 2. Capture images by tapping the cervix, and swipe down to zoom image capture button. -
Page 13: Using The Green Filter
Using the Green Filter For health providers who are using the EVA System for colposcopy, there is a feature that allows applying a green filter to the image. To use the green filter, enter the 2. Capture images with the green... -
Page 14: Using The Video Feature
Using the video feature If you use video in your examination, start a new session and enter the visualization screen, by tapping on the camera icon in the Details screen. 1. To use the video feature, tap the video 2. A timer will appear in the bottom icon in the bottom right corner (1). -
Page 15: Capturing Images Without Touching The Phone
Capturing images without touching the phone If your System is connected to a stand, you can capture images without touching the phone, simply by waving your hand. First, turn on the "Hand Gesture Feature" in the application settings: 1. Access the settings by tapping on 2. -
Page 16: Using The Timer While Performing Visual Inspection With Acetic Acid (Via)
Using the timer while performing visual inspection with acetic acid (VIA) 1. Apply acetic acid to the After applying acetic acid, tap cervix with a swab. the timer at the top to begin. The phone will vibrate once it is 4. -
Page 17: Step #4: Reviewing Patient Information
Step #4: Reviewing patient information After capturing the images, you can review the patient images and information: 1. Enter the patient gallery by 2. In the images gallery, you can tapping on the "Images" tab at review specific images and videos the top of the screen. -
Page 18: Step #5: Recording A Clinical Impression
Step #5: Recording a clinical impression You can use the EVA System to record your clinical impression. 1. To record a diagnosis, tap the 2. Complete the appropriate "Decision" tab on the top right steps in the decision-recording corner. tool. -
Page 19: Accessing The Settings
Accessing the settings 1. To access settings enter the Settings can be accessed by patient list screen (the main tapping the gear icon in the screen after login). top right corner. 3. On the settings screen you can: Turn on/off information transfer through the cellular network as well as Wi-Fi (1). - Page 20 4. Below the app details, you will find options to seek help from MobileODT online, read more about MobileODT, the terms of use and privacy policy, and the open source licenses on the app. 5. If you need to send 6.
-
Page 21: Troubleshooting
If the user is unable to do so, or doesn't know how – please contact MobileODT support. Furthermore, if the images have synced but there is still insufficient space, the user should contact support. -
Page 22: Web Portal Troubleshooting
Incorrect Login or Forgotten Password To reset a password or set a password after the login link from the user’s email expires, click “forgot password” on the login page to have another link sent to the user's email. Access portal.mobileodt.com to reset a password. - Page 23 If a grey image appears or one or more images are missing, manually sync from the app. Use the “arrows” button to sync the session data to the portal. Contacting support For questions concerning service, please contact MobileODT support: Email: support@mobileodt.com Phone: +1 (617) 454-4687 Website: www.mobileodt.com All specifications for the product are subject to change without notice.
Need help?
Do you have a question about the EVA System and is the answer not in the manual?
Questions and answers