
Related Manuals for Magic Care MIZAR


Summary of Contents for Magic Care MIZAR
-
Page 1: Table Of Contents
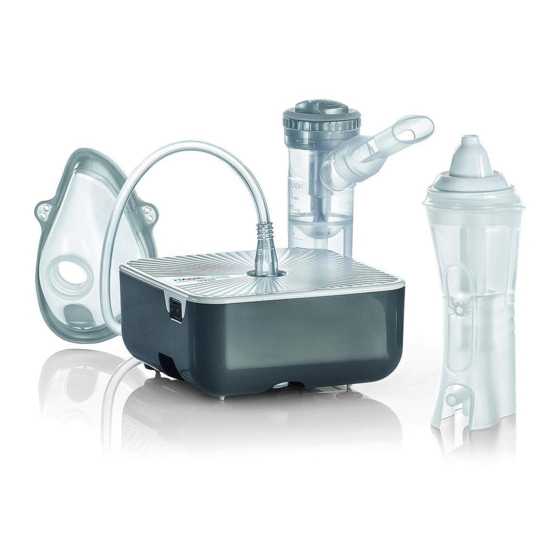
MIZAR I - MANUALE ISTRUZIONI D'USO GB - INSTRUCTION FOR USE MANUAL C6.5 C1. 2 C6.4 C6.3 C1.1 C6.2.2 C6.2.1 C1.2 C6.2 C1.2.3 C6.2.3 C1.2.2 C6.2.1 C1.2.1 C6.1 Accessory Schema di collegamento - Assembly diagram... -
Page 3: C6.3
MIZAR Mod. P0915EM APPARECCHIO PER AEROSOLTERAPIA Siamo lieti per l’acquisto da Voi effettuato e Vi ringraziamo per la Vostra fiducia. Il nostro obiettivo è la piena soddisfazione dei Nostri clienti offrendo loro prodotti all’avanguardia nel trattamento delle malattie delle vie respiratorie. Leggete attentamente queste istruzioni e conservatele per consultazioni future. - Page 4 • In presenza di bambini e di persone non autosufficienti, l’apparecchio deve essere utilizzato sotto la stretta supervisione di un adulto che abbia letto il presente manuale. • Alcuni componenti dell’apparecchio hanno dimensioni tanto piccole da poter essere inghiottite dai bambini; conservate quindi l’apparecchio fuori dalla portata dei bambini.
- Page 5 C1.2.2 C1.2.1...
- Page 6 7. Terminata l’applicazione, spegnete l’apparecchio e staccate la spina. ATTENZIONE: Se dopo la seduta terapeutica si forma un evidente deposito di umidità all’interno del tubo (B), staccate il tubo dal nebulizzatore ed asciugatelo con la venti- lazione del compressore stesso; questa azione evita possibili proliferazioni di muffe all’interno del tubo.
-
Page 7: C6.2.1
2. Inserite l’atomizzatore (6.3) nella camera di nebulizzazione (C6.2.1). 3. Inserite la soluzione (max 10 ml) nella camera di nebulizzazione (C6.2.1). 4. Applicate il separatore (C6.4). Inserite l’adattatore nasale (C6.5). 5. Collegate la doccia nasale all’apparecchio mediante il tubo (B) e il raccordo (C6.1). -
Page 8: C6.2
C6.3-C6.4-C6.5 in lavastoviglie con ciclo a caldo. metodo C: Sanificate gli accessori C1.1-C1.2.1-C1.2.2-C1.2.3-C2-C3-C4-C5-C6.1-C6.2- C6.3-C6.4-C6.5 mediante immersione in una soluzione con il 50% di acqua ed il 50% di aceto bianco, infine risciacquate abbondantemente con acqua calda potabile (circa 40°C). Se volete eseguire anche la pulizia per DISINFEZIONE saltate al paragrafo DISINFEZIONE. Dopo aver sanificato gli accessori scuoteteli energicamente ed adagiateli su un tovagliolo di carta, oppure in alternativa asciugateli con un getto d’aria calda (per esempio asciugacapelli). - Page 9 FILTRAGGIO ARIA L’apparecchio è dotato di un filtro di aspirazione (A3) da sostituire quando è sporco o cambia colore. Non lavate ne riutilizzate lo stesso filtro. La sostituzione regolare del filtro è necessaria per aiutare ad assicurare prestazioni corrette del compressore. Il filtro deve essere controllato regolarmente.
- Page 10 CARATTERISTICHE TECNICHE Mod. P0915EM Alimentazione: 12V DC 1,25A Pressione Max: 2 ± 0,3 bar Portata aria al compressore: 9 l/min approx Rumorosità (a 1 m): 51 dB (A) approx Funzionamento: 30 minuti ON - 30 minuti OFF Condizioni d’esercizio: Temperatura: min 10°C;...
- Page 11 TABELLA LOCALIZZAZIONE GUASTI Prima di effettuare qualsiasi operazione spegnete l’apparecchio e scollegate il cavo di rete dalla presa. PROBLEMA CAUSA RIMEDIO Alimentatore non inserito correttamente nella presa L’apparecchio non Inserire correttamente dell’apparecchio o nella funziona l’alimentatore nelle prese presa di alimentazione di rete Non è...
- Page 12 COMPATIBILITÀ ELETTROMAGNETICA Questo apparecchio è stato studiato per soddisfare i requisiti attualmente richiesti per la compatibilità elettromagnetica (EN 60601-1-2:2015). I dispositivi elettromedicali richiedono particolare cura, in fase di installazione ed utilizzo, relativamente ai requisiti EMC, si richiede quindi che essi vengano installati e/o utilizzati in accordo a quanto specificato dal costruttore.
-
Page 13: C1.2.2
MIZAR Mod. P0915EM AEROSOL THERAPY APPARATUS We are pleased you have purchased our product and we thank you for your trust in us. Our goal is to fully satisfy consumers by offering them cutting-edge systems for the treatment of respiratory tract ailments. Carefully read these instructions and keep them in a safe place for future reference. - Page 14 • Children and people who are not self-sufficient must use the device under the close supervision of an adult who has read this manual. • Some parts of the device are small enough to be swallowed by children; therefore, keep the device out of the reach of children. •...
- Page 15 C1.2.2 C1.2.1...
-
Page 16: C6.1
USER METHODS OF THE “RF8 DUAL SPEED” NEBULISER WITH SPEED SELECTOR To make the inhalation therapy faster, turn the speed selector (C1.2.3) clockwise. For more effective inhalation therapy, turn the speed selector (C1.2.3) anticlockwise. In this case, you have optimal assumption of the medication, minimising leaks into the surrounding environ- ment. - Page 17 one nostril. 8. During treatment, it is better to close with a finger the nostril that is not supposed to be irrigated. 9. Activate the NASAL DOUCHE by closing the dispensing hole (C6.2.3) while inhaling and release the button before exhaling; to help expel the mucous, blow gently with the nostril being treated directly into the NASAL DOUCHE.
- Page 18 DISINFECTION After sanitising the nebuliser cup and the accessories, disinfect them choosing one of the methods described below. method A: Accessories C1.1-C1.2.1-C1.2.2-C1.2.3-C2-C3-C4-C5-C6.1-C6.2-C6.3- C6.4-C6.5 can be disinfected. The disinfectant must be an electrolytic chloroxidizer (active principle: sodium hypochlorite) specific for disinfecting, which is available in any pharmacy. Implementation: - Fill a container big enough to hold all of the parts to disinfect with a solution of potable water and disinfectant, according to the proportions indicated on the...
- Page 19 SYMBOLS EC Marking medical ref. Dir 93/42 Device serial number EEC and subsequent updates Class II device Manufacturer Attention: check the instructions Type BF applied part for use On “ON” When the device is Alternating current switched off, the on/off witch stops compressor function in only one Risk: electrocution.
- Page 20 TECHNICAL SPECIFICATIONS Mod. P0915EM Power supply: 12V DC 1,25A Max pressure: 2 ± 0.3 bar Compressor air delivery: approx 9 l/min Noise (at 1 m): approx 51 dB (A) Operation use: 30 minutes ON/ 30 minutes OFF Operating Conditions: Temperature: min 10°C;...
- Page 21 DEVICE DISPOSAL In compliance with the Directive 2012/19/EC, the symbol printed on the device shows that the device to be disposed of is considered waste and must therefore be an item of ‘’differentiated collection’’ . Consequently, the user must take it (or have it taken) to the designated collection sites provided by the local authorities, or turn it in to the dealer when purchasing an equivalent new device.
- Page 22 TROUBLE-SHOOTING Switch off the device before any procedure and unplug the power cable from the socket. PROBLEM CAUSE SOLUTION The power adaptor has not The device does not been correctly inserted into Correctly insert the power work the socket of the device or adaptor in sockets.
- Page 24 FLAEM NUOVA S.p.A. Via Colli Storici, 221 25015 S. MARTINO DELLA BATTAGLIA (Brescia) – ITALY Tel. +39 030 9910168 r.a. Fax +39 030 9910287 www.flaemnuova.it 2017 FLAEM NUOVA® All right reserved cod. 17495A0 Rev. 03/2017 (TÜV A1)
Need help?
Do you have a question about the MIZAR and is the answer not in the manual?
Questions and answers