Advertisement
OWNERS MANUAL & ASSEMBLY INSTRUCTIONS
ADJUSTABLE BED FRAME
TABLE OF CONTENTS
Safety & Warnings ...............................................................
Parts List .............................................................................
Assembly Instructions .........................................................
Remote Control Instructions ...............................................
Synchronizing Two Foundations .........................................
Troubleshooting ..................................................................
Warranty ..............................................................................
02
03
04
09
10
11
12
13
v 1.0
126010-5020
126010-5030
126010-5050
126010-5060
Advertisement

Subscribe to Our Youtube Channel
Related Manuals for Classic Brands 126010-5020


Summary of Contents for Classic Brands 126010-5020
-
Page 1: Table Of Contents
OWNERS MANUAL & ASSEMBLY INSTRUCTIONS ADJUSTABLE BED FRAME TABLE OF CONTENTS Safety & Warnings ............... Parts List ................Assembly Instructions ............Remote Control Instructions ..........Setting Programmable Positions and Pairing Remote ..Synchronizing Two Foundations ......... Troubleshooting ..............126010-5020 Warranty ................126010-5030 126010-5050 126010-5060... -
Page 2: Safety & Warnings
SAFETY & WARNING ASSEMBLY WARNING! • Due to the size of this base we recommend assembling it in the room intended for use. • Check the packaging to make sure you have all the parts listed on this instruction - small parts may have come loose inside the carton during shipment. -
Page 3: Parts List
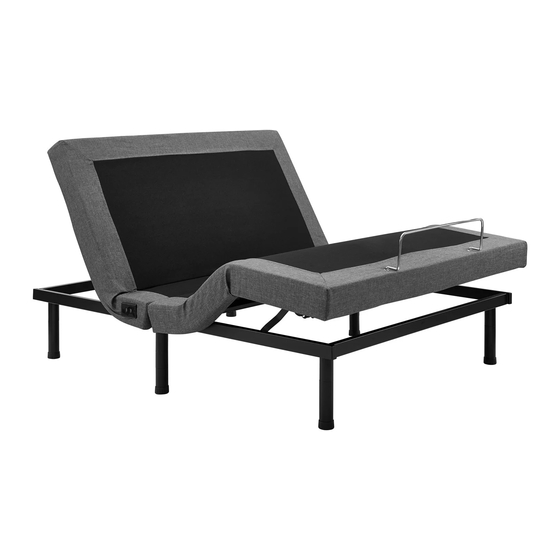
PARTS LIST All electronics and components that need to be installed are located in boxes under the base or attached to the frame. Before discarding the packing materials, ensure that all the parts are accounted for. Control Box x 1 Head/Foot Actuator x 1 Power Adapter x 1 (Pre-assembled on frame) -
Page 4: Assembly Instructions
ASSEMBLY INSTRUCTIONS WARNING: It is important that you read and carefully follow all base assembly instructions. Do not plug the power cord into an electrical outlet until all assembly has been properly completed. Failure to follow all foundation assembly instructions may cause the bed to operate improperly possibly resulting in the risk of personal injury or death. - Page 5 ASSEMBLY INSTRUCTIONS Cut all ties by hand and remove all parts from the box. NOTE: Before discarding any packing materials, check the carton and verify all items in the parts list are included. Have a question? Please contact Customer Service at 877-707-7533 for the quickest service. We are open Mon.
- Page 6 ASSEMBLY INSTRUCTIONS Thread the bolt of the leg into frame and turn by hand until tight. Split Apart 11.5Inches 5 Inches 6.5 Inches During assembly, decide on desired height for bed frame. Originally legs are 11.5 inches tall. These may be spilt into two shorter leg options; a 5 inches and a 6.5 inches height option. Have a question? Please contact Customer Service at 877-707-7533 for the quickest service.
- Page 7 ASSEMBLY INSTRUCTIONS WARNING: It is important that you read and carefully follow all base assembly instructions. Do not plug the power cord into an electrical outlet until all assembly has been properly completed. Failure to follow all foundation assembly instructions may cause the bed to operate improperly possibly resulting in the risk of personal injury or death.
- Page 8 ASSEMBLY INSTRUCTIONS WARNING: It is important that you read and carefully follow all base assembly instructions. Do not plug the power cord into an electrical outlet until all assembly has been properly completed. Failure to follow all foundation assembly instructions may cause the bed to operate improperly possibly resulting in the risk of personal injury or death.
-
Page 9: Remote Control Instructions
REMOTE CONTROL INSTRUCTIONS ZERO GRAVITY: ANTI-SNORE: Press to move the bed to Zero-Gravity Press to move the bed to anti-snore position. position. TV : HEAD AND FOOT UP: Press to move the bed to TV position. Press and hold to raise the head HEAD: and foot section at the same time. -
Page 10: Setting Programmable Positions And Pairing Remote
SETTING PROGRAMMABLE POSITIONS AND PAIRING REMOTE The original remote that comes in the box is already paired to the base. No further action is required. In the event when the remote is not paired OR if you have changed the batteries in the remote, follow the instructions. HINT: To pairing, hold all three buttons at the same time. -
Page 11: Synchronizing Two Foundations
SYNCHRONIZING TWO FOUNDATIONS SYNC TWO TXL BASES WITH ONE REMOTE: Each base comes paired with its own remote. You can use only one remote and put the 2nd remote away for safekeeping. Bed “A” is already synced. Step 1: Unplug bed “A” and take the “A” remote and sync it to bed “B”. Step 2: Plug one of the beds and Hold the head DOWN and the foot UP at the same time and do not let go until you have pushed the recessed button on the words reset coding or next to the word learn and hold the recessed button for 3 seconds and release. -
Page 12: Troubleshooting
TROUBLESHOOTING In the event that the power foundation fails to operate, assess the symptoms and possible solutions provided in the chart below. SYMPTOMS SOLUTIONS Perform any or all of the following: The base does not respond * Check that the power cord is plugged into a working and grounded electrical when the remote is used. -
Page 13: Warranty
Classic Brands warrants this adjustable base to you on the terms and over the reducing periods of time set out below. All warranty claims require notice from You to be given to Classic Brands in the manner set out below, and to be received by Classic Brands inside the applicable warranty time period.
Need help?
Do you have a question about the 126010-5020 and is the answer not in the manual?
Questions and answers
How to reset the base. Base is not responding
To reset the Classic Brands base model 126010-5020 that is not responding, follow these steps:
1. Check Power Connection – Ensure the power cord is plugged into a working and grounded electrical outlet.
2. Check Control Box Light – Verify that the light on the control box is on.
3. Check Home Circuit Breaker and Fuses – Ensure there are no power issues affecting the base.
4. Unplug and Reset – Unplug the power cord from the outlet, wait for a minute, then plug it back in.
5. Re-sync Remote – Hold the head DOWN and foot UP buttons at the same time. While holding them, press and hold the recessed reset button labeled reset coding or learn for 3 seconds, then release.
6. Listen for Beep – Once you hear a beep, plug both bases in, and they should function as one.
These steps should reset the base and restore functionality.
This answer is automatically generated
@Mr. Anderson
@Joyce nicholson I have no reset button on my remote. I purchased this need in 2020.
Hi! I can’t get the remote and the bed to talk.
The original remote is already paired to the base. If the remote is not paired or if the batteries were changed, follow these steps to pair it:
1. Press and hold the head DOWN and foot UP buttons on the remote at the same time.
2. While holding these buttons, press the recessed button on the side of the control next to the word "learn."
3. Release all buttons once the pairing is complete.
This should connect the remote to the adjustable bed base.
This answer is automatically generated
I do t have a reset or learn button on my remote either and I purchased bed in 2020
Is there a way to order a power supply box for model 126010-5020, I tried a 24 volt AC DC adapter with no battery backup and can't get the light to come on in the box under the bed
Where can I get a replacement remote control?
Hello, I need the remote for this bed how do I get it or order it?
I lost the remotel for the bed. Where can I buy a new one?