Table of Contents
Advertisement
Quick Links
Advertisement
Table of Contents

Related Manuals for Explore Scientific DeepSky Astro Series


Summary of Contents for Explore Scientific DeepSky Astro Series
- Page 1 Digital camera · DeepSky Astro Camera Series Instruction manual...
- Page 2 Besuchen Sie unsere Website über den folgenden QR Code oder Weblink um weitere Informationen zu diesem Produkt oder die verfügbaren Übersetzungen dieser Anleitung zu finden. Visit our website via the following QR Code or web link to find further information on this product or the available translations of these instructions.
-
Page 3: Table Of Contents
Contents 1 Imprint ................................ 4 2 Validity note .............................. 4 3 About this Instruction Manual........................ 4 4 Intended use .............................. 4 5 General safety instructions ........................... 5 6 General safety instructions ........................... 5 7 Parts overview and scope of delivery ...................... 8 8 Parts overview and scope of delivery ...................... 9 9 Installing the software and drivers ...................... 10 10 Installing the software and drivers ...................... 10 11 Camera mounting on telescope ........................ 11... -
Page 4: Imprint
1 Imprint Bresser GmbH Gutenbergstr. 2 46414 Rhede Germany www.explorescientific.de For any warranty claims or service inquiries, please refer to the information on "Warranty" and "Ser- vice" in this documentation. We ask for your understanding that unsolicited returns cannot be pro- cessed. -
Page 5: General Safety Instructions
5 General safety instructions DANGER Danger of suffocation! Improper use of this product may result in suffocation, especially for children. It is therefore imperative that you observe the following safety information. • Keep packaging materials (plastic bags, rubber bands, etc.) away from children! There is a danger of choking! •... - Page 6 • Never use the device with defective or damaged components (e.g. housing, cable, lamp, etc.). • Do not expose the device to high temperatures. Use only the supplied AC adapter. Do not short- circuit the device or batteries or dispose of in fire! Excessive heat and improper handling can cause short circuits, fires and even explosions! •...
- Page 7 NOTICE Danger of data loss! Do not interrupt an on-going data connection to a computer before all data has been transferred. This could lead to data loss for which the manufacturer is not liable. NOTICE Privacy Protection Respect the privacy of your fellow human beings - do not look into flats with this device, for example! NOTICE Use of the maximum transmission speed rate To use the full transmission speed rate, please use the included USB 3.0 connection cable and a cor-...
-
Page 8: Parts Overview And Scope Of Delivery
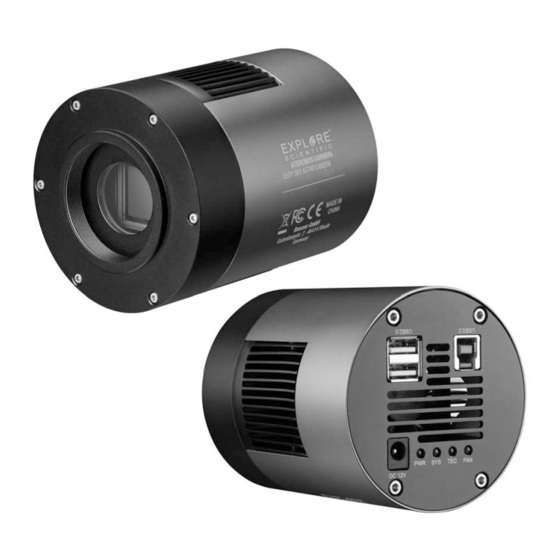
7 Parts overview and scope of delivery Illustration 1: All parts of the Astro camera with rear view (connection area) 1 Camera housing 2 Ventilation slits 3 Holding thread 4 USB 2.0 socket (2x USB HUB) 5 USB 3.0 socket (1x) 6 Connection socket for DC barrel con- nector 7 PWR function light (power supply of the... - Page 9 Scope of delivery: Camera (A); ); T2 adapter (B); power adapter (C); power cable (D); power cable extension (E); USB 3.0 connection cable (F); software CD; hardcase Also required (not included): Computer running Windows 8/10 NOTICE! This is not a stand-alone camera. A computer with Windows operating system and free USB 3.0 interface is required for operation.
-
Page 10: Installing The Software And Drivers
Scope of delivery Astro camera (A); 1 ¼" plug-in adaptor (B); USB cable (C); ST4 cable (D); software CD (E) 9 Installing the software and drivers 1. Insert the supplied CD-ROM into the CD drive of your computer. Alternatively, you can download the software package from the product page and start the installation directly. -
Page 11: Camera Mounting On Telescope
Illustration 4: EXPLORE Capture: Select camera 7. The camera now continuously sends live images to the computer at the current exposure time. 8. Use the telescopes´ finder scope to focus on a bright star in the cameras` field of view. To obtain a faster image sequence and a higher camera sensitivity during focusing, switch to binning mode if necessary (see software menu "Digital Binning"). -
Page 12: Using The Internal Usb Hub (Usb 2.0)
13 Using the internal USB HUB (USB 2.0) The camera is equipped with an built-in USB HUB with 2x USB 2.0 sockets at the rear. This can be used to connect additional components (e.g. autoguider camera, motor focus etc.). Separate cable connections of the accessories to the computer are omitted. - Page 13 7 USB port on PC/notebook 8 ST4 connecting cable 9 ST4 port on the mount* 10 Recording device (e.g. single lens reflex cam- era or another deep sky camera) *Not included in the scope of delivery. Additional accessories may be required for mounting a recording device. NOTICE! This is not a stand-alone camera.
-
Page 14: Camera Mounting With Optional Autoguider
15 Camera mounting with optional autoguider Illustration 8: Mounting the Deep Sky Astro Camera with optional autoguider camera 1 Autoguider camera 2 ST4 connecting cable 3 USB 3.0 connecting cable 4 Guiding scope 5 Telescope 6 ST4-capable mount 7 Control panel of the mount 8 ST4 socket on control panel 9 Deep Sky Astro Camera 10 Computer... -
Page 15: Optimizing The Camera Settings For Long Exposures
16 Optimizing the camera settings for long exposures Image 1 Image 2 Image 3 Image 4 Illustration 9: Menu windows relevant for optimization in the supplied software To ensure that the camera delivers the best possible image results for long exposures over 1 minute, you can optimally adjust the setting values for gain and black level depending on the desired exposure time. -
Page 16: Disposal
6. Switch off the oven after heating and wait until the oven has returned to room temperature. 7. CAUTION! Risk of burns! Wear suitable protective gloves when removing the camera from the oven! 8. Remove the camera from the oven. Replace the housing lock and screw it in place. 9. - Page 17 Data output: Images and Data output: Images and Data output: Images and video video video Image sensor: Panasonic Image sensor: SONY Exmor Image sensor: SONY Exmor NM34230PLI CMOS Color IMX432 CMOS Colour Sensor IMX428 CMOS Color Sensor Sensor Adjustable resolution: Adjustable resolution: Adjustable resolution: 4648x3506 / 2304x1750 /...
- Page 18 Operating system: WINDOWS Operating system: WINDOWS Operating system: WINDOWS 7, 8 and 10 7, 8 and 10 7, 8 and 10 PC requirements: CPU Intel PC requirements: CPU Intel PC requirements: CPU Intel Core2 2.8Ghz or higher / 2 GB Core2 2.8Ghz or higher / 2 GB Core2 2.8Ghz or higher / 2 GB Ram / USB 3.0...
- Page 19 Telefon*: +49 28 72 80 74 310 Teléfono*: +31 528 23 24 76 BRESSER GmbH BRESSER Benelux Kundenservice Explore Scientific Klantenservice Gutenbergstr. 2 Smirnoffstraat 8 46414 Rhede 7903 AX Hoogeveen Deutschland Nederland * Lokale Rufnummer in Deutschland (Die Höhe der Gebühren je * Het telefoonnummer wordt in het Nederland tegen lokaal tarief Telefonat ist abhängig vom Tarif Ihres Telefonanbieters);...
- Page 20 Bresser GmbH Gutenbergstraße 2 46414 Rhede · Germany www.bresser.de @BresserEurope...
Need help?
Do you have a question about the DeepSky Astro Series and is the answer not in the manual?
Questions and answers