Table of Contents
Advertisement
Quick Links
K13086 assembly
1. Carefully remove contents from the packaging.
2. Select a firm, level surface on which to assemble the Teardown Table with Parts washer
3. Tools required (not supplied) 2 x 14mm Spanner, 1 x 13mm Spanner and
1 x Phillips screw driver
Packed Contents
Description
Parts Washer
Drain Table
Handle Frame
End Frame
Fixed Sliding Frame
Parts washer support Leg
Lower Shelf
Locking Castors
Castors
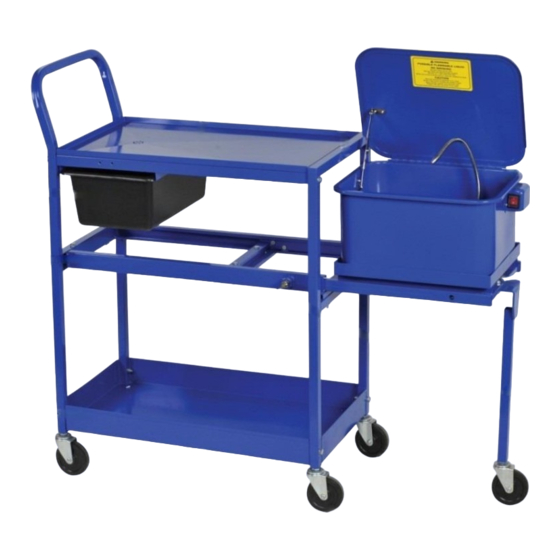
Know your product
4
12
5
6
7
1. Parts Washer
4. Handle Frame
7. Locking Castors
10. Sliding frame
:
Qty
2. End Frame
5. Fixed Sliding Frame
8. Castor
11. Sliding Frame Lock
Description
1
Oil Tub
1
Oil Tub Stop Bracket
1
Bolts M14 x 65mm
1
Bolts M14 x 45mm
1
Bolts M13 x 40mm
1
Flat Washers
1
Spring Washers
2
Screws
3
Small Flat washer
Nut
3
2
Qty
1
1
4
8
2
24
2
2
2
10
9
11
8
3. Drain Table
6. Lower Shelf
9. Parts Washer Support Leg
12. Oil Tub
1
10
Advertisement
Table of Contents

Related Manuals for kincrome K13086


Summary of Contents for kincrome K13086
- Page 1 K13086 assembly 1. Carefully remove contents from the packaging. 2. Select a firm, level surface on which to assemble the Teardown Table with Parts washer 3. Tools required (not supplied) 2 x 14mm Spanner, 1 x 13mm Spanner and 1 x Phillips screw driver...
- Page 2 Assembling Lower storage Section 1. Locate the Handle frame (4), End Frame (2) and the Lower Shelf (6). 2. Align the holes in the bottom of the Handle frame (4) and End Frame (2) with the 4 holes in the corners of the Lower Shelf (6). 3.
- Page 3 Attaching the Castors 1. Locate the two Locking Castors (7) and the three Castors (8). 2. Turn the Tear down table upside down on a piece of cardboard or old carpet. 3. Align the Locking Castors (7) with the Handle Frame (4) holes and tighten. 4.
Need help?
Do you have a question about the K13086 and is the answer not in the manual?
Questions and answers