Table of Contents
Advertisement
Quick Links
Advertisement
Table of Contents

Related Manuals for Hydro Instruments TH-4000


Summary of Contents for Hydro Instruments TH-4000
- Page 1 TH-4000 Turbidimeter Operation and Maintenance Manual The information contained in this manual was current at the time of printing. The most current versions of all Hydro Instruments manuals can be found on our website: www.hydroinstruments.com TH-4000 Rev. 4/29/2022 v2...
-
Page 2: Table Of Contents
VI. Optional Data Logger ............... 8 Figures 1. Operation Mode Screens ............. 5 2. TH-4000 All Screens ..............6 3. TH-4000 Controller Electronics ........... 9 4. TH-4000 Circuit Board MB124 ..........10 Drawings TH-4000 Exploded View and Bill of Materials ........11... -
Page 3: Introduction
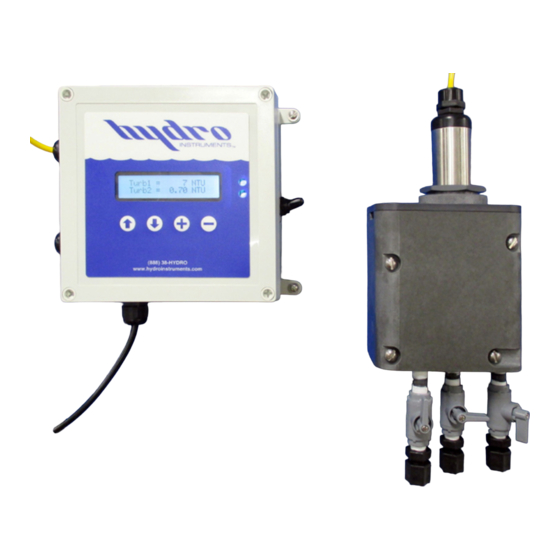
I. INTRODUCTION The Hydro Instruments TH-4000 turbidimeter uses a pre-scaled inline sensor that measures turbidity in water using a white LED as the excitation light source and by measuring the scattered light at a 90-degree angle with respect to the excitation beam. The fl uidic and optical arrangement of the sensor is designed to overcome many shortcomings associated with other inline turbidimeters. -
Page 4: Operation Of The Th-4000
A. Start Up and Installation 1. The TH-4000 will accept any single phase A/C power in the range of 110 to 240 VAC at 50 to 60 Hz. When connecting A/C power to the instrument, it is imperative that the A/C source be well grounded. -
Page 5: Configuration Of Parameters
III. CONFIGURATION OF PARAMETERS Confi guration of Sensor Parameters & Calibration of Sensors Each TH-4000 Turbidimeter will be set up from the factory as per the ordering instructions. How- ever, settings and sensors can be changed using the following procedure. -
Page 6: Th-4000 All Screens
FIGURE 2: TH-4000 All Screens Turb1 = 0.74 NTU HOLD HOLD HOLD Alarm Status Modbus Baud=19200 Screens shown with grey border are Screens shown with grey border are hidden screens, hidden screens, Normal Node= 1 Data=8/N/1 accessed by holding -... -
Page 7: Maintenance
IV. MAINTENANCE A. Sensor Maintenance The turbidity sensor is designed to be easily removed, inspected, and cleaned when required. It is recommended that the turbidity sensor be checked for fouling and cleaned on a monthly basis. Heavily contaminated water may require more frequent cleanings. Cleaner water sources with less contamination may not require cleaning for several months. -
Page 8: Optional Data Logger
6. Damaged Circuit Board: The circuit boards can be damaged if high voltage is connected to the wrong terminals, by lightning, other power surges, or by corrosion. If you believe that the circuit board is damaged, then contact the factory and your local sales representative. -
Page 9: Th-4000 Controller Electronics
Comma, then click “Next”. vi. On the next pop up window “Text Import Wizard – Step 3 of 3” you can accept the “Column data format” setting of “General” and then click “Finish”. TABLE 1: TH-4000 Data Log File Example Date Time... -
Page 10: Th-4000 Circuit Board Mb124
FIGURE 3: TH-4000 Controller Electronics... -
Page 11: Th-4000 Exploded View And Bill Of Materials
FIGURE 4: TH-4000 Circuit Board MB124... - Page 12 Item Part Turbidity Sensor No. Range Description Quantity TSH-10 0-10 NTU Probe Nut TFC-PN-1 TSH-100 0-100 NTU Turbidity Sensor See Table TSH-1K 0-1,000 NTU O-Ring TFC-BOD-OR TSH-10K 0-10,000 NTU Flow Tee Body, ³ " TFC-BOD-1 O-Ring TFC-UE-OR Flow Tee Union End TFC-UE Date: 2022-04-18-v2 Flow Tee Union Nut...
Need help?
Do you have a question about the TH-4000 and is the answer not in the manual?
Questions and answers