
Subscribe to Our Youtube Channel
Related Manuals for Flymaster LIVE DS


Summary of Contents for Flymaster LIVE DS
- Page 1 Read before use A lire avant utilisation Vor Benutzung lesen Leggere prima dell’uso Прочитайте перед использованием Ler antes de usar...
-
Page 2: Main Specifications
Dual speaker system for separate vario and voice Memory expansion Micro SD card 72-channel BeiDou, Galileo, GLONASS, GPS / QZSS Microprocessor Flymaster Microprocessor with proprietary RTOS Multi-band LTE-M / EGPRS Module FLARM® Flarm ready (optional Flarm Aware RX+TX mode) Bluetooth... - Page 3 - Warranty terms and conditions. - Complete user manual of your instrument. To do that, please use the following links: https://dnl.flymaster.net/Flymaster_Standard_Limited_Warranty_EN.pdf https://www.flymaster.net/manuals/live-ds STEP 2 - Create a Flymaster Cloud account if you don’t already have one. After the account creation go to: https://livetrack360.com/devices/liveds/register...
- Page 4 STEP 3 - Activate the Live DS A valid Paypal account is needed to activate the LIVE DS. Go to the following link and use the activation code https://livetrack360.com/vodasims/activate The activation code of the Flymaster LIVE DS can be found on the last page of this booklet.
-
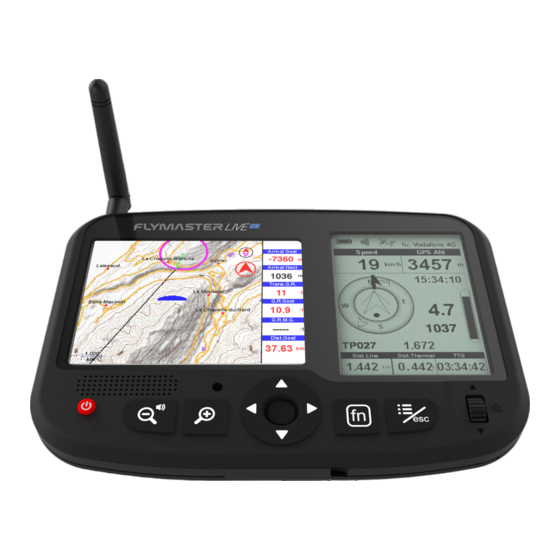
Page 5: General View
General view 12 13 1 - Colour display 2 - Monochrome display 3 - Voice assistance speaker 4 - Vario speaker 5 - Power 6 - Zoom 0ut / sound adjustment (long press) 7 - Zoom In 8 - Cursor/ Pan keys 9 - Enter/Mark 10 - Fn Key 11 - Menu/Esc (back) - Page 6 Do not delete or manipulate any files in the SD card directly. All SD card management tasks must be done through Flymaster Instrument Manager. Not doing so, may cause the instrument to malfunction. To copy some file from SD card to your computer, you must use your computer’s file explorer using the USB connection with...
- Page 7 Getting started Change page - In flight mode, short press Fn key to switch pages, Long press Fn key to show pages access menu. In the pages access menu, use scroll wheel or Up and Down cursor keys to choose page. Push Enter to confirm. Task Navigator - Use up and down cursor keys or navigation wheel to navigate through task waypoints in the monochrome display.
-
Page 8: Spécifications Principales
Système à double haut-parleur pour vario et voix séparés Extension de mémoire Carte Micro SD 72-channel BeiDou, Galileo, GLONASS, GPS / QZSS Microprocesseur Microprocesseur Flymaster avec RTOS propriétaire Multi-band LTE-M / EGPRS Module FLARM® Prêt pour Flarm (mode Flarm Aware RX+TX en option) Bluetooth... - Page 9 - Manuel d’utilisation complet de votre instrument. Pour ce faire, veuillez utiliser les liens suivants : https://dnl.flymaster.net/Flymaster_Standard_Limited_Warranty_EN.pdf https://www.flymaster.net/manuals/live-ds ÉTAPE 2 - Créez un compte Flymaster Cloud si vous n’en avez pas déjà un. Après la création du compte allez sur : https://livetrack360.com/devices/liveds/register...
- Page 10 ÉTAPE 3 - Activer le Live DS Un compte Paypal valide est nécessaire pour activer le LIVE DS. Allez sur le lien suivant et utilisez le code d’activation https://livetrack360.com/vodasims/activate Le code d’activation du Flymaster LIVE DS se trouve à la dernière page de ce livret.
- Page 11 Vue générale 12 13 1 - Affichage couleur 2 - Affichage monochrome 3 - Haut-parleur assistant vocal 4 - Haut-parleur Vario 5 - Touche marche/arrêt 6 - Zoom arrière / réglage du son (appui long) 7 - Agrandir (Zoom in) 8 - Touches curseur 9 - Enter/Mark 10 - Fn clé...
- Page 12 Ne supprimez ou ne manipulez aucun fichier directement sur la carte SD. Toutes les tâches de gestion de la carte SD doivent être effectuées via Flymaster Instrument Manager. Ne pas le faire peut entraîner un dysfonc- tionnement de l’instrument. Pour copier un fichier de la carte SD sur votre ordinateur, vous devez utiliser l’explorateur de fichiers de votre ordinateur...
- Page 13 Commencer Changer de page - En mode de vol, appuyez brièvement sur la touche Fn pour changer de page, appuyez longuement sur la touche Fn pour afficher le menu d’accès aux pages. Dans le menu d’accès aux pages, utilisez la molette de défilement ou les touches curseur Haut et Bas pour choisir la page.
- Page 14 Getrenntes Audio Dual Lautsprecher System für Vario und Stimme Memory expansion Erweiterte Speicherfunktion mit Micro SD card 72-channel BeiDou, Galileo, GLONASS, GPS / QZSS Microprozessor Flymaster Microprozessor mit geschütztem RTOS Multi-band LTE-M / EGPRS Module FLARM® Flarm ready (optional Flarm Aware RX+TX mode) Bluetooth...
- Page 15 - Garantiebestimmungen - Bedienungsanleitung ihres Gerätes Folgen Sie hierfür dem folgenden Link: https://dnl.flymaster.net/Flymaster_Standard_Limited_Warranty_ EN.pdf https://www.flymaster.net/manuals/live-ds SCHRITT 2 Kreieren Sie einen Account in der Flymaster Cloud, wenn Sie noch keinen haben. Nachdem Sie Ihren Account eingerichtet haben, gehen Sie auf: https://livetrack360.com/devices/liveds/register...
- Page 16 SCHRITT 3 Aktivieren Sie das Live DS Zunächst benötigen Sie einen gültigen Paypal Account, um Ihr Live DS aktivieren zu können. Folgen Sie dem folgenden Link und geben Sie dort ihren Aktivierungscode ein: https://livetrack360.com/vodasims/activate Den Aktivierungscode für Ihr Live DS fin-...
- Page 17 Überblick 12 13 1 - Farbdisplay 2 - Schwarzweißdisplay 3 - Lautsprecher Sprachsteuerung 4 - Lautsprecher Vario 5 - Power an/aus 6 - Rauszoomen und Lautstärkeregelung (Lange halten) 7 - Ranzoomen 8 - Cursor/Pan-Tasten 9 - Enter/Markieren 10 - Fn-Taste 11 - Menü/Esc (zurück) 12 -Scrollrad 13 - Enter (Scrollrad)
- Page 18 Kurzanleitung Löschen oder verändern Sie niemals eine Datei direkt auf der DS-Karte. Alle Änderungen dürfen ausschließlich über den Flymaster Instrument Manager vorgenommen werden. Wenn Sie sich nicht daran halten, kann es sein, dass ihr Gerät nicht mehr ordnungsgemäß funktioniert. Um ein Dokument von Ihrer DS-Karte auf Ihren Computer zu kopieren, verwenden Sie die Ordner in Ihrem Explorer über die USB-Verbindung mit dem Gerät.
- Page 19 Kurzanleitung Seiten einstellen - Bringen sie das Gerät in den Flugmodus. Drücken sie kurz die Fn-Taste, um zwischen den Seiten zu wechseln, halten Sie die Fn- Tast länger, um das eine Übersicht der Seiten angezeigt zu bekommen. In dem Seiten-Auswahl-Menü benutzen Sie das Scrollrad, um eine Seite auszuwählen. Drücken Sie Enter, um die Auswahl zu bestätigen.
-
Page 20: Specifiche Principali
Espansione della memoria Scheda Micro SD 72-canali BeiDou, Galileo, GLONASS, GPS / QZSS Microprocessore Microprocessore Flymaster con RTOS proprietario Modulo multibanda LTE-M / EGPRS FLARM® Flarm ready (modulo Flarm Aware RX+TX opzionale) Bluetooth Modulo Bluetooth 5 a basso consumo energetico... - Page 21 - Termini e condizioni di garanzia. - Manuale completo dello strumento. Per visualizzare i documenti, utilizzare i seguenti link: https://dnl.flymaster.net/Flymaster_Standard_Limited_Warranty_EN.pdf https://www.flymaster.net/manuals/live-ds STEP 2 - Creare un account Flymaster Cloud se non se ne pos- siede già uno. Dopo aver creato l’account, accedere a: https://livetrack360.com/devices/liveds/register...
- Page 22 STEP 3 - Attivare il Live DS Per l’attivazione del LIVE DS è necessario un account Paypal valido. Seguire il seguente link e utilizzare il codice di attivazione https://livetrack360.com/vodasims/activate Il codice di attivazione di Flymaster LIVE DS si trova nell’ultima pagina di questa guida.
-
Page 23: Vista Generale
Vista generale 12 13 1 - Display a colori 2 - Display monocromatico 3 - Altoparlanti ad assitenza vocale 4 - Altoparlante Vario 5 - Accensione 6 - Zoom 0ut / Regolazione suono (premere a lungo) 7 - Zoom In 8 - Tasti Cursore/Panoramica 9 - Invio/Segna 10 - Tasto Fn... - Page 24 Non cancellare o manipolare direttamente i file presenti sulla sche- da SD. Tutte le attività di gestione della scheda SD devono essere eseguite tramite Flymaster Instrument Manager. In caso contrario, lo strumento potrebbe non funzionare correttamente. Per copiare i file dalla scheda SD al computer, è necessario utilizzare la ricerca file del computer utilizzando la connessione USB con lo strumento.
- Page 25 Per iniziare Cambio pagina - In modalità volo, premere brevemente il tasto Fn per cambiare pa- gina, premere a lungo il tasto Fn per mostrare il menu di accesso alle pagine. Nel menu di accesso alle pagine, utilizzare la rotella di scorrimento coi tasti cursore Su e Giù per cambiare pagina.
-
Page 26: Основные Характеристики
Возможность использования МикроСД карты для расширения памяти GPS: 72-канальный приемник, работающий с системами BeiDou, Galileo, GLONASS, GPS / QZSS Микропроцессор: Flymaster с собственной ОСРВ модуль многодиапазонный LTE-M / EGPRS FLARM® Flarm подготовленный (опционально Flarm оповещение RX+TX мода) Bluetooth: Bluetooth 5, модуль с малым энергопотреблением... - Page 27 Мы рекомендуем ознакомиться со следующими документами: - Условия гарантии - Полная инструкция для вашего прибора Для этого используйте следующие ссылки: https://dnl.flymaster.net/Flymaster_Standard_Limited_Warranty_EN.pdf https://www.flymaster.net/manuals/live-ds Шаг 1 Если у Вас нет, то создайте учётную запись в Flymaster Cloud После создания учётной записи пройдите по ссылке: https://livetrack360.com/devices/liveds/register...
- Page 28 Manager», в которой находится установочный файл. Шаг 5 - Опциональный сервис Flarm Зайдите на наш сайт (www.flymaster.net), и в разделе “ac- cessories” вы сможете купить продукт «Flarm Aware». Вы должны заполнить поле “Dev. ID” (Серийный номер Flarm, который можно увидеть на приборе). После получения...
-
Page 29: Общий Вид
Общий вид. 12 13 1 - Цветной дисплей 2 - Монохромный дисплей 3 - Динамик звукового помощника 4 - Динамик вариометра 5 -Кнопка включения (Питание) 6 - Уменьшение масштаба/ настройка звука (при длительном нажатии) 7 - Увеличение масштаба 8 - Курсор 9 - Ввод... - Page 30 Начинаем Не удаляйте и не изменяйте файлы на SD-карте напрямую. Все задачи по управлению SD-картой должны выполняться через Flymaster In- strument Manager. В противном случае прибор может выйти из строя. Чтобы скопировать какой-либо файл с SD-карты на ваш компьютер, вы должны использовать файловый менеджер вашего компьютера, используя...
- Page 31 Начинаем Переключение страницы - Для переключения страниц в режиме полета используется короткое нажатие клавиши Fn, а длительное нажатие клавиши Fn - для отображения меню доступа к страницам. В меню доступа к страницам используйте колесо прокрутки или клавиши курсора вверх и вниз для выбора...
-
Page 32: Especificações Técnicas
Sistema de duplo Altifalante para voz e som de variómetro Expansão da memória Cartão Micro SD 72 canais BeiDou, Galileo, GLONASS, GPS / QZSS Microprocessador Microprocessador Flymaster com RT OS proprietário Módulo Multi-banda LTE-M / EGPRS FLARM® Flarm beacon incluído (Flarm Aware RX+TX mode opcional) Bluetooth Módulo Bluetooth 5 BLE... - Page 33 - Termos e condições da garantia. - Manual completo do usuário. Para o fazer siga os seguintes links: https://dnl.flymaster.net/Flymaster_Standard_Limited_Warranty_EN.pdf https://www.flymaster.net/manuals/live-ds PASSO 2 - Crie uma conta na Flymaster Cloud caso não tenha uma. Depois da criação da conta, registe o seu instrumento em: https://livetrack360.com/devices/liveds/register...
- Page 34 PASSO 3 - Ative o Live DS Uma conta Paypal válida é necessária para ativar o LIVE DS. Siga o seguinte link e uso o código de ativação. https://livetrack360.com/vodasims/activate O código de ativação deste Live DS pode ser encontrado na última página deste folheto.
-
Page 35: Vista Geral
Vista Geral 12 13 1 - Display colorido 2 - Display Mono 3 - Altifalante assistente voz 4 - Altifalante variómetro 5 - Ligar 6 - Zoom 0ut / ajuste do som (long press) 7 - Zoom In 8 - Cursor/ Pan 9 - Enter/Mark 10 - Tecla Fn 11 - Menu/Esc (retornar) - Page 36 Configurar “report back” e mensagens de SOS - Faça login na sua conta Flymaster na Web. Na barra lateral esquerda clique em devices. Escolha o seu instrumento e em “actions” -> Messages. Ajustar o volume - Em qualquer página faça long press na tecla Zoom 0ut / ajuste do som.
- Page 37 Funções básicas Mudar de página - Pressione tecla Fn para mudar de página. Prima longamente a tecla Fn para aceder ao menu de acesso rápido ás páginas. Task Navigator - Use as teclas cursor/pan acima e abaixo ou a roda de navegação para navegar entre os waypoints da Task no dispaly mono.
-
Page 39: Activation Code
Series Series Activation code Code d’activation Aktivierungscode Codice di attivazione Código de activação...
Need help?
Do you have a question about the LIVE DS and is the answer not in the manual?
Questions and answers