Table of Contents
Advertisement
Available languages
Available languages
Quick Links
Advertisement
Table of Contents

Subscribe to Our Youtube Channel
Related Manuals for Gigabyte Aivia M8600


Summary of Contents for Gigabyte Aivia M8600
- Page 2 Aivia is not only an extension to the human intellect, but also an intuitive The Aivia M8600 Wireless Macro Gaming mouse breaks free from the constraint of tangled wires while achieving tough mission during game play.
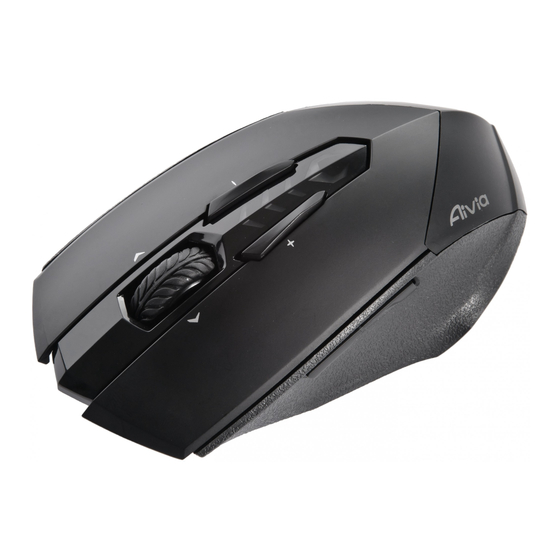
- Page 3 Mouse Introduction Default button assignments Mouse button 1 – Left Click Pro-laser Gaming Sensor Mouse button 2 – Right Click Battery Charging Connector Mouse button 3 – Middle Click and 4 ways Scrolling Wheel ID Pairing Button Mouse button 4 – DPI Switching Up Power on/off Switch Mouse button 5 –...
-
Page 4: Installation
Installation Wireless Mode 1. Remove the sticker between battery and mouse before using. 2. Switch on M8600. 3. Connect the Charging Dock to your computer with the mini-USB cable. 4. Press the connecting buttons on M8600 and Charging Dock at the same time. When the pairing process is completed, your M8600 is then ready for use in wireless mode. -
Page 5: Charging Methods
Charging Methods Place M8600 on the charging dock connected to your PC. There will be running green light on the front side of mouse to indicate charging process. Insert your battery to battery slot of the charging dock. Connect the charging dock to your PC. The red light on charging dock will turn into green to indicate charging process. -
Page 6: Led Light System
LED Light System The LED color can be selected from the GHOST Engine software based on your preference. - Page 8 Engine software. (In wireless mode you are only allowed to adjust sensitivity, left-handed/right-handed mode and gaming/power saving mode) Aivia M8600 is designed both for left-handed and right-handed user. You may simply switch the left hand/ right hand mode from the options of GHOSTTM Engine. The description of the buttons then will swap around symmetrically.
-
Page 9: Button Assignment
Button Assignment User can assign various functions to buttons from both “BASIC FUNCTION” and “MACRO SCRIPTS”. All you have to do is drag the function icon and simply drop to the button you would like to assign. Remember that you may edit each macro script in the “MACRO EDITING”... -
Page 10: Macro Editing
Macro Editing The macro editing tab allows you easily to record all the commands, including key bindings and the press of mouse button. Each single macro also can be imported and exported onto your hard disk for further usage. Step1 Click "Record the duration or intervals" if you'd like to record intervals between two commands. Step2 Double-click “Cycle through selection of action mode”... - Page 11 Record the duration or intervals (Time lag) If this function is marked, it allows you to record the intervals between two commands. To execute a macro once. the assigned button to stop the running macro. Executing a macro continuously until you release the assigned button. Delete You can delete a command or a whole macro script by dragging the command or the macro script to “Delete”...
- Page 12 Export To export your a macro to the PC. Import To import a macro to the macro editing in GHOST engine application program. Dragging the macro script back to macro editing allows you to re-edit this macro. Sensitivity set up preferred sensitivity value of four sensitivity stages via GHOST Engine, you can then simply adjust The report rate determines the time intervals that your PC retrieves data from your mouse.
- Page 13 Antenna Gain=0dBm Long period of repetitive motion using an improperly set-up workplace, or incorrect body posture may be associated with physical discomfort and injury to nerves, tendons, and muscles.
- Page 14 Safety to Part 15 of the FCC Rules. These limits are designed to provide reasonable protection against harmful interference in a residential installation. This equipment generates, uses and can radiated radio frequency energy and, if not installed and used in accordance with the instructions, may cause harmful interference to radio communications.
- Page 15 Mouse button 1 – Mouse button 2 – Mouse button 3 – Mouse button 4 – Mouse button 5 – Mouse button 6 – Mouse button 7 – Mouse button 8 – Mouse button 9 – mini USB...
- Page 16 M8600 mini-USB M8600 M8600 M8600 Alternatively, M8600 can be charged through the mini USB cable as a wired mode. mini-USB M8600 M8600 mini-USB...
- Page 17 M8600 GHOST...
- Page 19 GHOST GHOST Windows 98 Windows 2000 Windows XP Windows7 GHOST Aivia M8600 GHOST...
- Page 20 GHOST GHOST...
- Page 21 (ms) Step1 Step2 Step3 Step4 Step5 Step6 GHOST Engine Step7 Step8...
- Page 22 Pause Pause...
- Page 23 GHOST Dot Per Inch) DPI M8600 800, 1600, 3200 5600DPI GHOST Engine (100-6600DPI) GHOST Engine 125Hz (8ms), 250Hz (4ms), 500Hz (2ms), or 1000Hz(1ms) GHOST Engine...
- Page 24 Antenna Gain=0dBm 2402/ 2439/ 2450/ 2411/ 2468/ 2425/ 2447/ 2479MHz 8 ch 0 dBm 2.4G GFSK modulator BURNABY INTERNATIONAL TECHNOLOGY...
- Page 25 (9303322)
- Page 26 瑠勳н壮嫩血 瑠勳劒燃н壮 Mouse button 1 – Mouse button 2 – Mouse button 3 – Mouse button 4 – Mouse button 5 – Mouse button 6 – Mouse button 7 – Mouse button 8 – mini USB Mouse button 9 –...
- Page 27 沿俯嫩血 並憙忖艶 M8600 mini-USB M8600 M8600 Alternatively, M8600 can be charged through the mini USB cable as a wired mode. 欧憙忖艶 mini-USB M8600 mini-USB...
- Page 28 LED 卯祈 M8600 忖艶三一 GHOST...
- Page 29 籗免三一 膊貞咲三一枹...
- Page 30 GHOST GHOST Windows 98 Windows 2000 Windows XP Windows7 GHOST Aivia M8600 GHOST...
- Page 31 GHOST GHOST...
- Page 32 (ms) Step1 Step2 Step3 Step4 Step5 Step6 GHOST Engine Step7 Step8...
- Page 33 Pause Pause...
- Page 34 GHOST Dot Per Inch M8600 800, 1600, 3200 5600DPI GHOST Engine (100-6600DPI) GHOST Engine 125Hz (8ms), 250Hz (4ms), 500Hz (2ms), or 1000Hz(1ms) GHOST Engine...
- Page 35 Antenna Gain=0dBm 2402/ 2439/ 2450/ 2411/ 2468/ 2425/ 2447/ 2479MHz 8 ch 0 dBm 2.4G GFSK modulator BURNABY INTERNATIONAL TECHNOLOGY...
- Page 36 Mausanleitung Mausbuton 1 – Linksklick Pro-laser gaming Sensor Mausbuton 2 – Rechtsklick Akkuladestecker Mausbuton 3 – Mittlere Maustaste und 4-Wege Scrollrad Mausbuton 4 – Taste zum DPI erhöhen Ein/Aus Schalter Mausbuton 5 – Taste zum DPI erniedrigen Schalter zum sperren/entsperren des Akkus Mausbuton 7 –Zurück Ladekontaktfeder Mausbuton 9 –...
-
Page 37: Installation
Installation 2. Schalten Sie die M8600 ein. 5. Um die M8600 aufzuladen legen Sie sie einfach auf die Ladestation. Ein Ersatzakku liegt ebenfalls bei. (Bitte laden Sie beide Akkus für mindestens 8 Stunden vor der ersten Inbetriebnahme.) 6. Um den Akku zu wechseln drücken Sie den Akku-Schalter nach links wie es in der Abbildung gezeigt wird. - Page 38 Lademodus Legen Sie die M8600 auf die Ladestation wenn dies emit der Maus zeigt an das die Maus geladen wird. die Ladestation mit dem PC verbunden ist. Das rote Licht auf der Ladestation wird grün sobald der Ladevorgang beginnt. zu rot. PC.
- Page 41 GHOST Macro Engine Die GHOST™ Macro Engine unterstützt Windows 98, Windows 2000, Windows XP und Windows 7. Installieren Sie die Software, Stellen Sie sicher das die M8600 mittels des USB Kabels mit Ihrem PC verbunden ist wenn die Makros editieren oder die Modus einfach in den Optionen der GHOST Engine umstellen.
- Page 42 TASTEN ZUWEISEN Sie können den Tasten sowohl mit „BASISFUNKTION“ als auch den „MAKROSKRIPTEN“ verschiedene Funktionen zuweisen. Alles was Sie tun müssen, ist das Ziehen des Funktionssymbols und das einfache Ablegen auf die Taste, zu der sie zugewiesen werden wenn nötig wieder zurückspielen.
- Page 43 MAKROBEARBEITUNG Tastenbelegungen und dem Druck einer Maustaste. diese exportiert werden. Schritt 1 Klicken Sie auf „Dauer oder Intervalle aufzeichnen“, wenn Sie die Intervalle zwischen zwei Befehlen aufzeichnen möchten. Schritt 2 Führen Sie einen Doppelklick auf „Auswahl des Aktionsmodus durchsuchen“ aus, um den Schritt 3 Klicken Sie auf „Aufnahme“, um mit der Erstellung eines Makros zu beginnen und alle Tastatureingaben oder Mausbefehle aufzuzeichnen.
- Page 44 Aufzeichnung der Dauer der Intervalle (Zeitverzögerung) Wenn diese Funktion markiert ist, können Sie die Intervalle zwischen Befehlen aufzeichnen. Um ein Makro ein Mal auszuführen. Taste, um die Ausführung des Makros zu stoppen. Dauerhafte Ausführung eines Makros, bis Sie die zugewiesene Taste loslassen. Sie können ein Kommando ode rein komplettes Makro löschen indem Sie es in den Mülleimer ziehen.
- Page 45 Export Für den Export Ihres Makros auf den PC. Import Für den Import eines Makros in die Makrobearbeitung des GHOST Engine Programms. Ziehen Sie das Makroscript zurück in die Makrobearbeitung, um das Makro zu überarbeiten. inch). Sie mit dem anzupassen. Abtastrate Abtastrate auf 125Hz (8ms), 250Hz (4ms), 500Hz (2ms), oder 1000Hz (1ms) durch Bewegen des Schiebereglers...
- Page 46 Introduction de la souris Bouton de souris 1 - Clique de gauche sonde du jeu Pro-laser Bouton de souris 2 - Clique de droite Connecteur de charge de batterie Bouton de souris 4 - commutation du DPI vers le haut Commutateur «...
- Page 47 Installation 1. Enlevez l'autocollant entre la batterie et la souris avant utilisation. 2. Allumez M8600. 4. Appuyer sur les boutons de connexions sur M8600 et le dock de charge en même temps. Quand le processus de couplage est complété, votre M8600 est alors également une batterie de charge de remplacement disponible.(Pour la première utilisation, veuillez recharger la batterie pendant au moins 8 heures.) 6.Pour remplacer la batterie par la batterie de rechange, poussez le commutateur de...
- Page 48 Placez M8600 sur le dock de charge relié à votre PC. Une lumière verte s'allumera sur la face frontale de la souris pour indiquer le processus de charge. Insérez votre batterie dans la fiche de d'insertion de la batterie du dock de charge. Reliez le dock de charge à votre PC.
- Page 49 Système de lumière LED être choisie parmi le logiciel de moteur de GHOST basé sur votre préférence.
- Page 51 Moteur macro de GHOST™ Le moteur de support de macro GHOST Windows 98, Windows 2000, Windows XP, et Windows 7. Installez le logiciel pour boutons par le logiciel de moteur GHOST (En mode sans fil, il ne vous est permit d'ajuster que le mode sensitivité, mode gaucher/droitier, et le mode jeu/économie d'énergie par le moteur de GHOST™.) gaucher/droitier depuis les options du moteur de GHOST™.
- Page 52 Affectation des bouton L'utilisateur peut assigner diverses fonctions aux boutons depuis « FONCTION de BASE » et « MACRO MANUSCRITS ». Tout ce que vous devez faire est de glisser l'icône et simplement le poser sur le bouton que vous voulez assigner. Rappelez vous que vous pouvez éditer chaque macro manuscrit dans l'onglet «...
- Page 53 Edition Macro L'onglet d'édition de macro vous permet d'enregistrer facilement toutes les commandes, y compris les touches d'attaches et les pression du bouton de souris. Chaque macro peut être importée et également exportée sur votre disque dur pour davantage d'utilisation. commandes.
- Page 54 Enregistrer la durée ou les intervalles (le délai) Si cette fonction est marquée, elle vous permet d'enregistrer les intervalles entre deux commandes. Pour exécuter une macro une fois. arrêter la macro en cour. Exécuter une macro sans interruption jusqu'à ce que vous libériez le bouton assigné. «...
- Page 55 Exporter Pour exporter une macro vers le PC. Importer Pour importer une macro vers l'éditeur de macro dans le programme du moteur d'application GHOST. Re-déplacer un script de macro vers l'éditeur de macro vous permet de rééditer cette macro. l'intermédiaire du moteur GHOST, vous pouvez alors simplement ajuster le DPI par le commutateur pendant la marche.
- Page 56 Introdução ao Rato Botão do rato 1 – Clique Esquerdo Sensor para Jogo Pro-láser Botão do rato 2 – Clique Direito Conector para Carregamento de Bateria Botão do rato 3 – Clique do Meio e Roda de Deslocamento de 4 direções Botão para Ligação de ID Botão do rato 4 –...
- Page 57 Instalação Modo Sem Fio 1. Remover o adesivo entre a bateria e o rato antes de utilizar. 2. Ligar M8600. 3. Ligar a Plataforma de Carregamento ao seu computador com o mini cabo USB. 4. Premir os botões de ligação no M8600 e a Plataforma de Carregamento ao mesmo tempo.
- Page 58 Coloque M8600 na plataforma de carregamento ligado ao seu PC. Haverá luz verde em frente do rato para indicar o processo de carregamento. Introduzir a sua bateria no conector para bateria introduzido na plataforma de carregamento. Ligue a plataforma de carregamento ao seu PC.
- Page 59 software do GHOST Engine baseado na sua preferência.
-
Page 61: Ghost™ Macro Engine
GHOST™ Macro Engine GHOST Macro Engine suporta Windows 98, Windows 2000, Windows XP, e Windows 7. Instale o software para atribuir botões e energia através do GHOST™ Engine.) canhoto/destro a partir das opções do GHOST™ Engine. A descrição dos botões se alternarão então simetricamente. - Page 62 Atribuição de Botão Utilizador pode atribuir várias funções aos botões a partir da “FUNÇÃO BÁSICA” e “MACRO SCRIPTS”. Tudo o que você tem a fazer é guia “EDIÇÃO MACRO”.
- Page 63 Edição Macro tecla e pressão do botão de rato. Cada macro simples pode também ser importado e exportado no seu disco duro para utilização posterior. Passo 1 Clique “Registar a duração ou intervalos” se quiser registrar os intervalos entre dois comandos. Passo 2 Faça clique duplo em “Circule pela selecção do modo acção”...
- Page 64 Registar a duração ou intervalos (Defasagem de Tempo) Se esta função estiver marcada, ela lhe permitirá registrar os intervalos entre dois comandos. Para executar um macro uma vez. para parar o macro em execução. Eliminar “Eliminar”. Ao fazer clique nesta opção irá ignorar a pressão do rato e simplesmente registará os batimentos de tecla ao registrar um macro.
- Page 65 Exportar Para exportar seu macro ao PC. Importar Para importar um macro para a edição no programa aplicativo do GHOST engine. Arrastar o macro script de volta para a edição de macro para permitir-lhe de re-editar este macro. Sensibilidade A taxa de transmissão determina os intervalos de tempo em que o seu PC recupera os dados do seu rato. ms) ao mover o botão no controle deslizante.
- Page 66 Introducción Clic Izquierdo Sensor Pro-laser para Gaming Clic Derecho Clic Intermedio y 4 dimensiones de Scroll Aumentar DPI Interruptor Encendido/Apagado Disminuir DPI Adelante Atrás Contactos para cargar Atrás Conector de cable mini USB Interruptor para Trabar/Destrabar el cable...
-
Page 67: Instalación
Instalación 2. Encienda el M8600. ser usado en modo inalámbrico. 1. Conecte el terminal mini-USB al M8600 2. Conecte el mouse al Puerto USB de su ordenador. El M8600 estará listo para automáticamente en este modo. derecha como se muesta, luego se puede tirar el conector mini-USB. - Page 68 encenderá una luz verde en el frente del Mouse indicando que se está cargando. de carga se pondrá verde para indicar el proceso de carga. Conecte el M8600 a su PC con el cable mini-USB. El Mouse se empezará a cargar automáticamente en este modo.
- Page 69 correspondientes a 5 perfiles para cambiar. El color del LED puede ser personalizado desde el software GHOST Engine acorde a su preferencia.
- Page 71 Engine. (En modo inalámbrico solo se puede ajustar sensibilidad, modo diestro/zurdo y cambiar entre modo gaming/ahorro de Modo Zurdo/Diestro El Aivia M8600 fue diseñado para usuarios diestros y zurdos. Para cambiar entre estos modos simplemente hágalo desde las opciones del GHOST Engine.
-
Page 72: Asignación De Botones
ASIGNACIÓN DE BOTONES El usuario puede asignar varias funciones a los botones tanto desde “FUNCIÓN BÁSICA” como desde “MACRO ESCRITURA”. puede editar cada macro escritura en la pestaña “MACRO EDICIÓN”. existente en su disco duro y cárguelo cuando lo necesite. - Page 73 MACRO EDICIÓN Cada macro individual también se puede importar y exportar en su disco duro para más usos. comandos. Paso 3 Haga clic en “Grabar” para empezar a crear una macro y grabar todas las pulsaciones de teclas o Paso 6 Tras grabar una macro, puede arrastrar los comandos de la macro y soltarlos en “Tabla Script” Paso 7 Haga doble clic en la macro script para renombrar esta macro.
- Page 74 Para ejecutar una macro una vez. la macro en uso. Borrar archivos. Presione “Remover” si lo que quiere es remover el icono.
- Page 75 Exportar Para exportar su macro al PC. Importar Sensibilidad por pulgada). Puede configurar los valores de sensibilidad que prefiera de entre los cuatro niveles a través del GHOST separadamente” para ajustar los niveles de sensibilidad X-Y. Puede ajustar el barra deslizante.
- Page 87 2. M8600 4. M8600 M8600 5. M8600 M8600 M8600...
- Page 88 M8600...
- Page 89 M8600 GHOST Engine...
- Page 91 GHOST™ Macro Engine Windows 98, Windows 2000, Windows XP Windows 7 GHOST™ M8600 GHOST™ Engine...
- Page 92 "BASIC FUNCTION "MACRO SCRIPTS "MACRO EDITING "backup...
- Page 93 Step 1 "Record the duration or intervals Step 2 Step 3 Step 4 Step 5 Step 6 Step 7 Step 8...
- Page 94 "Delete...
- Page 95 GHOST engine GHOST Engine "set X and Y axis separately 125 Hz (8 ms), 250 Hz (4 ms), 500 Hz (2 ms) 1000 Hz (1 ms)
- Page 96 Úvod Zamknout/Odemknout baterii Konektor pro mini USB kabel J Zamknout/Odemknout kabel Zasunutý jack...
- Page 97 Instalace konektoru USB.
- Page 99 GHOST Engine.
- Page 101 Nástroj GHOST™ Macro Engine...
- Page 103 Úprava Macro nebo intervaly. skript“.
- Page 104 Provést makro jednou.
- Page 105 Export Pro export makra do PC. Import Citlivost Hz (8 ms), 250 Hz (4 ms), 500 Hz (2 ms), nebo 1000 Hz (1 ms).
- Page 106 1. egérgomb – Bal kattintás 2. egérgomb – Jobb kattintás ID-csatlakozás gomb 4. egérgomb – DPI növelése 5. egérgomb – DPI csökkentése Ultra-Durable Csatlakozás gomb...
- Page 107 2. Kapcsolja be az M8600-as egeret. 1. Csatlakoztassa a mini USB-kábel végét az M8600-ashoz.
- Page 108 vált, ezzel jelezve, hogy a töltés folyamatban van. Ha az ismét pirosra vált.
- Page 111 GHOST Macro Engine A GHOST...
- Page 113 az egérkattintásokat is.
- Page 114 nyomja az adott gombot.
- Page 115 csúszkán. gombot a csúszkán.
- Page 116 Laserowy sensor Przycisk 5 – Zmniejszanie DPI Blokowanie/Odblokowanie baterii Przycisk 6 – Do przodu Przycisk 7 –Cofnij Przycisk 9 – Cofnij Gniazdko kabla mini USB Przycisk odblokowania/zablokowania przewodu Gniazdo baterii...
- Page 117 bezprzewodowym. rysunku. Bateria natychmiast wyskoczy. mini USB.
- Page 118 powrotem na czerwony.
-
Page 119: Diody Led
Diody LED... - Page 121 Macro Engine...
- Page 123 komendami. instrukcji. swojego makra, w tym celu kliknij „change icon”.
- Page 124 Wykonuje makro raz. zatrzymuje wykonywanie makra. Wykonuje makro nieustannie do momentu zwolnienia przypisanego przycisku.
- Page 125 Export Eksportuje makro do komputera. Import Importuje makro do edytora makr GHOST.
Need help?
Do you have a question about the Aivia M8600 and is the answer not in the manual?
Questions and answers