Advertisement
VisionTek
®
THUNDERBOLT™ 3
MINI eGFX ENCLOSURE
Quick Start Guide
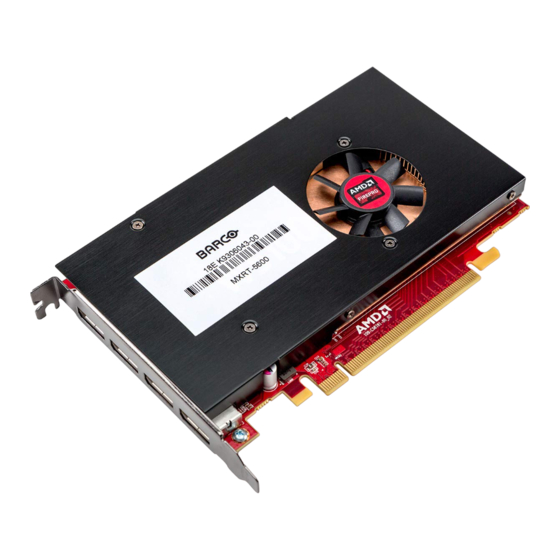
The eGFX Enclosure with Barco MXRT-5600 allows
you to drive powerful graphics from a laptop
™
computer using a Thunderbolt
3 connection.
Before using the enclosure, closely follow the setup
instructions and ensure you are using a Barco-
approved mobile workstation running Windows 10.
For further information on this product, including
compatible mobile workstations, installation, and
troubleshooting, please visit:
www.barco.com/egfx
Advertisement
Table of Contents

Related Manuals for Barco VisionTek MXRT-5600


Summary of Contents for Barco VisionTek MXRT-5600
- Page 1 Thunderbolt 3 connection. Before using the enclosure, closely follow the setup instructions and ensure you are using a Barco- approved mobile workstation running Windows 10. For further information on this product, including compatible mobile workstations, installation, and troubleshooting, please visit: www.barco.com/egfx...
- Page 2 1. Ensure the latest BIOS, Thunderbolt Windows updates have been installed. Visit your PC manufacturer’s website to download the latest software. 2. Download the latest version of the Barco MXRT Driver Installation Package for your region from the following URL: https://www.barco.com/en/support/mxrt-5600...
- Page 3 3. Select the self-extracting installation package file and begin the installation process with local administrator rights to install software on your computer. 4. Make sure to select all software packages and proceed with installation. Note: The computer may restart multiple times during the installation process.
- Page 4 Hardware Setup: 1. Once the driver has successfully installed, connect the AC power adapter to the enclosure and to a power outlet . Turn on the AC adapter. 2. Connect the Thunderbolt™ 3 cable to the computer. Note: Use only active Thunderbolt™ 3 cables for runs longer than 0.5m.
- Page 5 Thunderbolt™ Configuration: 1. After connecting the eGFX enclosure, the Thunderbolt ™ device will be detected by the computer. Click to approve the device. 2. When the system shows the dialogue box below, select “Always Connect” for each controller. Click “OK” to complete setup. 3.
- Page 6 Display Configuration: 1. To extend the desktop and configure the displays, access the Display Settings panel by right clicking on the desktop and selecting “Display settings”. 2. Depending on your configuration, the displays should be visible similar to the image below. If the desktop is not automatically extended to connected displays, proceed to Step 3.
- Page 7 3. Select the target display in the “Rearrange your displays” window in Step 2. In the “Multiple Displays” dialogue box select “Extend desktop to this display”. Always be sure to select “Keep changes” when prompted. 4. In the “Scale and layout” window select the appropriate resolution for your display.
- Page 8 Healthcare USA/Canada Toll-free call: 1 (866) 992-2726 Hours: 8 am to 8 pm EST Website: www.barco.com/egfx R5912441 Rev. 00 2020-01-21 Barco NV | Beneluxpark 21, 8500 Kortrijk, Belgium Registered office: Barco NV | President Kennedypark 35, 8500 Kortrijk, Belgium www.barco.com...
Need help?
Do you have a question about the VisionTek MXRT-5600 and is the answer not in the manual?
Questions and answers