Advertisement
Quick Links
Advertisement

Related Manuals for OZCO 56609

Summary of Contents for OZCO 56609
- Page 1 www.OZCOBuildingProducts.com...
- Page 2 6x6 Post Base Laredo Sunset Item #: 56608 Replacement Parts Kit Includes: 1 Post Base (a) 4 Decorative Plates (b) 8 Hex Cap Nuts (c) 8 2 ¾″ Lag Bolts (d) • Adjustable 5 ½” Up To 6” Sq. • Base Elevates Post From Ground Contact •...
- Page 3 6x6 Post Base Item #: 56608 Laredo Sunset - Installation Guide General Guidelines: • Materials are heavy and bulky minimum of 2 people are required for most installations • Brace and tie off large beams and posts until all connections are made • Wear proper safety equipment •...
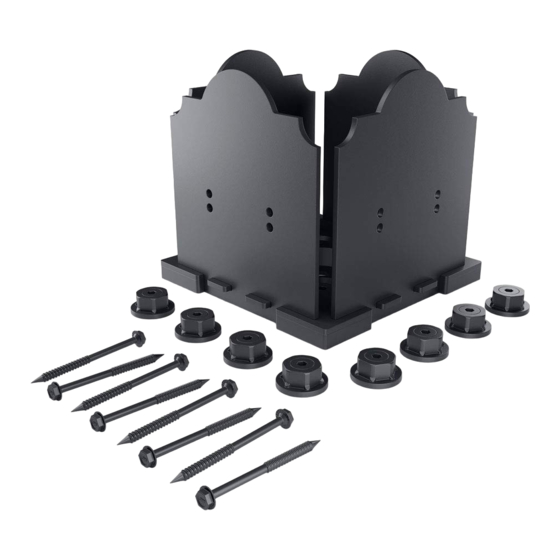
- Page 4 8x8 Post Base Laredo Sunset Item #: 56609 Replacement Parts Kit Includes: 1 Post Base (a) 4 Decorative Plates (b) 8 Hex Cap Nuts (c) 8 3 ¾″ Lag Bolts (d) • Adjustable 7½” Up To 8” Sq. • Base Elevates Post From Ground Contact •...
- Page 5 8x8 Post Base Item #: 56609 Laredo Sunset - Installation Guide General Guidelines: • Materials are heavy and bulky minimum of 2 people are required for most installations • Brace and tie off large beams and posts until all connections are made • Wear proper safety equipment •...
- Page 6 Post To Beam 2″ Laredo Sunset Item #:56610 Replacement Parts Kit Includes: 2 Post Ledge Base (a) 8 Hex Cap Nuts (c) 2 Top Cover Plates (b) 4 3 ¾″ Lag Bolts (d) 4 2 ¾″ Lag Bolts (e) • 2 Piece Design Allows The Base To Be Mounted Before Beam Is Positioned • Accommodates Beams Up To 1⅞” Thick Without Dado. 4″ Thick Beams Require 2″...
- Page 7 Post To Beam 2″ Item #:56610 Laredo Sunset - Installation Guide General Guidelines: • Materials are heavy and bulky minimum of 2 people are required for most installations • Brace and tie off large beams and posts until all connections are made • Wear proper safety equipment •...
- Page 8 Rafter Clips 2″ Laredo Sunset Item #: 56617 Kit Includes: Replacement Parts 10 2″ Rafter Clips (a) 20 #10 x 1 ¼″ hex screws (b) • Attractive Sturdy Angle Bracket Can Be Used In A Wide Range Of Projects • Decorative Bracket Cutout Makes Exact Location Easy To Establish • Offset Hole Pattern For Unobstructed Back To Back Mounting •...
- Page 9 Rafter Clips 2″ Item #: 56617 Laredo Sunset - Installation Guide General Guidelines: • Materials are heavy and bulky minimum of 2 people are required for most installations • Brace and tie off large beams and posts until all connections are made • Wear proper safety equipment •...
- Page 10 Rafter Clips 4″ Laredo Sunset Item #: 56618 Replacement Parts Kit Includes: 10 4″ Rafter Clips (a) 20 1 ¾″ Lag screws (b) Hex Cap Nuts (c) • Attractive Sturdy Angle Bracket Can Be Used In A Wide Range Of Projects • Decorative Bracket Cutout Makes Exact Location Easy To Establish •...
- Page 11 Rafter Clips 4″ Item #: 56618 Laredo Sunset - Installation Guide General Guidelines: • Materials are heavy and bulky minimum of 2 people are required for most installations • Brace and tie off large beams and posts until all connections are made • Wear proper safety equipment •...
- Page 12 Truss Accent Laredo Sunset Item #: 56616 Replacement Parts Kit Includes: 2 Truss Accent Plates (a) 4 Hex Cap Nuts (b) • Accent Plate For All OWT Truss Ties • Includes 4 Hex Cap Nuts (Lag Bolts Sold Separately) • 3/16” Thick, Galvanized & Power Coated Steel www.OZCOBuildingProducts.com...
- Page 13 Truss Accent Item #: 56616 Laredo Sunset - Installation Guide General Guidelines: • Materials are heavy and bulky minimum of 2 people are required for most installations • Brace and tie off large beams and posts until all connections are made • Wear proper safety equipment •...
- Page 14 “T” Tie Plate Truss Tie Item #: 56612 Replacement Parts Kit Includes: 2 “T″ Tie Plates (a) Number of Truss Accent Kits Required: Sold Separately • Truss Tie For 90 Deg. “T” Joint. • Designed For Connection Material >5 ½” • Truss Accents, Lag Bolts, & Hex Cap Nuts Sold Separately •...
- Page 15 Truss Accent Item #: 56612 Truss Tie - Installation Guide General Guidelines: • Materials are heavy and bulky minimum of 2 people are required for most installations • Brace and tie off large beams and posts until all connections are made • Wear proper safety equipment •...
- Page 16 Butt Joint Plate Truss Tie Item #: 56613 Replacement Parts Kit Includes: 2 Butt Joint Plates (a) Number of Truss Accent Kits Required: Sold Separately • Truss Tie For Butt Joint • Designed For Connection Material >5 ½” • Truss Accents, Lag Bolts, & Hex Cap Nuts Sold Separately •...
- Page 17 Butt Joint Plate Item #: 56613 Truss Tie - Installation Guide General Guidelines: • Materials are heavy and bulky minimum of 2 people are required for most installations • Brace and tie off large beams and posts until all connections are made • Wear proper safety equipment •...
- Page 18 90° Flush Outside Truss Tie Item #: 56614 Replacement Parts Kit Includes: 2 Flush Outside Plates (a) Number of Truss Accent Kits Required: Sold Separately • Truss Tie For 90 Deg. Outside Joint • Designed For Connection Material >5 ½” • Truss Accents, Lag Bolts, & Hex Cap Nuts Sold Separately •...
- Page 19 90° Flush Outside Item #: 56614 Truss Tie - Installation Guide General Guidelines: • Materials are heavy and bulky minimum of 2 people are required for most installations • Brace and tie off large beams and posts until all connections are made • Wear proper safety equipment •...
- Page 20 90° Flush Inside Truss Tie Item #: 56615 Replacement Parts Kit Includes: 2 Flush Inside 90 Deg. Plates (a) Number of Truss Accent Kits Required: Sold Separately • Truss Tie For 90 Deg. Inside Joint • Designed For Connection Material >5 ½” • Truss Accents, Lag Bolts, & Hex Cap Nuts Sold Separately •...
- Page 21 90° Flush Inside Item #: 56615 Truss Tie - Installation Guide General Guidelines: • Materials are heavy and bulky minimum of 2 people are required for most installations • Brace and tie off large beams and posts until all connections are made • Wear proper safety equipment •...
- Page 22 45° Flush Inside Truss Tie Item #: 56611 Replacement Parts Kit Includes: 2 Flush Inside 45 Deg. Plates (a) Number of Truss Accent Kits Required: Sold Separately • Truss Tie For 45 Deg. Inside Joint • Designed For Connection Material >5 ½” • Truss Accents, Lag Bolts, & Hex Cap Nuts Sold Separately •...
- Page 23 45° Flush Inside Item #: 56611 Truss Tie - Installation Guide General Guidelines: • Materials are heavy and bulky minimum of 2 people are required for most installations • Brace and tie off large beams and posts until all connections are made • Wear proper safety equipment •...
- Page 24 Truss Base Fan 8:12 Truss Tie Item #: 56619 Replacement Parts Kit Includes: 1 Truss Base Fan 8:12 (a) Number of Truss Accent Kits Required: Sold Separately • Truss Tie For Truss Roof Pitch 8:12 • Designed For Connection Material >5 ½” •...
- Page 25 Truss Base Fan 8:12 Item #: 56619 Truss Tie - Installation Guide General Guidelines: • Materials are heavy and bulky minimum of 2 people are required for most installations • Brace and tie off large beams and posts until all connections are made • Wear proper safety equipment •...
- Page 26 Truss Base Fan 10:12 Truss Tie Item #: 56620 Replacement Parts Kit Includes: 1 Truss Base Fan 10:12 (a) Number of Truss Accent Kits Required: Sold Separately • Truss Tie For Truss Roof Pitch 10:12 • Designed For Connection Material >5 ½” •...
- Page 27 Truss Base Fan 10:12 Item #: 56620 Truss Tie - Installation Guide General Guidelines: • Materials are heavy and bulky minimum of 2 people are required for most installations • Brace and tie off large beams and posts until all connections are made • Wear proper safety equipment •...
- Page 28 Star 2⅜″ OD Ornamental Hardware Item #: 56623 Replacement Parts Kit Includes: 10 2⅜″ OD Star (a) 10 #6 x 1¾″ Wood Screw (b) • 2 ⅜” Od Decorative Star With Center Hole • Aluminum Casting • Powder Coated Black www.OZCOBuildingProducts.com...
- Page 29 Star 2⅜″ OD Item #: 56623 Ornamental Hardware - Installation Guide Steps: 1. Position star in desired location 2. Check to make sure that screw is not too long for your installation location 3. Tighten screw Use and Care: This hardware may not be suitable for every situation or installation application. A design professional should be consulted to ensure the specific installation application meets local building code requirements.
- Page 30 Star 3⅜″ OD Ornamental Hardware Item #: 56624 Replacement Parts Kit Includes: 10 3⅜″ OD Star (a) 10 #6 x 1¾″ Wood Screw (b) • 3 ⅜” Od Decorative Star With Center Hole • Aluminum Casting • Powder Coated Black www.OZCOBuildingProducts.com...
- Page 31 Star 3⅜″ OD Item #: 56624 Ornamental Hardware - Installation Guide Steps: 1. Position star in desired location 2. Check to make sure that screw is not too long for your installation location 3. Tighten screw Use and Care: This hardware may not be suitable for every situation or installation application. A design professional should be consulted to ensure the specific installation application meets local building code requirements.
- Page 32 1½″ Hex Cover Nut Ornamental Hardware Item #: 56621 Replacement Parts Kit Includes: 10 Hex Cap Nuts (a) • Decorative Hardware Conceals Lag Screws • Lag Screws Sold Separately www.OZCOBuildingProducts.com...
- Page 33 1½″ Hex Cover Nut Item #: 56621 Ornamental Hardware - Installation Guide Steps: 1. Remove threaded covers from all Hex Cap Nuts 2. Insert Lag Bolts into Cap Nut 3. OWT Lag Bolts require a 3/8” Hex Bit 4. Replace Threaded Covers until flush with edge of the nut 5.
- Page 34 Hammered Dome Cap Ornamental Hardware Item #: 56622 Replacement Parts Kit Includes: 10 Hammered Dome Cap Nuts (a) • Decorative Hardware Conceals Lag Screws • Aluminum Casting • Powder Coated Black • Lag Screws Sold Separately • Fits Hardware Up To 0.60” Diameter www.OZCOBuildingProducts.com...
- Page 35 Hammered Dome Cap Nut Item #: 56622 Ornamental Hardware - Installation Guide Steps: 1. Remove threaded covers from all Dome Cap Nuts 2. Insert Lag Bolts into Cap Nut 3. OWT Lag Bolts require a 3/8” Hex Bit 4. Replace Threaded Covers do not over tighten 5.
Need help?
Do you have a question about the 56609 and is the answer not in the manual?
Questions and answers