Table of Contents
Advertisement
Quick Links
Advertisement
Table of Contents

Related Manuals for Oreka OREKA O2


Summary of Contents for Oreka OREKA O2
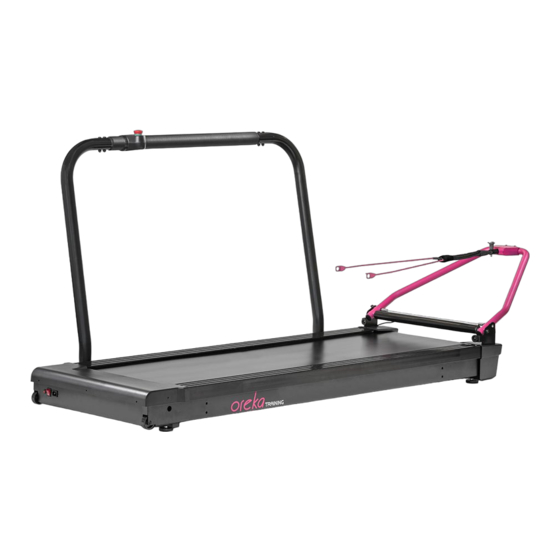
- Page 1 USER MANUAL TRAINING THE PERFECT ALLY FOR INTENSIVE AND REAL TRAINING...
- Page 2 TRAINING Thank you for purchasing our OREKA O2 ! To use our product safely, please read this manual carefullybeforehand. In case you need more information, please visit our website, FAQs or contact us in: support@orekatraining.com For any other consult, please contact: OREKA TRAINING, S.L.
-
Page 3: Table Of Contents
INDEX 1. GENERAL VIEW OF THE PRODUCT ................3 2. TRAINER USAGE NOTES ....................4 3. ASSEMBL Y INSTRUCTIONS ..................7 RAIL ASSEMBLY ..................... 9 5. PLACING THE BICYCLE ON THE TRAINER ............13 6. BAND ADJUSTMENT ....................15 7. BEFORE YOUR FIRST SESSION ................18 PAIRING TO A SIMULATOR ................... -
Page 4: General View Of The Product
TRAINING 1. GENERAL VIEW OF THE PRODUCT To take the trainer out of the box, lay the box on the floor on a horizontal position and open the upper section. Then, take the product out of the box. Do not take out the equipment while the box is on a vertical position, this could make the components fall and cause damage to them. -
Page 5: Trainer Usage Notes
• When receiving the product for the first time, if you suspect that the trainer has been manipulated or • damaged, please contact OREKA TRAINING immediately before proceeding with assembly. The maximum user weight is 120 Kg. • While using the trainer make sure that there is not any object that could interfere with the wheels. - Page 6 TRAINING • Make sure that the posterior lash system is properly placed, quick fastening, OREKA´s latch to the bicycle and rear handle are not loose. If this is not properly fixed it could make the user fall. • Do not insert or attach any additional mechanisms or sensors to the trainer that are not approved previously by OREKA TRAINING.
- Page 7 But before cleaning, make sure that the trainer is switched off and after that, unplug it. • If water makes its way into the trainer, unplug it immediately and get in contact with OREKA TRAINING to voice your concern.
-
Page 8: Assembly Instructions
TRAINING 3. ASSEMBLY INSTRUCTIONS a) Disassembled main body b) Disassembled accesories ELEMENT Description Auto thread Screw Ø3x12 Auto thread Screw Ø4x15 Screw M6xP1.0x10 Screw M8xP1.25x60 (thread lenght 25 mm) Nylon nut dry screw M8xP1.25 Hexagonal Screw M10xP1.5x85 Plastic plug 6P-4 Hexagon wrench 5x28x75mm ( there’s a hole in the middle) - Page 9 Open spanner 13mm Hexagon wrench 5x36x120mm Hexagon wrench 8x36x98mm Hexagon wrench 10x65x120mm Power cord Quick Release Pin c) Rear support fold i. Rear support placing The rear support rotates upward until the bolt automatically locates the fixed hole. ii. Fold Pull the steel cable upward so that the bolt leave the hole and rotate the lash downward.
-
Page 10: Rail Assembly
TRAINING 4. RAIL ASSEMBLY Step 1 1. The emergency button is fixed to the horizontal tube of the rail with the C screws. The connection cables enter through the notch on the horizontal tube and should exit through one of its extremities. 2. - Page 11 Step 3 The rail it’s attached to the assemble by the F screws. As a first step, each screw is placed approximately 5-10mm, and after every screw is tightened individually. Step 4 Unscrew the top lid of the mainframe to open the lid.
- Page 12 TRAINING Step 5 The cable for the emergency button goes through the lateral whole on the mainframe and connected to the connected shifter cable. Step 6 Cover the holes with the G plug that allows the cable to go through. Installing the plug: the cable is griped by the plug and there’s where you insert the cable to the hole.
- Page 13 Step 7 Place and screw the electric components top lid. PRECAUTIONS FOR THE RAIL ASSEMBLY The rail can be placed to the left or to the right of the mainframe depending on the user´s preference. The following should be considered: •...
-
Page 14: Placing The Bicycle On The Trainer
Trainer, turn on the Bkool simulator. Step 1 Place the posterior Oreka axis on the posterior axis of the bicycle and tighten with the hexagon wrench H Side-Note: The wing of the screw should be facing upward. - Page 15 Step 3 The rear lash rotates downward until is parallel to the ground. Then you must make sure that the butterfly screw has properly entered the elliptic hole of the rear latch. Step 4 Fit the steel piece of fixed arm into the bushing, and then get the quick release pin through the hole of bushing of rear support and the end of fixed arm.
-
Page 16: Band Adjustment
TRAINING 6. BAND ADJUSTMENT The proper adjustment of the band is very important and please always make sure the band is well centered. The band may get out of place due to weight, way of pedaling and the size of the rider. A slight lateral movement of the belt will not affect the training, but in case the band moves from its place, please stop your training, and get off the bicycle. - Page 17 Step 2 Unscrew the lateral screws of the mainframe: Step 3 When the band moves towards the left side, tighten the front screw clockwise ¼ of a spin. Likewise, if the band moves towards the right side, tighten the screw in the front counterclockwise ¼ of a spin. After adjusting, set up and try to ride the bicycle again to check if the band goes back to its natural position.
- Page 18 TRAINING Step 5 Close the top lid of the mainframe and tighten the screws. NOTES: 1. The proper adjustment of the band is very important. Please do not ride if the band is not well centered. 2. Please always make sure the band is well centered...
-
Page 19: Before Your First Session
25% and a maximum of 2200 watts. 8. PAIRING TO A SIMULATOR For OREKA, to be able to offer a better user experience, we need to synchronize the simulator with your physical activity. Therefore, the simulator needs to know your pedaling and heart rate. You must connect (pair) the simulator with the trainer and with your heart rate sensor (normally it’s a band around... -
Page 20: Exemption From Liability
These updates are free for trainer users. The User recognises that they are in full physical condition and in full health to exercise on the OREKA TRAINING and assumes full responsibility for this exercise, relieving OREKA TRAINING of any liability. The User is solely responsible for choosing their sports training, as well as for the physical and mental consequences that may ensue. -
Page 21: Warranty
10. WARRANTY OREKA TRAINING S.L. OFFERS YOU A LIMITED WARRANTY OF 2 YEARS FROM THE ORIGINAL DATE OF PURCHASE. DURING THE WARRANTY PERIOD OREKA TRAINING S.L. GUARANTEES THAT THE TRAINER WILL NOT SHOW ANY DAMAGE IN ITS MATERIAL OR MANUFACTURE. OREKA TRAININGS S.L. WILL NOT BE LIABLE UNDER ANY CIRCUMSTANCES FOR DAMAGE CAUSED BY INAPPROPRIATE USE OF THIS PRODUCT.
Need help?
Do you have a question about the OREKA O2 and is the answer not in the manual?
Questions and answers